Tuesday, July 13, 2010

Dyeing to Learn Batik

Dyeing to Learn Batik 
a class from Malka Dubrawsky My all time favorite teacher who forever has altered my life for the better is offering her wonderful class Dyeing to Learn Batik, on Sunday, July 25. I highly recommend it! You can read more about her class here at her Etsy shop. But be careful, chances are if you go to her Etsy shop, you will want to buy some of her fabulous fabric bundles and pillows and such. They are too yummy for words! Here's a pile of them, looking really wonderful together! Or check out her blog, here.

Monday, July 12, 2010

Summer

Summer
It's been a fast summer. I am working on a new piece for my entry to Quilt National. So, I am busy, but can't show any pictures yet. Meanwhile, my fabric line is on the shelves, and I've been to see it! What's next? Well, International Quilt Festival in Long Beach, CA is coming up soon, July 23 to 25. I have a new piece debuting there called, Fifty and Female and Fearless (it's the same one on the post below!) And I wanted to share with you that all the quilts in this exhibit are available in a book called, Beneath the Surface, from Blurb. This is so awesome! And, so reasonably priced that I was surprised, only $15.95. If you go to the quilt show in Long Beach, you will also be able to see my quilts, Duck and Cover (at the SAQA exhibit, Sense of Humor), and Red Legged Bird with a Tale to Tell (at Tactile Architecture). Also showing are my two winning quilts from IQA's World of Beauty, Building UP (1st place, small abstract), and Falling through the Cracks (3rd place, embellished). Meanwhile, I will show you a few photos of the fabric I have dyed for my new quilt, but sadly, it doesn't portray at all what I am doing with them. Sorry.

Thursday, July 08, 2010

Beneath the Surface

Beneath the Surface
My postcards have arrived and I would love to share them with you. If you want one, drop me a comment, and email me your address, I will send one to you! Offer expires when I run out of postcards! Details: International Quilt Festival in Long Beach July 22-25, 2010 Also showing at International Quilt Festival in Houston Nov 4-7, 2010 Isn't it cool how they used the image of my quilt, Fifty and Female and Fearless, on the front!!

Sunday, July 04, 2010

The Quilt Store

The Quilt Store 
 Many years ago I took my first quilting class at The Quilt Store. I had finished my first quilt by then and had just completed a baby quilt. I was having trouble with the backs, they just weren't large enough. So I took a beginning class to learn more about construction. I just wanted an answer for that question about the backs, but I learned so much more. Things like....you are supposed to bury your knots inside the quilt sandwich. Really? I didn't know that. My first quilt was all hand quilted, double bed size, with all the knots on the back. A technique called Stab and Jab, which is pitifully slow. That might explain why that first quilt took 20 years to make! Anyway, after the first class, I took another on machine quilting, and then a third on applique techniques. I usually take classes when I am stumped with a question. I had started a Christmas banner project and it was all applique. The instructions were vague and I got caught up with way too many layers to be able to sew through. Susan Tennison set me straight on that. She taught me 10 different ways to applique, and now I know that which technique depends on the type of project you have. I could go on and on with stories about classes and what I've learned, but let's flash forward a bit. On my most recent visit to The Quilt Store, (yes, even more years later), my love for quilting and fabric design has resulted in my own fabric line. I couldn't wait to see it actually on the shelves! My expectation was to have to look for each bolt of fabric in it's own color section. I think that is one thing that I have LOVED about The Quilt Store so much; it is the way Laurie Evans organizes the fabrics into bays of color. Walk into the green bay, it involks a stronge emotion, the same as the blue bay, and the yellow and orange bay, etc. The colors speak most loudly when they are grouped together and when they surround you, you can hear them clearly. This is how I pick color palettes. Oops, sorry, I digress. What I found was my fabric line on it's own shelf, right by the front door. I was so happy and I feel so honored to have my own shelf. And it was truly pleasing to see how well my fabrics fit in with the whimsical theme of that section. PERFECTION!!

Wednesday, June 30, 2010

Quilting Arts In Stitch emag

Quilting Arts In Stitch emag 
 I am excited to announce that I have an article in the premier edition of the new sewing sensation, an emag from Quilting Arts called In Stitch. You can download it and have immediate access to the cool articles. Not only that, but they also feature slide shows and videos! The videos are awesome and show artists hard at work, demonstrating and teaching their techniques. It's really cool! My video is on the satin stitch and I have a short interview. They have two editions, one for PC's and one for Mac's. If you click on the links it will take you to the appropriate edition for you! Be sure to scroll down once you hit the link. You will be able to see what my page looks like!

Monday, June 28, 2010

Urban Landscapes arrives: Cat gets first peak!

Urban Landscapes arrives: Cat gets first peak! 
At last Urban Landscapes arrives! So much hard work, so beautiful! I was crying when I opened the box. Feeling a bit silly didn't stop the tears either. My first time through this process, I am in awe of how beautiful and vibrant the colors are and how wonderful the fabric FEELS!! So if your local quilt store doesn't have any yet, do not despair! It will be arriving shortly. And if your local quilt store hasn't purchased Urban Landscapes, it's not too late. Ask them to get this fabulous line at Clothworks! If you live in Austin, you can find Urban Landscapes at two local shops of which I know have purchased the line: The Quilt Store and Honey Bee's. And if you are in Lakeway, you can find it at the Cotton Cupboard. Have fun shopping! Have more fun sewing! And I have news I can't wait to share, but I will have to, so keep checking back!

Wednesday, June 16, 2010

Opening tomorrow!

Opening tomorrow! 
Quilt National (collection C) will be at the National Quilt Museum located at 215 Jefferson Street in historic downtown Paducah, Kentucky. 6/17/10 - 8/10/10 Stop by and see my quilt, Little Fish in a Big City.

Wednesday, June 09, 2010

Coloring Outside the Blocks: Artists Do Lunch

Coloring Outside the Blocks: Artists Do Lunch 
77.5" x 51" 
Leslie Jenison, Frances Holliday Alford, Sherri McCauley, Barb Forrister, Connie Hudson, Kathy York
 
On a roll! Our art quilt bee has made two quilts to enter into Houston IQA this year! This one is the result of what happens when you ask artists over for lunch, which is exactly what Frances Holliday Alford did! After lunch she brought out the fabric markers, and told us to play on the tablecloth. So, we all sat around, mindlessly drawing and playing. Then, each time we got together we would draw or paint on a different section. Eventually, Frances tore up the tablecloth into six pieces, gave each of us a piece. The instructions were to finishing painting and then quilt your section. In about a month, we met again and joined our sections, then cut them apart and then joined them again. Last, we quilted some sections of black and white and then the border was overlapped with the edges of the quilt to create the curvy boundary, which were then joined together. It looks super fabulous! And really, really fun! You can see more details on Leslie's blog, here.

Tuesday, June 01, 2010

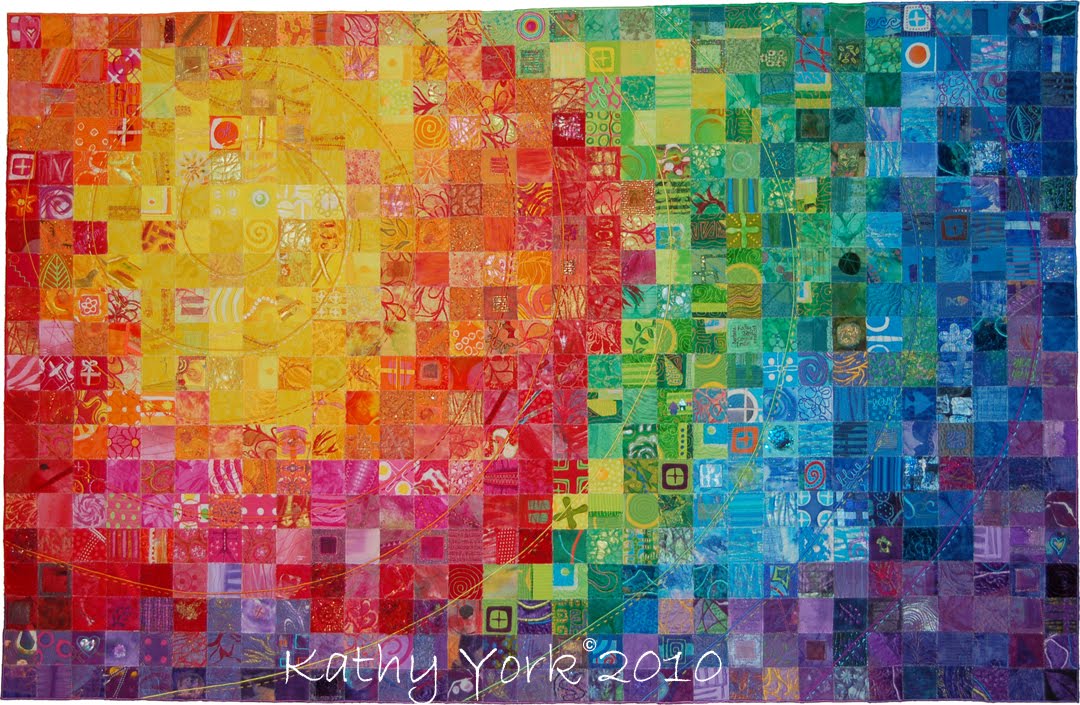
Rainbow Pixel Project

Rainbow Pixel Project 
60.5" x 39" 
 by Kathy York, Connie Hudson, Sherri McCauley, Leslie Jenison, Frances Holiday Alford, and Barb Forrister Well, here's the full view of our entry for Houston this year. It went together so easily, and we had fun making it. When asked about techniques on the entry form, I just wanted to list, "everything". Obviously, it is impossible for it to have EVERY technique, but it sure felt like it! We tried something new with the joining of the quilted blocks that I wanted to tell you about. We usually trim the quilted blocks, butt the edges together, zig-zag with invisible thread. Then we turn it over and fuse fabric strips over the joined edges, flip the quilt back over and satin stitch over the invisible zig-zag. This time, after joining all the pieces with invisible thread, we decided that the satin stitch would be distracting because our blocks were so small (just 2" x 2"). We liked the way that the invisible thread looked, but were concerned about the overall strength of the piece. So, Leslie dyed a gorgeous piece of red organza (which I have not taken a photo of yet, sorry!!), and we fused the entire thing to the back. The photo below is what the back looked like before the organza. I thought that looked pretty awesome too! After fusing the organza, we went back and zig-zagged all the seams through all the layers for reinforcement. Then we decided to add some satin stitching lines, keeping them consistent with the overall work but not overwhelming the work that was all ready there. It was hard to decide what these lines would be, but we eventually settled on these somewhat concentric lines. The thread was chosen to be similar to the background to keep the effect subtle, and some hand stitching with embroidery floss was added to both soften and emphasize our new lines. The work is just incredible! It is rich with the individual artist's voices and the group process sings! Last, this was an easy group project that has so many possibilities! I am curious to see if we will try it again and get a totally different quilt.....or if any of you will give it a try! Be sure to let me know!

Thursday, May 27, 2010

Soy Wax Batik

Soy Wax Batik 
 Why? Why did I take this workshop? I love what I am doing with parafin. The batik is fun, I get the results I am looking for and it's working for me. But soy wax? It is a weird beast. It does act as a resist, but it is also water soluble. You can wash it out with hot water. This is easy compared to boiling regular wax out over the hot steaming stove. I don't have much experience with soy wax though, so I could use a primer. And then, Jane Dunnewold was teaching it. I said YES before I even found out if I could go. I didn't know what to expect, but I was going with friends, I just love Jane's work and the books I have gotten from her. They have taught me so much about surface design and are so inspiring. I was completely unprepared for the joy that was about to come my way. Jane is on the cutting edge of a completely new way of making batik. She has been experimenting for over a year and a half to come up with this new technique. She puts the dye right in the wax!! Then you can stamp or brush on many different colors in one pass, and then dye the background. It is an incredibly important and significant difference than the batik of olde. And she has formulated a recipe to make dye crayons with the soy wax too. So, you can color with them (see the bird below), and you can use them to do rubbings for texture. I am in awe! Jane Dunnewold and Lisa Kerpoe (both of our teachers!) These are the trays of soy wax on the hot plate with dye in them. This is one of the two cats that live in Art Cloth Studios. Very cute! This is an inspiring piece, lots of wonderful colors! Sorry I can't remember who made this one. Quick someone email me with the appropriate reference! This one is also wonderful. It was made by Lisa Kerpoe. Actually I spent a lot of time browsing all the fantastic samples that Jane and Lisa had out for us. I got so caught up I forgot to take pictures of them. This is a double layer done by Sherri McCauley. There is a silk piece underneath, and a sheer piece on top. These look marvelous together! This is another sample from Sherri showing the textures from rubbings with the soy dye crayons. They are processed with steam and the colors really come alive! This is one of my favorites by Leslie Jenison. I love the combination of colors she used in this rubbing! Very pretty! This is a sample of mine. It is cotton and I thought I had ruined it. The low water immersion dye bath dissolved a lot of my soy wax and I thought I lost a lot of detail. Upon processing, a lot of the colors were still there. It is my favorite piece that I did during the 3 day workshop. I never would have picked the muddy neutral background color. It just happened by accident, and I LOVE the way it turned out! This is another of my favorites. In addition to using the crayons to capture texture with rubbings, you can also just color with them. I sat on the floor and felt like a little kid again. Pure bliss! Jane and me. Fun class! I would highly recommend Jane as a teacher. She shares a ton of information, is very patient with students' questions, and offers a lot of inspiration and expertise! Thanks Jane!