Showing posts with label two sided quilt. Show all posts

Friday, June 13, 2025

No. 2 and No. 4 Two-sided quilting

 No. 2 and No. 4: Quilting
45" x 45"

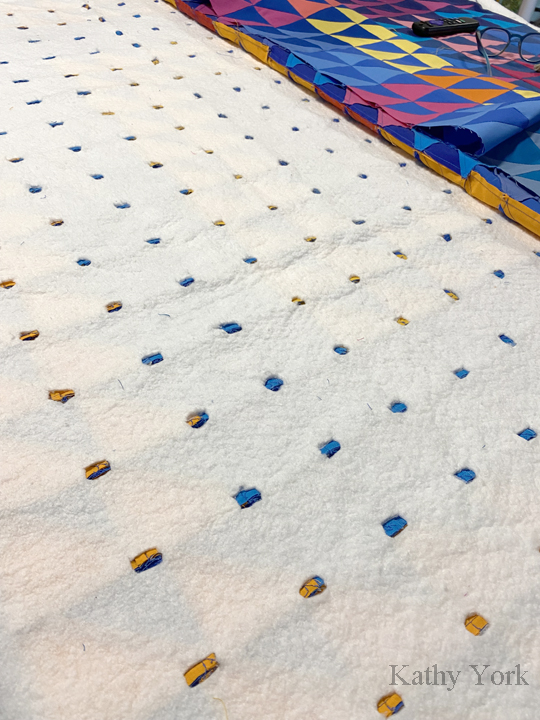
When I put the wrong sides together for this set of quilt tops, I could feel a really large bulk of seams at every intersection. I decided I would try the trick I did on THIS quilt, to see if it helped reduce the bulk.
Thus began the trimming of the batting with scissors...
It seemed to lessen the bulk, so I kept going to cut out holes at EVERY intersection. 

My original plan was to use straight lines across the designs of No. 4, which would include horizontal and vertical straight lines. This also requires a stellar basting job of lining up the top and back of the quilt so that the straight lines will work on both sides of the quilt. Unfortunately, this plan failed miserably despite my best efforts. The quilt tops kept shifting while I was working and the tension was really bad when I got anywhere near the intersections of all those bulky seams. 

I opted to rip out the quilting, and try something else. The new plan involved quilting circles in the centers of each square. It looks rather interesting, and has the bonus of not touching those bulky seams.
The trick was still to keep the quilt tops lined up. I solved it this time by using pins. I would pin through the seam on the top and feel for it underneath. Then I would make sure that it also went through the seam on the back before passing it back up. When stitching, I would have at least 3 sides of each square pinned before starting the quilting. And I worked slowly, one block at a time.  
The circle motif was easy to follow with free motion quilting by making a lot of freezer paper templates and pressing them on. They could be reused multiple times. The trick was pressing them on without the iron accidentally melting the pin heads...oops! I learned that it was a sequence problem.  Iron the paper circles on FIRST, then put the pins in to line up the seams (front and back). 
The next part was to tuck in all the thread tails, one set for each circle. Not fun, but it made the whole thing work. 

I also decided that a hanging tube on either side would look bad, so I opted early on to make an internal hanging tube, like on THIS quilt. The quilting of the circles was compatible with the internal sleeve, and I lived happily ever after. ;)

Last, I thought I would save time by making these two quilts into one quilt, that way, I would only have to quilt it once. Sadly, it did not save time. And it seemed like a lot of extra work for two quilts that I did not particularly like. The best part of this project was finishing it and moving on. It is all part of the learning path of working in a series, and I am okay with that. 

Sunday, May 25, 2025

No. 2

No. 2
45" x 45"


In the wild, at Bull Creek

This one was an experiment to use HST to make a quilt with a reference to log cabin blocks. I think this variation of log cabin is called square in a square. I learned a lot making this quilt. I thought I could imagine what it would look like when I picked the color palette and started. It did not look like what my head imagined, which was both interesting and frustrating. 

Also, I continue to fight with photography of art that has both blues and oranges in it. I can usually get the exposures right if I shoot outside. That was not the case here. If I adjust settings to make the blues look right, then the oranges are wrong. And, if I get the oranges right, then the blues are wrong.  Also, some of the fabrics bounce light differently than how they look in real life. ???? What's that about? I used to shoot in the RAW camera mode, which was excellent, but my computer got corrupted and I don't have a way to process RAW images now. I should probably explore that more and find a new program that I can download and use. And, I will also probably reshoot the finished quilt and put a more color accurate photo in place of the one at the top, but not today...

The colors (below) more closely approach correctness when I shot some process photos in my studio while I was working. I really enjoy making different shapes while I work on sewing the blocks. When the blocks are completed is the BEST time to play with design!! This first one is called the big C. 


The next arrangement reminds me of those old tabletop rotary telephones.

Of note regarding design. When I made the center blocks, I was not expecting the yellow to look like an arrow pointing left. I think anyone with ANY experience with HST would know that, but I did not. I ultimately rotated the final design so that the yellow arrow would point right. And, I am still not sure why that mattered to me, but it did. When I finished the top for this one, I put it in a pile. I didn't really like the outcome, and was in no hurry to finish it. 
 
Later, when I made No. 4, I realized that it was the same size as No.2. And also, No. 4 did not appeal much to me either. So, I decided to cut the quilting work in half and make them a two sided quilt. One quilting motif, and two quilt tops quilted simultaneously.  Voila! This also went wrong in a number of ways which I will talk about when I get to posting about No. 4..... Suffice to say, that it did NOT decrease the amount of work.  Ha ha! I am still learning. And the learning is exciting regardless of the intention of the work. The 'failures' inspired me to keep working because I learned that I still had a lot to learn. 

Wednesday, October 18, 2023

New England Quilt Museum


contacted me last spring to request one of my quilts for their exhibit, Animalia: the Animal Kingdom in Quilts and Textiles, this fall! I think that's a first for me, and I really like it! They wanted this one:

Plenty to Go Around / Scarcity

I just had one question, can you show both sides? And they said yes.  So, I said yes.  
I also wasn't sure of it's availability so I offered another of my deer quilts.  In the end they wanted both quilts. I'm delighted.  I love the Two Deer quilt so much, I rarely let it out to travel.  
Two Deer (or Too Dear)

The exhibit runs Sept 12 through Dec 30.  I was hoping to post some photos of the exhibit, but I am not going to be traveling there.  Hopefully, they will post some, or perhaps one of their visitors!

Tuesday, August 08, 2023

Summer News

Some things have been happening, which is ever so lovely because the project I am currently working on is taking foreverrrrr!

I am honored to have won an Honorable Mention in the Lincoln Center new Legacies: Contemporary Art Quilts exhibit for my quilt Ocean Blues/Oil and Water! Phil D. Jones, one of the awards judges noted that my quilt was a "conceptual beauty!"  High praise indeed and remarkably validating!! 


My quilt, Turn the Dial/Diverging Distractions had been on display at the International Quilt Festival show in Long Beach, July 6 - 8 in the exhibit Celebration of Color. I believe it is going to Houston next for the fall Festival Market and Quilt Show, Nov 2 - 5. This one was also a two-sided quilt, but they only showed the front side (left). I am okay with that, because the feeling you get standing in front of this giant burst of yellow is pure joy! That works for me!


And, I entered and got juried into a special exhibit at the International Quilt Festival, called in Full Bloom, with my quilt, Mother Nature's All-Inclusive Flower Garden. 

As a special surprise, I found out a few weeks ago that it was selected by Nancy O'Bryant as the signature quilt for Quilt Market/Houston this year. What an incredible honor!!! This means that the image will be included on Quilt Market marketing materials.  Very cool!

And, last, I got a quilt juried into the judged show at the International Quilt Festival/Houston this year.  It is called Complements and is a special favorite of mine!  I didn't get to enter last year because I was a judge.  And the year before, my entry was not juried in. So it's been a few years.


I love the complexity of the tiny piecing of the print fabrics contrasted with the giant bold solid color swaths in complementary colors. It appeals to me on many levels. And, it is so bright, it will probably glow and light up the quilts around it! Ha ha ha ha ha! Fun!

Seems like a good year to get back to Houston.  I am truly hoping that I can make it! Cheers!

Wednesday, December 22, 2021

Ocean Blues/Oil and Water - the Transparent Part

Ocean Blues/Oil and Water - the Transparent Part
74" x 74"

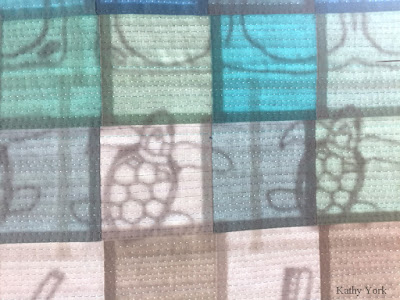
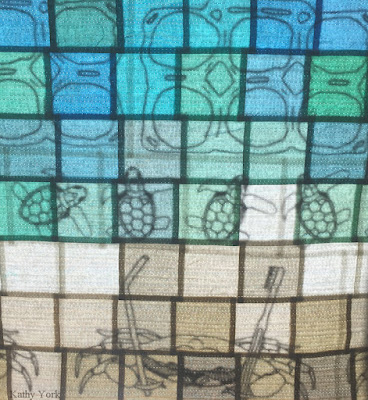
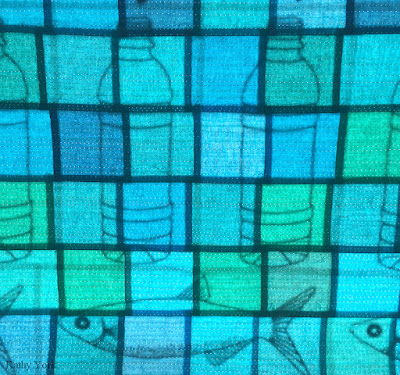
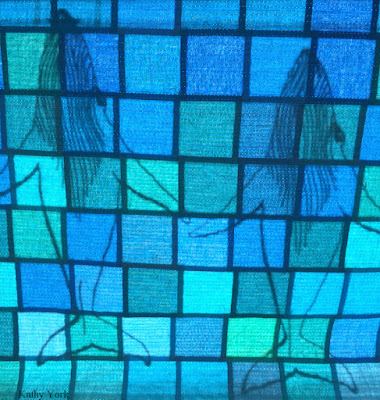
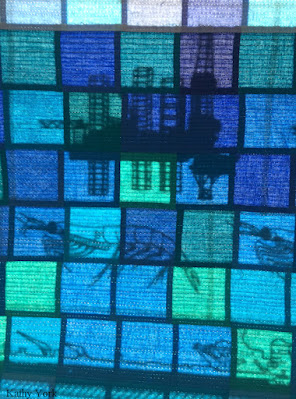
It was late afternoon and my quilt was draped over a table when I saw this. One might think I would start looking for this by now, but I didn't think about it. So here are the shots where you can see through the quilt and a glimpse of both sides at the same time. Sweet! 


I love this so much. As water is transparent, so is this quilt about water! Just so lovely! Light gives more information and shows a bigger and more complete picture, one that is more transparent.


And, that's a wrap for this quilt. I am hoping to enter it into some shows next year. We'll see how it goes! May you have a safe and happy new year!


Wednesday, December 15, 2021

Ocean Blues/Oil and Water - other cool stuff about this quilt

Ocean Blues/Oil and Water - other cool stuff about this quilt
74" x 74"

The quilting:
I usually pin baste my quilts, on the floor. Mostly because my quilts are big, and I don't have a table big enough for really big quilts. The floor is a pretty uncomfortable place to work, but it gets good results.  This time, I did pin baste my quilt. However, I also have had problems with machine quilting the further I get from the center. It is as if the backing fabric travels, regardless of having been pinned in place. My hand basted quilts do not do this. So, I opted to switch out the pin basting for hand basting on this quilt. I am not convinced that I need to do both, but there it is.
ready for quilting!!

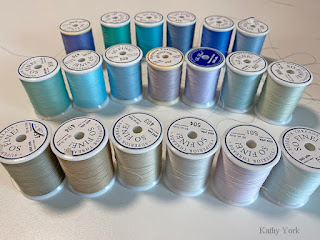
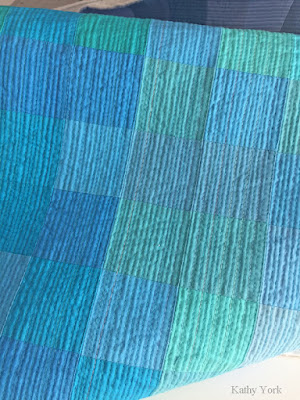
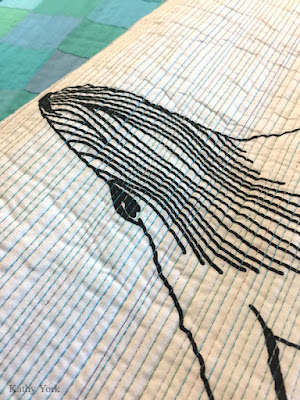
I also wanted my quilting threads to kind of disappear into the back ground, but also provide a linear aspect to the quilting design.  I opted for these wonderful very thin polyester threads from Superior Threads. 
It was another expense to buy a whole new line of threads, but I was super happy with the visual effect after I quilted this.  As a bonus, one that I did not anticipate, because the threads were NOT cotton, they did not fill up my machine with lint.  I did not have to clean the lint with every bobbin change, which was awesome!!

I love the side lighting coming through the window for this shot!

A whale and all the quilting lines.

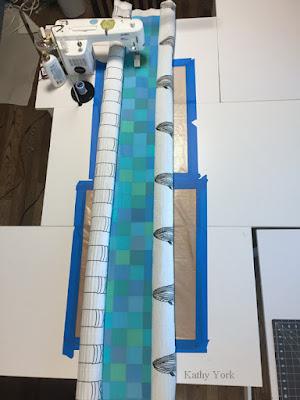
I had a very hard time dragging this quilt through my sewing machine. Usually a big quilt is already hard because it is bulky and heavy. This one was harder. Apparently the black fabric paint on the other side was creating more friction with my table. I decided to try using painter's tape to attach some Goddess sheets (teflon sheets) from Mistyfuse to reduce the drag. It worked great and made my job SO MUCH EASIER. Thanks Iris!!
A top view looking down on my quilt under my sewing machine

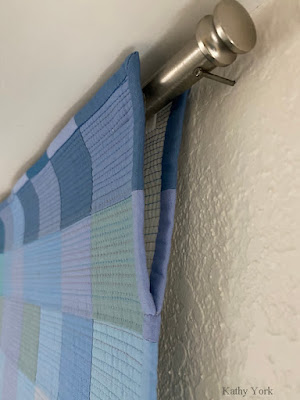
The hanging sleeve, hanging tube:
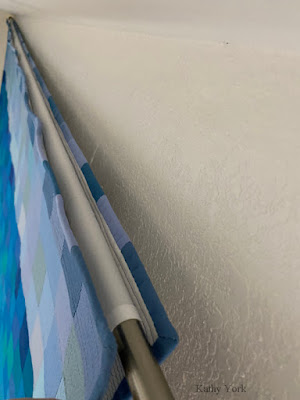
Before I quilted the top 5" or so, I had an idea, one that I have used before on a two-sided quilt. I decided to peel back the layers, and insert more fabric and batting to make an internal hanging sleeve.  It worked great! And the construction of it was seamless and I got to incorporate the quilting and the tube at the same time, which is very hard to explain, but it worked!

It is undetectable from either side! Here is a top view. It also works for a larger sized hanging rod, but this is the one I am currently using while it is hanging at my home.

The binding:
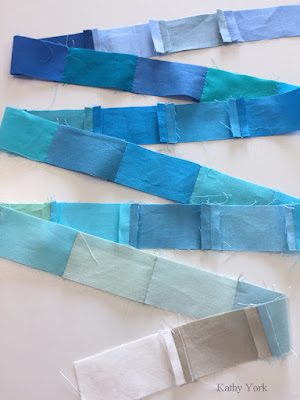
You may have already noticed that the binding changes colors with every block. I did not pre-plan this. I was indecisive about the binding for the entire construction of the quilt. It was only when I got to the end, that I decided my absolute best choice was to do it this way. So I dug out all the fabrics I used and started cutting new pieces to make the "blended" binding. So many pieces! ARGH!!
Then I stitched all the little pieces together. I opted to do only one side at a time to deal with the corners. I also opted for open seams to reduce bulk when turning the binding to the other side of the quilt.

I am happy with the way it turned out. It also looks really good from both sides of the quilt.


There is ONE MORE THING! But this post is already long, so I am saving it for next week. Hope you will pop back by. It is the coolest thing ever!! Cheers!

Wednesday, December 08, 2021

Ocean Blues

Ocean Blues
74" x 74"

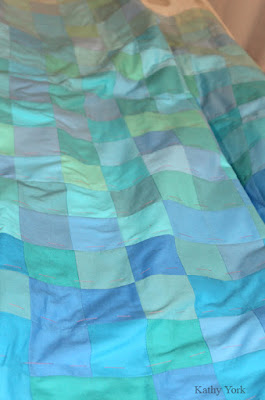
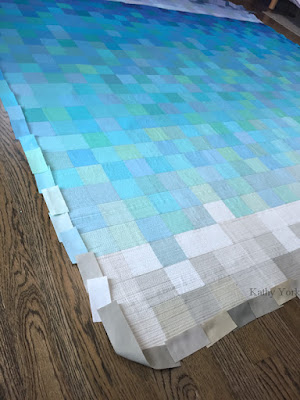
I have finally finished my two sided pixel ocean quilt! It was delayed during quilting by my broken sewing machine. And it was such a wonderful feeling to have it finished at last! It is one of my favorites and is happily hanging on my wall now.
My intent was to create a wall of blue, evocative of the ocean. I began by selecting a color palette. Since it is impossible to pick accurate colors from a monitor, I have been collecting sample packets of solid colors from different manufactures.  
Here are three of them.  Moda Bella is on the table, along with a page of RJR Cotton Supremes.  I just got the Kona card standing up in the back. PS. These samples are a little expensive, and not available year round, which can be frustrating. Also, you may notice that some of the fabric swatches have been ripped off the cards. That is because colors are very fickle, they can look different in different surroundings. I pull off a little swatch, and then attach a sticker on the back with the name of the color.  Then, if I want to get some, I still know what it is.  The Kona is permanently welded to the page.  I have no idea how to separate those colors from each other, perhaps an exacto knife?

Moda Bella samples, with labels added

Next I kind of swoosh them around to see how they look next to each other. Once I am satisfied, I try to find these exact colors from quilt stores.  That is not an easy task!  For this project I think I shopped at 6 different stores to find my fabrics, and was unable to find 2 of them.  Some stores require a minimum purchase of a yard of fabric, which is more than I need.  So, it is inherently inefficient, and especially so when adding up all the shipping costs.  However, no one carries all the colors. What is up with that??? Ha!

Here is a stack of some of the new fabrics mixed in with the ones I already had.

Once I had my fabrics, I wasn't sure which idea I wanted to pursue on a large scale, so I made some little sample quilts first.  Perhaps you remember them from earlier posts in April and May of this year?

These are all so lovely, and I had other ideas I hadn't tried yet, but I knew I wanted to try the pixel one in a large quilt.  The stripey one I tried in two other slightly larger versions here and here

Let the rotary cutting begin! This part can be a bit tedious and led to repetitive use injuries.  I try to do it slowly with stretching in between.  It is FUN to see the different colors stacking up and ready for placement!
After I had a LOT of squares cut, I started putting them up on my design wall. I thought it would be fun and easy. And, it was fun, but it was not easy.  My original idea had more brown and greens and less blue. Like this:
It would seem that too much thinking sometimes gets in the way of making art. So, I took a lot of this down and rearranged it more than once, and kept trying.  I knew I was getting close when I had mostly blue. 

Next week I will post about the back of this quilt, because this is another one that has turned into a two-sided quilt! 

Oil and Water -the other side of Ocean Blues

Oil and Water -the other side of Ocean Blues
74" x 74"

I grew up by the ocean. I love the beach and everything that goes with it. When I was little the beach was frequently covered in sticky goey tar balls. They were hard to get off your feet, until you learned the trick about baby oil. The older I got, the more littered the beach became. When I go to the beach now, I have to pay a fee for a sticker for my car. The monies are used to bulldoze and scrape the beach of seaweed and trash (I'm assuming). And, I am not convinced that this is the best thing ecologically for the beach and the organisms that actually live there. There are also trash cans every 100 feet along the driveable part of the beach. 

When I graduated college, I got some temporary work on a research vessel. We called it Coring for Dollars and had some T-shirts made up. The program was run by a university professor who used the income from it to fund his own research and graduate students. We were taking piston cores and sampling them looking for traces of oil. I sliced up the deep ocean mud and put it into labeled bags that were frozen. Back at the lab, the mud was dried, and then extracted with multiple solvents. The left overs from the solvent washes were then tested in several different ways, including UV Fluorescence Spectrometry and Mass Spectrometry. If they found the "fingerprints" of an oil deposit, the results were sold to oil companies who then made a bid to drill for oil there. There is a huge amount of work and money that goes into oil production, and this is only the exploratory part. 

The thing is this. Oil is an incredibly valuable resource, but it is limited. It is not like a tree that can be regrown. Once we use it up, it is gone. Finding it and getting it causes huge environmental damage. Using it, or burning it, is also causing massive global climate change, but I will save that discussion for another day. It is not a hard sell to convince anyone that we waste it. But it seems like it should be a lot easier to convince both consumers and producers to stop using and making single use plastics that litter the earth and waste the limited resource. That is why I included plastic water bottles and 6-pack holders and straws and toothbrushes in this image. It symbolizes ALL the things we both waste oil on and trash our environment with. The earth is the MOST valuable commodity of all, and we have to protect and respect her. 

My life history infiltrated my thoughts as I was just drifting off to sleep after a long evening of sewing squares together. Such a INSPIRED idea that I was afraid I wouldn't remember it in the morning.  Ha! So I jumped up, went into the studio, and started sketching my idea and writing notes about it, notes that would help me to remember.

The next morning, I had a vague realization of what that idea would entail, and it was too much! Yet I couldn't give it up.  It stayed with me, unrelenting. I broke down the steps, drawing, editing and cleaning up my drawings, getting screens made, making the prints of each element, and then sewing all the pieces together. I couldn't decide if I wanted to make the screens myself (of which there are a number of different ways to do that), or simply paint or draw all the elements by hand? Since I wanted repetitions of each one, it made sense to make a screen and just print them. 

tracing the pencil drawing with a Sharpie

There was more planning. I had to decide the size of each design and how closely spaced vertically and horizontally they would be. I wanted to fill the space completely and not have any of the designs falling off the top or bottom edges. So, I drew the designs, and used photoshop to change the scale, then print and place on the design wall until everything was just right. 


The purchase of the screens were both expensive and expensive to have the image "burned" onto. I had a few screens that were gifted to me and very useful! But, I still had to buy a few. To save money I decided to try multiple images on one screen. I thought it made sense because I was planning to cut the pieces apart and sew them together. In reality it was not as simple as my plan. Here are a few of the double image screens:


The double screen did save money, but they took more effort and time to print. I did not have enough seam allowance to print them like this. So, I covered one side with plastic folder (cut to size) and then printed the other side. I used black fabric paint which dries very quickly in the screen, so all my materials were carefully planned and arranged to facilitate fast printing. It is stressful and yet fun to watch the images produced so quickly.

I thought I took more pictures of the printing process, but I was so busy trying to crank it out, there was no time for photos. As I was practicing with the whales, for the back another small quilt (here), I was printing outside and hanging the fabric to dry in the sun.  That was not the best idea. Working in the Texas heat made the paint dry faster in the screen. I had no idea how much I would need so I bought a lot extra, because I didn't want to run out during a print run. 
 

The ship was the hardest to print. The screen would kind of roll while printing and mess up the design after the first run. I think it took 7 prints to get 3 reasonably good ones. It was a learning process to be sure! 

After all the prints were made and dried, I heat set them with my iron, and then trimmed them with the rotary cutter and sewed all the pieces together. It was now ready to layer with the front, baste, and then quilt. :)

Wednesday, November 03, 2021

Both Sides Now

International Quilt Festival Houston
Both Sides Now
photo by Sherri McCauley

photo by Karen Alexander

I am so proud and thrilled that my exhibit, Both Sides Now, was so well received in Houston this year! And it wouldn't have been possible without the support of Becky Navarro at International Quilt Festival and my sponsor Juki America. I did not go, but had asked for photos of the exhibit from friends. I was overwhelmed with the response I got!!  Christi Carew and Suzin Stern took photos of almost every side of all the quilts!  Becky Navarro, Sherri McCauley, Susan Tennison, Frances Ledenbach, Karen Alexander, Cheryl Dagan, Deborah Boschert, and Carol Jones Morrisey took photos of the exhibit, many of which were showing people looking at my quilts!  And Andrea Brokenshire and Sarah Ann Smith took videos of the exhibit so that I could see what it looked like if you were walking around! Sarah's video included her commentary of my work which was quite lovely and gave it a very professional vibe that I LOVED! I am overwhelmed and so thankful for all the kindnesses! A big thank you to all so that I could share photos here with you!! It was almost like being there!

You can see both sides of every quilt in the exhibit, along with artist statement for the quilts, and links to the quilts while I was making them, in the new tab at the top of my blog, Both Sides Now

Turn the Dial (left), Flow (right)
photo by Susan Tennison

Neurodiversity (left); His and Hers (right)
photo by Carol Jones Morrissey

Bloom (left), Butterflies (right)
photo by Karen Alexander

Caterpillars
Photo by Christi Carew

Diverging Distractions
photo by Suzin Stern

There were some unexpected surprises as well!  If you stood in the right place the lighting went through some of the quilts, showing both sides at the same time!  

Scarcity
photo by Deborah Boschert
The front side of Scarcity, Plenty to Go Around.
Plenty to Go Around
photo by Cheryl Dagan

Seeds
photo by Deborah Boschert
The Bloom side:
Bloom
photo by Suzin Stern

No Earth, slightly more subtle in the lighting effects, but also looks amazing from the back especially when you can see references of the front side.
No Earth
photo by Suzin Stern
The front side of One Earth:
One Earth
photo by Suzin Stern

I have been asked the following questions. So I thought I would answer that here.
Q: "Why make two-sided quilts?"

A: 1. I always wonder while I am working, WHAT am I going to put on the back of this quilt??? Sometimes my brain starts brainstorming ideas that relate to the work that I am currently making for the front.  It is like expanding an idea to include another perspective of it.  Like working in a series, albeit, a limited series of only two.

2.  I really enjoy designing quilts more than quilting them (now that I am older).  This gives me an opportunity to design TWO quilts for each quilt I have to quilt.

3. Storage space for my work is getting smaller and smaller the older I get and the longer I make quilts.  This is a somewhat futile attempt to have two quilts fit into the space in my closet of ONE quilt.

4. I love, love, love the challenge of making a two-sided quilt, where the meanings or stories connect with both sides.  Even better, is when the quilting motif ties the two together. 

Q: How do I line them up so well?
A: It is really difficult to line them up.  The back side gets smoothed and taped to the floor, front side down.  Then I put a layer of batting on top of that.  Now I can't see anything of the back side, and I have to lay the front side on top of all of these, top side up.  
1. Sometimes you can fold the quilts into quarters and put a safety pin on the folds at the very edges.  Then you have 4 points you can line up.  

2. I also found that you can FEEL the seams of the back side of the quilt through the quilt sandwich and make subtle adjustments to line up the front with the way that the seam feels. 

3. Sometimes the actual design of the two sides does not have to line up perfectly for it to work.

4. For the quilt, Turn the Dial, I used the same pattern for the front as the back, and tried to sew accurately.  That one got off about 1/2" in some places, but it is not noticeable. 

If you have more questions, please ask in the comments section.  I will be happy to try answer your questions.  I am not sure if the Blogger platform will notify you that I have posted a response, but I try to answer every comment I receive, so check back!

Two Halves
photo by Suzin Stern

the other side:
Overlap
photo by Suzin Stern

I also had a few comments about the hanging tubes.  Those were dreamed up for each quilt, BEFORE the backs were made.  Especially in the quilt above, I had to make sure when I was batiking the two panels that were sewn together to make Overlap (above) that I made enough to include an extra piece with the correctly spaced and dyed stripes to add the hanging tube! And it worked!!

I don't think anyone commented about my labels....
I sewed those INSIDE the hanging sleeves, as per request from the exhibit curator and coordinator, Becky Navarro at IQF.  The labels usually go on the back side of a quilt.  If these were indeed two-sided quilts, with no front or back, then the label would need to be hidden from view.  Done!
Last, there is a giveaway on my Facebook page for free two-sided postcards from the exhibit.  I was planning to hand most of these out at the festival, but then didn't go.  I will send them internationally too, so if you want one, sign up there.  Posting has been delayed, because I have run out of envelopes.  They have been re-ordered and I am hoping a Nov 15 post date. 


Thank you for stopping by!