Quilting over seam allowances
My most recent finish was a two-sided quilt, and the front side has some tiny piecing on it, which makes for some hefty seam allowance bulk for my consideration. Just recently I heard about hump jumpers. (You can google it to find places to buy one or see youtube videos on how to use them.)
Perhaps you have experienced the really bad tension problems that result from sewing over a bulky seam? The reason for the biggish loops of thread that appear on the back side is that your walking foot is not level while sewing over them. As it approaches the thick stack of seam allowances, the front of the foot tilts up. As you sew over and exit the thick stack, the front of the foot tilts down. I don't know why that should matter, but it does. The hump jumper is meant to place under your sewing machine foot, first in the back, then take a few stitches, and then move it to the front....all in an effort to keep your sewing machine foot level while going over the changes in thickness. This sounds fine and reasonable to me, with the exception that there are just so many changes in thickness as I sew across a section of tiny piecing. It would require so many stops and moving of that hump jumper, that I would NEVER make it across an entire seam, much less hundreds of lines of stitching.
My quilt required great precision on both sides though, because it is two-sided, so I had to do solve the dilemma. That's when my mind thought up this crazy scheme. I tried it out on a practice sample first.
I decided to use batting as a way to build up an extra layer of thickness near the bulkiest seams, in an effort to keep the walking foot slightly more level as it goes over. I put a piece of batting on the back side of the sections with tiny piecing. Then I cut a circle around the most extensive bulky seams, for each seam.
I pinned the Swiss cheese looking batting in place (which will be basted if I decide to use this technique). Then I added a second layer of a full batting, and then sandwiched the entire thing together with top, the two batting layers and the back, held by more pins.
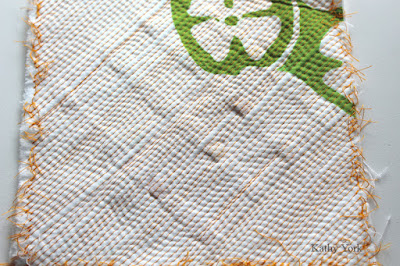
Then I went crazy with the matchstick quilting.
For convenience, I opted for one color of thread for the experiment. I was surprised how this much orange thread changes the appearance of the white fabric. Regardless, I was very satisfied with the performance of the process. There was also an unexpected "gift" in this process. Either the cut out holes or the bulky seams left a vague texture that can be seen on the back. My mind reels with possibilities of how to use this in the future! And, this little sample was successful enough to give me confidence to move on the machine quilting of my Caterpillar quilt.


No comments:
Post a Comment