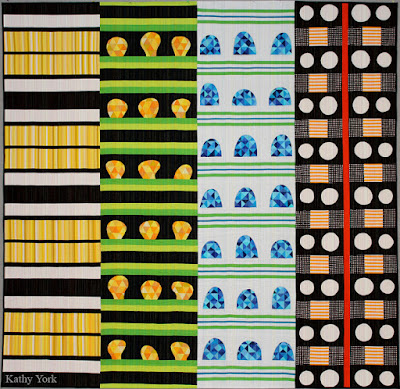
Caterpillars/Butterflies
64" x 62"
Whoot hoo! Finally finished with this one!
This quilt for me is all about the similarities and differences between the four panels. They each have things in common with each other, but also differences. And, from my previous post... I love the way the tops of the butterfly panels flow together in a continuous arc. It is a metaphor for the differences in individuals and yet they all belong to the same family or community. It is a feeling of belonging, like a safety net, or a protective arc, like an umbrella, helping us weather the storm.
You may notice that the white fabric on the back looks a bit less than white? Each panel has a slight color cast because there are so very many threads of different colors used for the quilting.
Quilting:
Even though I pin basted the quilt, I wanted absolutely no shifting between the layers. I started in the middle and worked my way out by removing the pins, and replacing with hand basting every 2 inches or so. Then I filled in with some machine quilting. Then I went back in for the close spaced machine quilted lines.
You can see the front (the green and orange), with the rolled up section of the back (the blue butterfly).
 |
 |
 |
| . |
You may remember from the previous post, my concerns about doing this matchstick densely spaced quilting over all the tiny pieces sections with lots of seam bulk? Well, I opted to put in the carefully trimmed batting. In some sections, I even put in the extra batting just to add another element of texture design. It is kind of cool how the circles show up on the other side, just from the extra individual circles of batting that are inside the quilt, and how they allude to the design on the opposite side of the quilt.
This side is the caterpillar side. I inserted a circle of batting under the white circle.
Two-sided binding:
The very top photos show the quilt photographed on a grey back board. If you look closely, you can see that the binding does not distract from the design. I pieced it to match the different colored sections, and I made it two-sided. That way, it could be white on one side of the quilt, and black on the other. This required a "knife-edge" binding, which was not at all easy.
Also, on the butterfly side of the quilt, I tried to match the black binding to the section of the wings that were going off the edge of the quilt. I made a design decision to just use a solid black, even though there were more colors on the edge.
Hanging tube:
The quilt was so heavily quilted, that a simple white tube (the same color as the background fabric), would have stuck out and not blended in. I made the painstaking decision to top stitch the tube with all the same colors. Yeah, I did that!
One color at a time, I went down the tube and traced where it should go. This is the mostly empty sleeve on top of the back of the quilt.
Nearly there, I am almost finished with this blue section and ready to move on to the warmer section on the right.
Here is the tube sewn with a tuck and pinned to the back.The photo of the butterfly side of the quilt at the top has the hanging sleeve already sewn on it. Can't see it? Yep, that was the point! Success!!!


3 comments:
I. I... just have no words Kathy. Just an astounding piece of engineering and lo labor intensive from beginning to end. A truly remarkable and singer achievement. (OK, I found some words, but I can't express how exquisite this work is) Truly gobsmacked! Wow!
Wow Stacy! Thank you so much. Now you have me a bit speechless! Thanks for leaving such a lovely comment!
You brain works in a mysterious way! Love it
Post a Comment