Showing posts with label minimalism. Show all posts

Tuesday, September 22, 2026

No. 29

No. 29
55.5" x 40"
Today's work features that horrible threat to relationships, miscommunication. The one that creates hurt feelings that linger even after the miscommunication is discovered and corrected (if you are lucky enough to find out...). And it all hinges on the ability to trust, something created from birth to about age 1. Simultaneous parallel talking without listening surely cannot help.
 
No. 29 was inspired after I made No. 18. I think the words that we say have a strong impact on relationships, so I wanted to do another version. What does this piece say to you?
No. 18
The design process started by arranging the paper cutouts on top of No. 18, to try to see what size the piece would be. It's a good starting point, but needed just a few adjustments.
After the top was completed, I tried another round of design...
Yeass! This works great! On with the quilting. I did not have backing fabric for this one, so I cut up some fabric from my stash and made a floral patchwork on the back. Here is a shot of the machine quilting in progress.

And one of the machine quilting of the stem after the applique was finished.

The handquilting, and the 1/4" tape for marking the lines. I really like using this tape because it bends around curves (unless they are too small), and you can keep moving it until you get a line that you like.
 
A chaotic scene from the back as I attach the hanging tube...
And last, a detail shot.

Sunday, August 30, 2026

No. 25

No. 25
35" x 54.5" 
 
This piece is a reminder that the relationship I have with myself, affects the relationships I have with others. Working towards self knowledge and acceptance helps to center me and ground me. This one also reminds me of the expression, "bloom where you are". 
 
The quilt.
Every time I look at this, the top half feels smaller than the bottom half. I have foolishly counted the blocks multiple times to confirm that they are the same size. And, so, I learn more about colors and their relative weights....
 
A closeup of the quilting:
If you look closely, you can see that the quilting threads are different colors in different directions. I always worry a lot about what color of quilting thread to use. And, I usually find that it doesn't really make too much difference....perhaps I am wrong about that?
 
The handquilting:

I tend to pull the quilting thread too tight, which causes massive tension problems. And so, I use the hoop to keep the tension even. As for circles, one of my favorite ways to mark them is to draw them on freezer paper and iron to the surface of the quilt. After quilting, they peel right off, and then I can cut it to the next smaller size, and iron it on again. The hand quilting is probably my favorite part of this process and I am always sad when I finish it.


The path not taken.

I love this color palette! I tried inserting these into the blue hump shape and it looked terrible. It was so terrible, and so wrong, and yet the colors are so pretty. It surprised me by taking a different tone than I wanted for the piece. So, they did not get used. I did save them, perhaps for a future quilt?

Sunday, November 30, 2025

No. 19

No. 19
27" x 33"


It is easy to get caught up in the small details, but it is increasingly vital to look at the whole field. A somewhat vague statement, but applicable to a number of scenarios. It surprises me how much the national political situation infiltrates my work subconsciously.

Design Process and 'Issues':
This one started as a sketch: (Note the orientation is different from the photo above. This one started with a vertical set of blocks).
I wanted to create depth by using different sized HSTs. Then I thought it might be interesting if they were separated by solid colors, one side darker than the other to imply shadows. And then I would quilt in the lines of perspective. 

1. I was unsure of what color values to use. So, I opted to try 4 different blocks in 4 different sets of values to see which combinations looked the best. This one was the winner! The darkest center seemed to create the most depth.


2. After finishing the quilting, the design looked very flat. The quilting lines for perspective did not show up enough. They needed to be bigger, bolder, and wider. So, I got out my handy Pfaff, and started satin stitching. It used up so much thread that I was scared I would run out before I finished. Luckily, I had enough! Yeasss!!

After finishing the black lines, it looked like this. I loved the depth that I could now see.
The individual blocks look great, but combined with each other, it created an unexpected secondary design, and a problem (for me).
 
3. Unfortunately, now I could only see the concentric diamonds in the center. They jumped out so voraciously, it was ALL that I could see. Like big EYES!!
Sorry, that is probably all you can see now too. I decided that it was a worthy experiment. It failed because of my lack of imagination and foresight. And it was okay that it failed miserably. It was worth the journey. It is how you learn, by trying something new, and then doing it, and learning along the way. And then my son walked by the studio and suggested rotating the quilt.
So, I did...
I could see the depth now in a horizontal orientation, and the 2 concentric diamonds that were now stacked vertically....well, they no longer looked like eyeballs staring back at me. 

It is still not my favorite quilt. It does not bother me that it is not my favorite quilt. I have had a number of comments on my FB post that suggest I would like it better if I turned the quilt horizontally...um, I have actually already tried that. Ha ha! And, I have already stitched the hanging tube on the back in this orientation. 
 
I guess if someone wants to purchase it, and turn it back to it's original orientation, I would be happy to change the hanging tube for them. I hope the big eyeballs won't bother them too much! Ha ha!

Here's a few closeups for you.

and another one...


Sunday, September 21, 2025

No. 16

No. 16
50.5" x 40"


This one is another quilt addressing the issue of privacy. Literally, this quilt is about windows, specifically, the extensive use of floor to ceiling glass windows in many new modern houses. If you can see out, then others can see in. I love the idea of being able to see out, and bringing nature into a building (which was the original intent of this style of architecture). But I also really value my privacy. This would not be an ideal house for me. Also, because guns, when I see a house like this, all I can think of is, where do you hide from the bullets? I will leave you to imagine the metaphorical meaning of this work, because it is not obvious. (HINT: Think of the word 'windows' and privacy, and you'll be there!). 

I have been dreaming of this one for a long time, like YEARS, but I couldn't see the whole picture. I wanted fish swimming in a house of floor to ceiling glass windows. Then about 9 months ago, I found a commercially printed paper with koi fish. I KNEW that these would be the fish for the quilt. Except that, they were paper, and I wasn't sure how this was going to work??

I got the courage to go ahead and try moving forward on the project by trying to sketch the house. None of my efforts were working. I drove around Austin looking for the perfect 'model' house to sketch. I did not find it, though I suspect it is out there somewhere. Then I decided to look online for some ideas. I found these 3. 

None were perfect, or had the right angles, so I just jumped in and tried making a perspective drawing of a house in my sketchbook. I have never done a perspective drawing before, though I had seen one on social media. I was surprised how easily it all came together. Then I had to upscale the drawings for each room to make a pattern. 
Here is the sketch of the kitchen:

After sketching, I had to decide how to cut this apart and make it into a pattern, and which pieces would be sewn together first? I wanted to minimize the Y seams because those are more challenging. I used colored pencils to outline the shapes that would be sewn together as a group. Then I cut the sketch apart...labeled the pieces, and selected the fabrics for each piece.
This part feels a little daunting. However, a friend reminded me that I have done projects with more pieces, and that helped!

The next step is to trace each piece onto the back of the fabric and then cut them out with a seam allowance. And, it is a little challenging because some of the pieces are small and hard to hold still while tracing around them onto the fabric. One by one, they are stitched together. It would probably have been easier to paper piece this and definitely more accurate, but I find this method to be mentally easier.
After getting the house pieced, and the background, it was time to consider the fish. So, I cut them out and freed them from their backgrounds.
I wasn't sure how many I would need, so I just keep cutting and placing them on the design wall. Ultimately, I decided that this was too many fish!

You can see from this photo that the fish are swimming in FRONT of the house. However, I wanted them placed IN the house, which means they would need to be swimming behind some of the house walls. So, I cut open the seam allowances in the house, where the fish would be, and inserted them in through the new slots. Then I hand stitched the seams to match the size needed for the fish opening. I also needed the fish to stay in place before I got to the quilting part, so I used Mistyfuse on the back side of the fish. Did you know it works great on paper too? Cool! Note: This was a sequence error. It is easier to put Mistyfuse on the fish before cutting them out than afterwards, so trimming the Mistyfuse to the fish body was a bit tedious.

If you look closely, you can see the fish behind the just barely transparent fabric of the door!

Then I started the machine quilting. I was very concerned that the needle holes from the quilting would rip the paper the fish were on. Fortunately it was such a heavy weight of paper that I had no problems! Whew! I did have a very clear vision of how I wanted the quilting lines to look, and it required a lot of stops and starts, which in turn meant a lot of thread tucking.

The other minor parts of the project included some hand applique for the lights in the kitchen, and a bit of satin stitch to define some of the shapes better. This put me on hold for a couple of weeks because I thought I needed some shiny black thread. I did get the thread, but the delivery was SO slow, and my patience for finishing the project was wearing thin. And then the new thread did not perform well in my sample testing, and I ended up using something I already had (which I can not remember now what it was...). That is the way it goes sometimes!
The last little part was the scariest! The fish took a bit of a beating with all the machine quilting from pushing the quilt through the machine so much. I decided to 'fortify' them with a couple of coats of high gloss medium, applied by hand with a small paint brush. I thought about doing it first, but the fish were ironed in place with the Mistyfuse, and I didn't want to try to iron a fish that had medium on the surface. So maybe it all worked out okay? 

I am overall very happy with the way this turned out! It is so satisfying to see an idea become actualized! I entered this quilt into Quilts=Art=Quilts, but it did not get accepted. As happy as it would have been to have my little quilt go out into the world, I am comforted when they get rejected because then I get to look at them a bit longer, and I don't have a lot of shipping expenses. Possibly a warped perspective here, but I am okay with that. I hope you like this one! Thanks for stopping by! 

Sunday, August 10, 2025

No. 11 Part 3

No. 11
78.5" x 53.5"

Part 3
Taking a negative and turning it into a positive. This was made from the outtakes of No. 9, and has been turned into the central theme of No. 11. Working on this project was so very helpful. I firmly believe that art heals. Gardening also heals and helps manage my depression and anxiety. So when it is too early in the season to work in the garden, this project was a perfect distraction!

Note, while this quilt does not technically have any half square triangles, it was the next in this new series of work. And it was made from parts from a quilt that does have a lot of half square triangles. It feels like it belongs, and so I am keeping it here.

After the background was quilted, I appliqued the flowers and stems by hand, and then I needed to quilt the flowers. I used a cutout freezer paper template (pressed into place), to help design the quilting lines for the flowers. The 1/4" masking tape is a bit difficult to turn such tight curves smoothly, but it gets easier as the curves get bigger. 


Ready to free motion quilt now! (and then repeat the process for the other 3 flowers!).
To finish the edges, I saved the very last color at the ends of the gradients for the binding. My binding was going to be 1/4", so it blends seamlessly with the color strips. 

I also opted to extend the flowers into the binding. I don't know why, it just looked right to me.
Last is the hanging tube, label on the back, and photographing the completed work. We took it up to the top of Mount Bonnell for a "quilts in the wild" photo! I didn't realize it was so windy that day, which made it a big challenging! For your viewing pleasure!


Monday, November 18, 2024

What's Next

What's Next
64.5" x 64.5"

 
This one gave me a perfect distraction and escape this last year while taking care of my mother. It was one of those projects that you could work on for just a few minutes a day, and still feel like you were making progress. I wanted something big and modern for the wall in my studio, and this looks WONDERFUL there!
The sections represent different stages of my life. I am wondering what is next in my life as I navigate a world without my mother. The grief so far has been hard to bear, it just leaks out unexpectedly. However, if I were to guess, when more time has passed, I think my next stage will have some joy, as that is part of who I am.

I usually start with a color palette. This got me into some trouble because I originally started with the idea to change the color palette for each section. I ended up hating what I was making, so I stripped out the inner corner, and decided to stick with the original color palette for the entire quilt. I kinda love the new inner corner now. Perfect! 

I also had to laugh because my color palette matched the color of the flower pin heads!


In the beginning I was cutting individual pieces of fabric and stitching them together.

By the time I got to the very tiny piecing of the outermost section, I decided to change my process and sew long strips together, cut them into chunks, and then sew those chunks together. It was much easier!

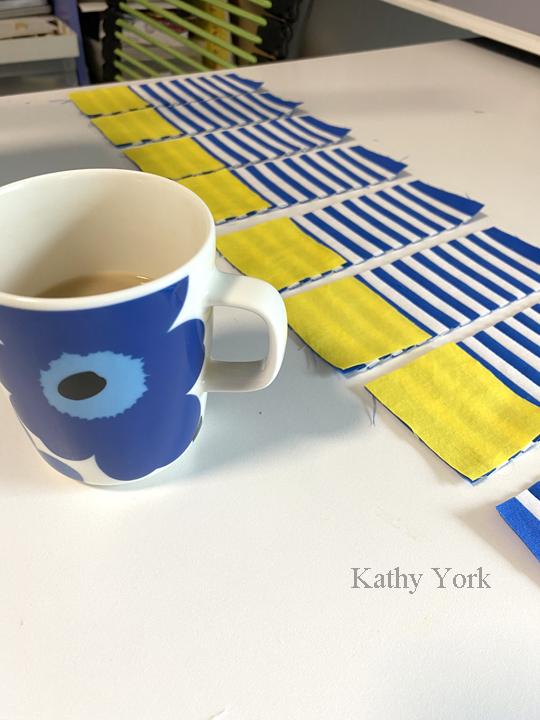
I also have to laugh at myself because of my quality check. If my work looks good next to my Unikko mug, then my quality of design must be good enough!!  Ha ha! I call it the Marimekko test!
Yep, it passed this time!

Sewing the last strips on,

A few close ups of the quilting.  


I still need to take a photo of it hanging in my studio.  I hung it as soon as I put the hanging tube on. It looks marvelous with my red Ikea couch!