Plenty to Go Around: Part 2
project: approximately 80" x 80"
follow progress on my Instagram account: #plentytogoaroundquilt
When I last left off, I referred to the individual design motifs: "Then it was time to start making all the pieces. It took me about 12 weeks. There were a total of 28 fat quarters that I drew, then batiked, and then dyed."
Today, I will start with the chickadees, one of my favorites! The fabric is created in my garage with batik and dye. These will be individually cut out, and then sewn, one by one, onto the giant white whole cloth background.
This is the sketch on tracing paper, and the beginning of creating LOTS of paper cut outs, to use in the overall quilt design.
Next up: tracing the shapes onto white fabric. This photo shows the first application of wax. The darker grey areas are the places where I have put liquid wax (which has then cooled and solidified). This layer of wax will keep the fabric under it white.
Making many, many, many duplicate chickadees. This motif needed 3 fat quarters, one fat quarter per wooded frame.
Adding the first layer of blue dye. It always looks darker when it's wet. And, at this stage, it is hard to believe this will eventually look like a little bird!
This shows the next stage. I am beginning to outline the areas that will be filled with navy dye. The wax on the white areas is still there.
In the last stage of batiking and dyeing, I have added even more wax for the wing, and the underbelly. I was a bit concerned that when I added the navy dye, it might leak (or drip, or spill) onto areas that I wanted to stay blue, so I protected those with the extra wax. Below you can see the waxed wing and underbelly that look darker than the background. In reality, they are still the same color as the background. I have also added the navy dye to the head, and chin, and tail. This is beginning to look like my little birds! :)
Here is the finished product, dyeing complete, wax boiled out, washed, ironed, and individually cut, ready for basting and applique!
What is really crazy about this time consuming project, is that I could have, most likely, just cut individual pieces of fabric for each part of the bird, and sewed them on to create a bird image. Yes, yes, I could do THAT! However, the batik has a unique look, that I like, and I like doing it, so I opted for this route. It will still be a long time before I am ready to add the birds to the quilt. I am really looking forward to seeing this bird with the edges turned under and the beak defined! Need more patience, can you send some? Thanks!!
Showing posts with label Art Quilt: Bird Series. Show all posts
Monday, August 19, 2019
Thursday, June 28, 2018
The Heron, the Kayak, and the Grebes: Part I
30" x 50"
This is my lovely entry for Dinner@Eight Artists exhibit this year. This is the final exhibit after a 10 year run and the theme was to choose something from the past 9 years. They were: Edges, The Space Between, Beneath the Surface, Rituals, Exquisite Moments, Reflections, Affinity, Patterns, and Personal Iconography. I think this piece was best represented by Affinity.
Artistic Statement: I have a strong affinity for kayaking. Gliding across calm clear water connects me with nature in a way that soothes my soul. In this view, I intentionally place the birds closer than they actually are because it represents the closeness of my emotional connection to this water world.
And, as an extra challenge, I decided to try my hand at writing my artistic statement about my quilt using ALL the past themes of Dinner@Eight. That was not an option on the entry form, but here goes:
This is the first time that I decided to make the entire piece, start to finish, by leaving the fabric attached to a wooden frame. And since I did not have a frame large enough, I headed to Home Depot for some wood. I cut the wood, used screws and cross bars to hold it together, and then painted it in several coats of polyurethane, sanding between coats. In this photo I have pinned the white fabric to the frame with push pins. This step is repetitive and a bit painful for my fingers. Once I get them just a little in, I tap gently with a hammer.
In batik, the wax can be used in two different ways. You can paint the liquid wax on the fabric in any place where you want to keep that color. Below, I have carefully painted wax on the white of the heron's neck feathers. I want those feathers to remain white. A different function for the batik wax is to build a "damn" or a "wall" in which I will apply the dye color I want and it will run right up to the edge of the wax (provided that there are no cracks in the wax). For example, I drew a liquid wax line on the heron's neck to separate it from the white background. I am planning to add layers of light grey, medium grey, dark grey, and blue dyes in this area, one layer at a time.
In this photo, I have added wax around the kayak and yellow dye for the kayak and the bird beaks. Then I added a lot more wax outlining the grebes, the heron head feathers in order to fill in with black dye. After the yellow dye has dried, I applied more wax to protect that section of the kayak to remain yellow. In this photo it looks like a wet yellow. The section that looks like a dry yellow will have layers of orange added later. I have also added wax on the oar handle to keep it white.
This shot is after many layers of orange dyes for the kayak, blue dye for the heron wing, grey dyes for the heron neck and body, and brown dyes for the herons legs.
Here is a shot of the heron head when I added the blue dye to the neck area. The background is a bit wet still, and it's not looking very good. I am not at all worried, because of my experience in batik, I know that it is proceeding as planned and in my mind's eye I actually see it as the photo below, with all the quilting added.
The finished head, with the wax boiled out and all the quilting completed.
Several examples of the layering of wax and dye. The heron's legs are outlined in a wax wall and filled with brown dye. The brown looks darker than it will be because the dye is still wet.
In the next stage, I put wax "stripes" on the first coat of brown on the legs and then overdyed a darker brown. The wax is applied with a tjanting tool, and can be a bit drippy. Here is the shot of the completed legs with quilting.
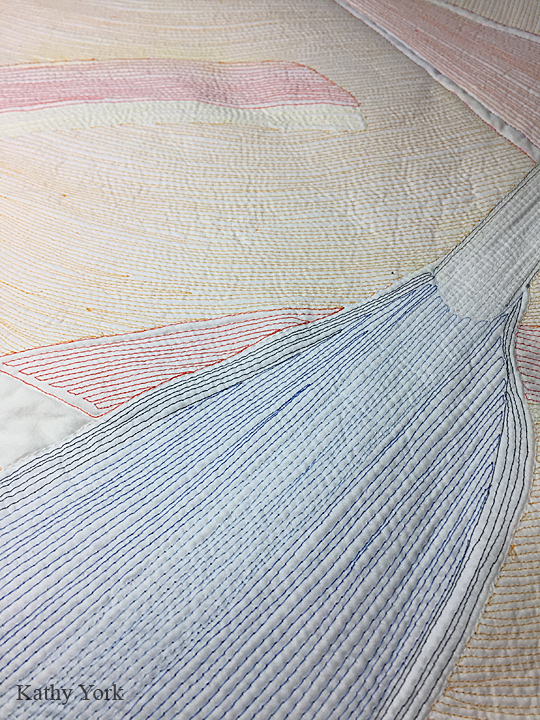
The oar was super fun! I dyed a light colored blue for the entire oar tip. It looks much darker in this photo because the dye is wet. After it dried, I added the wavy texture lines in wax.
Then I over dyed the oar with several shades of darker blue. I enhanced the shape of the oar with different colored blue threads to highlight the center and darken the edges.
However, before the quilting can start, the quilt top is rinsed and dried between every dye application. At the end, it is unpinned from the frame and boiled in a giant pot on the stove. I then wash it and fix the dyes. After drying, it is ready for basting with batting and a quilt backing. Then the quilting begins. Here's a shot showing some of the threads I used. I am driven by color!
The dense quilting lines were a bit tiresome. I used free motion machine quilting for this project. And, I use a lot of starts and stops. And, this is the stage where I was burying the loose threads with a needle.
I love the way the quilting lines look on the back!
A close up of one of the grebes for you!
30" x 50"
This is my lovely entry for Dinner@Eight Artists exhibit this year. This is the final exhibit after a 10 year run and the theme was to choose something from the past 9 years. They were: Edges, The Space Between, Beneath the Surface, Rituals, Exquisite Moments, Reflections, Affinity, Patterns, and Personal Iconography. I think this piece was best represented by Affinity.
Artistic Statement: I have a strong affinity for kayaking. Gliding across calm clear water connects me with nature in a way that soothes my soul. In this view, I intentionally place the birds closer than they actually are because it represents the closeness of my emotional connection to this water world.
And, as an extra challenge, I decided to try my hand at writing my artistic statement about my quilt using ALL the past themes of Dinner@Eight. That was not an option on the entry form, but here goes:
My affinity for kayaking is an exquisite moment, one
that has become a rejuvenating ritual.
I see reflections of the edges of the city on the water
and think about the space between nature and urban
development. As I row, I observe things beneath the surface,
the patterns of the waves, and I contemplate the personal
iconography of the heron and what it means to me.
Yaassss! I have thoroughly enjoyed my time and the work I have done for this exhibit over the years. I think some of my best work has been expressed because of the challenges offered by Jamie Fingal and Leslie Jenison. It has been an honor and a privilege and I am so happy to have been juried into this last round of exhibits! Thank you Jamie and Leslie!
I have also been overwhelmed by the response to my quilt on Facebook. I appreciate each and every comment, so thank you for that!
For those of you who have wondered about the process of creating a whole cloth batik quilt, I have included some process photos. The main idea is to build up the layers of colors and wax. It requires a specific sequence and lots of thought.
First I make a full scale drawing of my idea on paper. I tape the paper to my sliding glass door, and then overlay a piece of white cotton fabric. The fabric is held to the door with scotch tape as well and I trace, in pencil, the design lines onto the fabric.
This is the first time that I decided to make the entire piece, start to finish, by leaving the fabric attached to a wooden frame. And since I did not have a frame large enough, I headed to Home Depot for some wood. I cut the wood, used screws and cross bars to hold it together, and then painted it in several coats of polyurethane, sanding between coats. In this photo I have pinned the white fabric to the frame with push pins. This step is repetitive and a bit painful for my fingers. Once I get them just a little in, I tap gently with a hammer.
In batik, the wax can be used in two different ways. You can paint the liquid wax on the fabric in any place where you want to keep that color. Below, I have carefully painted wax on the white of the heron's neck feathers. I want those feathers to remain white. A different function for the batik wax is to build a "damn" or a "wall" in which I will apply the dye color I want and it will run right up to the edge of the wax (provided that there are no cracks in the wax). For example, I drew a liquid wax line on the heron's neck to separate it from the white background. I am planning to add layers of light grey, medium grey, dark grey, and blue dyes in this area, one layer at a time.
In this photo, I have added wax around the kayak and yellow dye for the kayak and the bird beaks. Then I added a lot more wax outlining the grebes, the heron head feathers in order to fill in with black dye. After the yellow dye has dried, I applied more wax to protect that section of the kayak to remain yellow. In this photo it looks like a wet yellow. The section that looks like a dry yellow will have layers of orange added later. I have also added wax on the oar handle to keep it white.
This shot is after many layers of orange dyes for the kayak, blue dye for the heron wing, grey dyes for the heron neck and body, and brown dyes for the herons legs.
Here is a shot of the heron head when I added the blue dye to the neck area. The background is a bit wet still, and it's not looking very good. I am not at all worried, because of my experience in batik, I know that it is proceeding as planned and in my mind's eye I actually see it as the photo below, with all the quilting added.
The finished head, with the wax boiled out and all the quilting completed.
Several examples of the layering of wax and dye. The heron's legs are outlined in a wax wall and filled with brown dye. The brown looks darker than it will be because the dye is still wet.
In the next stage, I put wax "stripes" on the first coat of brown on the legs and then overdyed a darker brown. The wax is applied with a tjanting tool, and can be a bit drippy. Here is the shot of the completed legs with quilting.
The oar was super fun! I dyed a light colored blue for the entire oar tip. It looks much darker in this photo because the dye is wet. After it dried, I added the wavy texture lines in wax.
Then I over dyed the oar with several shades of darker blue. I enhanced the shape of the oar with different colored blue threads to highlight the center and darken the edges.
However, before the quilting can start, the quilt top is rinsed and dried between every dye application. At the end, it is unpinned from the frame and boiled in a giant pot on the stove. I then wash it and fix the dyes. After drying, it is ready for basting with batting and a quilt backing. Then the quilting begins. Here's a shot showing some of the threads I used. I am driven by color!
The dense quilting lines were a bit tiresome. I used free motion machine quilting for this project. And, I use a lot of starts and stops. And, this is the stage where I was burying the loose threads with a needle.
I love the way the quilting lines look on the back!
A close up of one of the grebes for you!
Monday, November 03, 2014
Welcome Home
Welcome Home
12" x 12" x 1 1/2"
Colorful Fabric Collage
by Sue Bleiweiss
Last year I was invited to submit a small fused quilt to be included in Sue's book. I made this happy little quilt and was delighted that it was included in her book. The book is available for preorder from Amazon. I haven't seen it yet, but I look forward to it! As for my little quilt, here it is!
The hand dyed sky fabric and the hand-dyed floss is from my good friend Laura Wasilowski. I love her color sense and her fabrics. You can buy her fabric and threads and patterns here.
Perhaps you recognize this little bird from my other quilts with little birds (here)?
This 12" x 12" x 1 1/2" piece was wrapped around a canvas, so I used this fun black and white print for the side borders and wrapped the roof around. LOVE!
Thanks for stopping by! I hope to blog about my adventures in Houston soon. I am exhausted from the travel and still unpacking!
12" x 12" x 1 1/2"
Colorful Fabric Collage
by Sue Bleiweiss
Last year I was invited to submit a small fused quilt to be included in Sue's book. I made this happy little quilt and was delighted that it was included in her book. The book is available for preorder from Amazon. I haven't seen it yet, but I look forward to it! As for my little quilt, here it is!
The hand dyed sky fabric and the hand-dyed floss is from my good friend Laura Wasilowski. I love her color sense and her fabrics. You can buy her fabric and threads and patterns here.
Perhaps you recognize this little bird from my other quilts with little birds (here)?
This 12" x 12" x 1 1/2" piece was wrapped around a canvas, so I used this fun black and white print for the side borders and wrapped the roof around. LOVE!
Thanks for stopping by! I hope to blog about my adventures in Houston soon. I am exhausted from the travel and still unpacking!
Monday, June 03, 2013
Rainbow Chickadees, and the story of commission piece.
12" x 39" each
I was contacted by a third party and requested to make two more pieces to go with this quilt that I made last year, the Lovebirds.
It might seem like an obvious answer, YES, but that was not the case. The size requested by the client was unusual, and an idea of what to do with it did not immediately come to mind. And then there were the inevitable problems that I will just chalk up to the business part of making art for someone else. But the golden ring lie waiting for me to grasp; my art, in a public place, with a potential for bringing cheer to sick children, and/or taking the edge off the anxiety and fear of their parents....the new pieces were to hang at Cook's Children's Medical Center in Fort Worth, TX.
So, I set to work dreaming up an idea, and making a sketch. I went out on a limb and proposed a slightly different size that I thought would make the design work better, and it was accepted! And though they liked the design I submitted, the next stage was the waiting, waiting for the go-ahead to begin and the check for half up front to start. Somewhere along the way, this step got delayed. I knew how long it would take to make this project, and the timeline was shrinking fast. I used the waiting time to complete a number of other projects that I had on my plate. Then I got a call, a kind of plea, "do it now, please!!" I got lucky because a window of free time had just opened in my schedule, and they practically over-nighted the check to me. I was not going to be able to meet the original deadline, but they were open to extending it by a week or two, and so I set off.
Here was my proposal. I would do this quilt twice, in mirror images....as they wanted these panels to hang on both sides of the original quilt.
I have to give a lot of credit to the person or people who opted to go with this. Because though this mock up looks sort of cute, I think it pales in comparison to what the real work will look like, and significantly so. Thank you for having trust in me!!
I thought you might be interested to see how I made the mock up. I started by taping some of my real batiked blocks and flowers on a white background and took a photo of them.
Then, in Photoshop, I drew in the roofs, the vine, and some outlines around the roofs. This task was made so easy with my Cintiq sketch pad and pen.
Next, I selected everything that was white, and filled with a lovely blue, and while it was selected I picked a slightly different color of blue and used the paintbrush to do a sort of mottled wash over it. This gave the appear of some texture, like a real fabric would have. The last step was taking a photograph of a real quilted bird that I used on another quilt, isolating it, copy and paste.
Of course, the resolutions were different, so I had to shrink the size of the bird to make it the right size, and then repeat 5 times to get enough birds. Now the finished mock up has at least some elements that look like my actual work, compared to a line drawing that is colored in by hand.
Next, I went back to my records and found this. It is a sample of all the fabrics I used on the first quilt. I can't believe that I still have it, or was smart enough to make it in the first place. It is a life saver! Now, I have full confidence that I can make the new quilts have a similar feel to them by the selection of fabrics.
I went to my fabric stash and started collecting up the same blues. I did not have enough of some of the fabrics, but I repeated every fabric that I did have and then added to the set with hues that were in between and slightly extending the range of values. These were then cut into strips and sewn together.
I made two of them at the same time so that I could work on both panels.
I though it might be nice, in keeping with the rainbow stripes on pole of the first quilt, to have rainbow houses and rainbow birds. To help make the decision, I made a visual representation. Since I had the blue backgrounds pieced, I layered a piece of tracing paper on top. I decided to make the houses a rainbow set, and make the birds have polka dot rainbow wings to go with the houses.
I then made paper copies of the birds. I colored in the wings with rainbow hues, cut them out and played with the placement. This changed the design slightly, in terms of placement, so that had to be worked out before I marked the vine, or started the quilting.
Here are the two panels, side by side, with the beginnings of the quilting on the right side piece. I also had marked where the vine was going before sandwiching the quilt with the batting and backing and machine quilting. I decided early on, that because of the intricacy of the vine and all the houses, it would be much easier to quilt the background first, and then add the rest of the elements.
The next step was to fuse the vine, the houses, and the flowers into place. The vine was tricky. If I cut the fabric strips on the bias of the fabric, they will bend into curves if pulled slightly and ironed them into that shape. It takes a little practice, but it is pretty easy. It got a little confusing when I wanted some of the vines to go under the houses, and some to curl on top of the houses.
And if you are wondering....I am a Mistyfuse girl! I just love the stuff. I find it so easy to work with and so versatile. One of the nicest qualities is that I could heat it slightly, pull it back up, put the house down, and then re-fuse it into place. Also, you can tell from this step, that it doesn't look that good yet. Have a little faith! It will get there! The quilting and the birds and the handstitching will pull it all together!
Next, I took a side step, and started making the birds. Now the fun starts! I just loved working with the birds and their polka dotted wings! I don't have photos of all the steps, but briefly I will tell you that it involves, tracing a template of each of the bird parts, the body, the wing, and the tail. Next, sew the right sides together, with batting in between. Make a cut through the back fabric, and turn the whole assemblage right side out. I usually put a piece of fused fabric along the cut on the back, like a band-aid. Next is to machine quilt the little bird pieces (this is difficult). I also use felt for the bird beak and the tail, and these are placed in the little pieced sections before they are stitched together. I trim the felt to the right shape and size after turning them right side out. And, then I paint the bird heads with black fabric paint. Here is a small row of bird bodies, pinned to my design wall so that their heads can dry without touching anything.
After they dry, I paint the eyes. Here they are with wings, and a little late at night when I was getting punchy from too much coffee and M & M's. And with all their body parts, though not quilted yet. What a colorful little flock!! Lovely! and inspiring!
Back to the quilt panels, I machine quilt the vines and the houses. And then pin the birds to the quilt looking for their final placement. I briefly worried while making the birds, which ones would face right, and which would face left??? Then I realized, that it didn't matter. I was making mirror imaged panels, so I would need one of each, for each bird! Easy!
Last a few closeups before the final photos...
You will notice some hand stitched elements, which add softness, color and texture. I also opted not to add bird legs. The quilt has so much going on, that I liked the simplicity of the birds without legs better.
The last step, adding the bright blue binding, hanging tubes on the back and a label!
I am happy to present, Rainbow Chickadees....
Thanks for stopping by!
12" x 39" each
I was contacted by a third party and requested to make two more pieces to go with this quilt that I made last year, the Lovebirds.
![]() |
| Lovebirds |
So, I set to work dreaming up an idea, and making a sketch. I went out on a limb and proposed a slightly different size that I thought would make the design work better, and it was accepted! And though they liked the design I submitted, the next stage was the waiting, waiting for the go-ahead to begin and the check for half up front to start. Somewhere along the way, this step got delayed. I knew how long it would take to make this project, and the timeline was shrinking fast. I used the waiting time to complete a number of other projects that I had on my plate. Then I got a call, a kind of plea, "do it now, please!!" I got lucky because a window of free time had just opened in my schedule, and they practically over-nighted the check to me. I was not going to be able to meet the original deadline, but they were open to extending it by a week or two, and so I set off.
Here was my proposal. I would do this quilt twice, in mirror images....as they wanted these panels to hang on both sides of the original quilt.
I have to give a lot of credit to the person or people who opted to go with this. Because though this mock up looks sort of cute, I think it pales in comparison to what the real work will look like, and significantly so. Thank you for having trust in me!!
I thought you might be interested to see how I made the mock up. I started by taping some of my real batiked blocks and flowers on a white background and took a photo of them.
Then, in Photoshop, I drew in the roofs, the vine, and some outlines around the roofs. This task was made so easy with my Cintiq sketch pad and pen.
Next, I selected everything that was white, and filled with a lovely blue, and while it was selected I picked a slightly different color of blue and used the paintbrush to do a sort of mottled wash over it. This gave the appear of some texture, like a real fabric would have. The last step was taking a photograph of a real quilted bird that I used on another quilt, isolating it, copy and paste.
Of course, the resolutions were different, so I had to shrink the size of the bird to make it the right size, and then repeat 5 times to get enough birds. Now the finished mock up has at least some elements that look like my actual work, compared to a line drawing that is colored in by hand.
Next, I went back to my records and found this. It is a sample of all the fabrics I used on the first quilt. I can't believe that I still have it, or was smart enough to make it in the first place. It is a life saver! Now, I have full confidence that I can make the new quilts have a similar feel to them by the selection of fabrics.
I went to my fabric stash and started collecting up the same blues. I did not have enough of some of the fabrics, but I repeated every fabric that I did have and then added to the set with hues that were in between and slightly extending the range of values. These were then cut into strips and sewn together.
I made two of them at the same time so that I could work on both panels.
I though it might be nice, in keeping with the rainbow stripes on pole of the first quilt, to have rainbow houses and rainbow birds. To help make the decision, I made a visual representation. Since I had the blue backgrounds pieced, I layered a piece of tracing paper on top. I decided to make the houses a rainbow set, and make the birds have polka dot rainbow wings to go with the houses.
I then made paper copies of the birds. I colored in the wings with rainbow hues, cut them out and played with the placement. This changed the design slightly, in terms of placement, so that had to be worked out before I marked the vine, or started the quilting.
Here are the two panels, side by side, with the beginnings of the quilting on the right side piece. I also had marked where the vine was going before sandwiching the quilt with the batting and backing and machine quilting. I decided early on, that because of the intricacy of the vine and all the houses, it would be much easier to quilt the background first, and then add the rest of the elements.
The next step was to fuse the vine, the houses, and the flowers into place. The vine was tricky. If I cut the fabric strips on the bias of the fabric, they will bend into curves if pulled slightly and ironed them into that shape. It takes a little practice, but it is pretty easy. It got a little confusing when I wanted some of the vines to go under the houses, and some to curl on top of the houses.
And if you are wondering....I am a Mistyfuse girl! I just love the stuff. I find it so easy to work with and so versatile. One of the nicest qualities is that I could heat it slightly, pull it back up, put the house down, and then re-fuse it into place. Also, you can tell from this step, that it doesn't look that good yet. Have a little faith! It will get there! The quilting and the birds and the handstitching will pull it all together!
Next, I took a side step, and started making the birds. Now the fun starts! I just loved working with the birds and their polka dotted wings! I don't have photos of all the steps, but briefly I will tell you that it involves, tracing a template of each of the bird parts, the body, the wing, and the tail. Next, sew the right sides together, with batting in between. Make a cut through the back fabric, and turn the whole assemblage right side out. I usually put a piece of fused fabric along the cut on the back, like a band-aid. Next is to machine quilt the little bird pieces (this is difficult). I also use felt for the bird beak and the tail, and these are placed in the little pieced sections before they are stitched together. I trim the felt to the right shape and size after turning them right side out. And, then I paint the bird heads with black fabric paint. Here is a small row of bird bodies, pinned to my design wall so that their heads can dry without touching anything.
After they dry, I paint the eyes. Here they are with wings, and a little late at night when I was getting punchy from too much coffee and M & M's. And with all their body parts, though not quilted yet. What a colorful little flock!! Lovely! and inspiring!
Back to the quilt panels, I machine quilt the vines and the houses. And then pin the birds to the quilt looking for their final placement. I briefly worried while making the birds, which ones would face right, and which would face left??? Then I realized, that it didn't matter. I was making mirror imaged panels, so I would need one of each, for each bird! Easy!
Last a few closeups before the final photos...
You will notice some hand stitched elements, which add softness, color and texture. I also opted not to add bird legs. The quilt has so much going on, that I liked the simplicity of the birds without legs better.
The last step, adding the bright blue binding, hanging tubes on the back and a label!
I am happy to present, Rainbow Chickadees....
Thanks for stopping by!
Sunday, July 01, 2012
Lovebirds
Lovebirds
15" x 36"
I have finished my commission and wanted to share it with you. I was contacted by a third party for this commission. They had a client, a hospital, who wanted a piece for their new children's reception area. I was very excited to work on this project! After agreeing upon terms, I set out to design something to fit the size they wanted. I immediately knew what I wanted to do, they had a theme of "Home" in mind, and I made a quick sketch. This sketch was later drawn full scale, which was a real help when it came time to construct it.
After the client approved the design, they wanted to see it with colors. The contract said that they wanted it done in pink and blue, I think because that was the paint colors of their walls. This became a real difficulty for me because I don't work in pastels, or even just two colors. However, I pulled out a fabric palette of lovely pinks and blues. I then scanned them in and set them as a "design" in Photoshop. Then I selected the shape and filled with the fabric choices. In this way I was able to get a pretty good idea of what the fabrics would look like cut to their specific shapes and collaged to make the quilt surface. I was not excited about the piece anymore. Color is just so important to me, that I really struggled with this. Many of the fabrics I initially chose were replaced with others as I continued to audition the fabrics. Very time consuming and ultimately not ideal....in my mind.
However, I sent the photos with several choices and waited to hear back so that I could continue. Weeks passed. ACK!! What is happening? Did they change their minds? No, they didn't. They rejected my color scheme of pink and blue, and said they really wanted something in my more typical color palette. Add some more colors. And use brights! REALLY? Okay!!! I dashed to the studio, and pulled out an entirely new set of fabrics. Within an hour, I had the whole thing colored in with colors I craved! Sent the new photo and it was accepted really quickly.
What I learned from this commission is that people are drawn to my work for many reasons. If I am going to make something for someone else, it has to stay true to my sense of design and color, at least to a certain extent, otherwise, it won't look or feel like my work. Interesting!
Here is the complete quilt:
And there are always a few minor changes when moving from the drawing to the fabric stage. For example, the birds' shapes have changed slightly, and I used multiple fabrics for the background which doesn't show in the drawing. Here's a few closeups of the birds and the decks. That baby bird is just so darn cute! I love the little tufts of embroidery floss on top of his head!
And because kids LOVE rainbows, I knew I wanted some element of the quilt to have rainbows, so I used some of my hand dyes to make the greys in the pole, and for the multi-colored ribbon going up the pole:
And for the weathercock, I had to add a fish, because I just love the ocean and fish, I needed a small representative of myself in the quilt.
And last, you may remember this little quilt, The Blue Birds and their Orange House. This was a quilt that I donated to the Alliance for American Quilts. It is very similar to this quilt. I made it first and it really helped me as a prototype to learn to construct this house for the commission. Seems like I am drawn to birds again, which I have worked on before (see the Art Quilt: Bird Series on my sidebar, in the Labels section.)
I really have had so much fun making both these little quilts that it would not surprise me in the least to dream up another bird quilt!
15" x 36"
I have finished my commission and wanted to share it with you. I was contacted by a third party for this commission. They had a client, a hospital, who wanted a piece for their new children's reception area. I was very excited to work on this project! After agreeing upon terms, I set out to design something to fit the size they wanted. I immediately knew what I wanted to do, they had a theme of "Home" in mind, and I made a quick sketch. This sketch was later drawn full scale, which was a real help when it came time to construct it.
After the client approved the design, they wanted to see it with colors. The contract said that they wanted it done in pink and blue, I think because that was the paint colors of their walls. This became a real difficulty for me because I don't work in pastels, or even just two colors. However, I pulled out a fabric palette of lovely pinks and blues. I then scanned them in and set them as a "design" in Photoshop. Then I selected the shape and filled with the fabric choices. In this way I was able to get a pretty good idea of what the fabrics would look like cut to their specific shapes and collaged to make the quilt surface. I was not excited about the piece anymore. Color is just so important to me, that I really struggled with this. Many of the fabrics I initially chose were replaced with others as I continued to audition the fabrics. Very time consuming and ultimately not ideal....in my mind.
However, I sent the photos with several choices and waited to hear back so that I could continue. Weeks passed. ACK!! What is happening? Did they change their minds? No, they didn't. They rejected my color scheme of pink and blue, and said they really wanted something in my more typical color palette. Add some more colors. And use brights! REALLY? Okay!!! I dashed to the studio, and pulled out an entirely new set of fabrics. Within an hour, I had the whole thing colored in with colors I craved! Sent the new photo and it was accepted really quickly.
What I learned from this commission is that people are drawn to my work for many reasons. If I am going to make something for someone else, it has to stay true to my sense of design and color, at least to a certain extent, otherwise, it won't look or feel like my work. Interesting!
Here is the complete quilt:
And there are always a few minor changes when moving from the drawing to the fabric stage. For example, the birds' shapes have changed slightly, and I used multiple fabrics for the background which doesn't show in the drawing. Here's a few closeups of the birds and the decks. That baby bird is just so darn cute! I love the little tufts of embroidery floss on top of his head!
And because kids LOVE rainbows, I knew I wanted some element of the quilt to have rainbows, so I used some of my hand dyes to make the greys in the pole, and for the multi-colored ribbon going up the pole:
And for the weathercock, I had to add a fish, because I just love the ocean and fish, I needed a small representative of myself in the quilt.
And last, you may remember this little quilt, The Blue Birds and their Orange House. This was a quilt that I donated to the Alliance for American Quilts. It is very similar to this quilt. I made it first and it really helped me as a prototype to learn to construct this house for the commission. Seems like I am drawn to birds again, which I have worked on before (see the Art Quilt: Bird Series on my sidebar, in the Labels section.)
I really have had so much fun making both these little quilts that it would not surprise me in the least to dream up another bird quilt!
Subscribe to:
Posts (Atom)