Showing posts with label Art Quilt: 3D. Show all posts

Saturday, October 19, 2024

Going to the Show!

Where the Walls Have Eyes is going to Quilt National 25! And I couldn't be happier!!


It is difficult to photograph a 3D art project.  I guess I did okay with these because the jurors liked them! A big thanks to Martha Sielman, Luke Haynes, and Ellen Blalock for their efforts in putting this exhibit together and including me in their decisions!

I have only been in Quilt National once before.  It was '09. That was quite the emotional experience for me. It validated my new identity as an artist. This time around was very different. It was also very emotional but for a different reason. My mother is no longer here to share the good news with, and it was the first thing I wanted to do, call her. 

Quilt National 25 opens in May of next year, but they need the works a long time before that. This is because they need to see the quilts up close and personal to award prizes. And normally for an exhibit, this is done after the exhibit is hung. However, Quilt National publishes a very nice hardback book of the exhibit, and they need the extra time to put the book together (with the prize winners), and you know, actually publish the book and print the copies. So shipping is very early. 

I did not waste any time! I knew it would be easy to get a box, because I have a fantastic box store near me with boxes in every size. The limiting problem was going to be the plastic bag. Quilts need to be shipped in plastic in case the box gets wet. And this cube was too large to fit in any plastic bags I could find, including XXL garbage bags. I could find big enough bags if I was willing to buy 100 of them (which I was not). So, I opted to build my own plastic covering.


I bought plastic sheeting from a local home improvement store. Cut it into pieces, and taped the pieces together into a tube.  Then I put my lovely cubic work inside, and basically wrapped it like a present! I taped the top and bottom ends, and it fit perfectly inside the box.  


The last piece was to "protect" the box with my hand drawn talisman. Voila! Done! And very happy that it has safely arrived at the Dairy Barn Arts Center in Athens, OH.


Sunday, September 15, 2024

The Outtakes, fabric waste

The Outtakes, fabric waste

Regarding, Where the Walls Have Eyes, I think I have mentioned before how BIG a project this was. It also created a lot of waste..I made the following videos of the piles of "leftovers" from the project. 

Here are the cutouts from making the eyes...

And here are the quilt sandwich circle cutouts from quilted blocks...
 

And last, the quilted pieces that were trimmed off all 4 sides of each block...


Sunday, September 08, 2024

Where the Walls Have Eyes, Part 14

Where the Walls Have Eyes, Part 14
21" x 21" x 21"

Sometimes, when I get to a certain stage of making a quilt, the work speeds up for me, in eager anticipation of the finish. This was not one of those kind of projects. I had to deliberately work slowly so as not to tax my hands.

And then there were the unintentional delays.  The six stranded floss, at the point where it goes through the eye of the needle, becomes 12 strands. It is hard to push through the little quilted blocks, and much harder when there are also fused eyes to contend with.  Sometimes I would just yank it and accidentally peal off the fused eye. Rats!  I tried using a tiny miniature iron, I think it is called a Clove iron?, but I would over focus on the eye and the quilt, and not pay attention to where my fingers were, resulting in numerous clumsy burns. 
So, I opted for fabric glue, and clothespins and waited for the glue to dry. 
I also found that certain parts of the project were hard to reach at times.  The more I added, the taller it got. At one point, I had to switch from my table to a (closer to the floor) coffee table.  But then THAT was too low. 
My favorite seams were on the sides of the cube, because there are only 2 quilt pieces to join.  Very easy!
Here's what that stitch looks like from the inside.  You can also see me burying the thread end after taking 2 very tiny stitches in the end.  

Here is a sample below of sewing 3 pieces in one seam.  In this view you can only see 2 of the pieces.  The third piece is underneath, out of sight, until you flip this around.
Here's what it looks like to sew a seam with 4 little quilts in one seam. URGHH!
Just for a little trivia, I did not use any knots in the hand sewing seams.  I made a couple of very tiny stitches on the inside and then just proceeded forward.

I only used 2 hand stitching needles for the entire project.  This is the first one, after it broke.
Here is a photo of the inside at the part where it was time to use the little lime green squares! Ah YEASS!
And, here is the part where I got to add the little yellow squares.  Predictable, you can probably guess where this single yellow cube is.  Which is good, because once the cube is completely sewn, it is too dark to look inside to find it.
It is getting taller and heavier now. A view from inside the studio.   Ironically, the quilt on the wall is called Windows...
About half way through, I started arranging the 'ceiling' layers on my design wall.  It made it easier to keep up with the internal color patterning inside the cube. 
I never got tired looking through the holes to see the view. 

Getting very close to finishing.  This is the very last and top layer to add! Never thought I would see the day!!
The final project. I am not sure this view entirely captures how wonderful this is to experience in real life. So, I hope the process photos have help expand your imagination. The colors in real life are also pretty vibrant! 
As for the meaning behind this project, I have hidden some little trinkets inside the cube that are attached in a way that you cannot see them by looking through the holes.  I tried very hard unsuccessfully, and I KNEW where they were.  You could upgrade your "looking abilities" by investing in some technology, like a snake camera (which I did), and be able to see the hidden trinkets. It is possible to find them this way. And, it serves as a perfect metaphor for hackers upping THEIR game to steal YOUR privacy. 

Ta da! It really worked.  All those layers and it held up and did not collapse! 

And, for inquiring minds.  This build has 73.5 square feet of surface area.  That is equivalent to 102 in x 102 in quilt. And, all of these little pieces are essentially two-sided, so imagine twice the surface area!!
Compared to the flat version of the project (you can see here), it is even larger than THAT!

Monday, September 02, 2024

Where the Walls Have Eyes, Part 13

Where the Walls Have Eyes, Part 13

This part took so long to complete! Wahhhh! I took hundreds of photos along the way, and it has taken me a while to narrow it down a bit.  And, it is still too many photos for one post, so I will be making two posts about the building.

It is all hand sewn, like the prototype. Every seam is a different color.  Some of the seams have 2 squares, some have 3, and some have 4.  As expected the ones with 4 pieces being combined in a single seam were the most difficult physically.  I am pushing a needle through 4 quilted pieces while it is threaded with 6 strands of embroidery floss. Chonky! 
And, trying to remember the orientation of the thing while it is rotated many times during stitching. I selected one face (the front), and put a safety pin in it, to ease my confusion. There are also a number of different color patterns INSIDE the cube, that were a bit cumbersome to remember. 
The first row is completed, and now I move on to those even more tricky seams with 4 pieces at a time. After the first one, I wanted to quit! 

I am starting to get the hang of it! More rows on the first layer! I am also learning that the hand sewing is very stressful to my hands. And it tweaks my tendons, so I started doing hand therapy and getting out the forceps to pull the needle most of the time.

But, I did not. Breaks and rest time are a crucial part of this project! Here is the complete first layer. Every little interior cube will have 4 walls, a floor and a ceiling. The little interior cubes will share their walls, and floors and ceilings with adjoining little cubes. The beautiful colors and threads kept me going!
My stash of embroidery floss.  I had no idea when I started how much thread I would need.  I ended up shopping for more thread about 4 times throughout the project. 
I also changed the color scheme before I started. I liked the aqua blue so much better than the navy blues, that I opted to have all the external sides the brighter and lighter blue. I worked out the math because the entire structure was envisioned with a different set of colors, which were made to order. And, with a few modifications, I was able to make the change. I am so glad I did. I absolutely LOVE the aqua color on the outside.  

I also preplanned the layout of the external sides, to make sure that I was able to both have enough pieces, and that I could arrange those pieces in a pleasing layout.
You can see some of the missing pieces above, which shows how far along I was when I took this photo! 
On to the next level!
And flipped over...
And looking through some holes...

These process photos of looking in the holes before the 'ceilings' are sewn on, have an abundance of light, which really shows off the wonderful colors.  Once the ceilings are sewn on, this beautiful view gets lost, or maybe I should say, goes private? 

Stay tuned. I will post the rest of the process photos and the final project next week. Nearly there!

Sunday, August 04, 2024

Where the Walls Have Eyes, Part 12

Where the Walls Have Eyes, Part 12

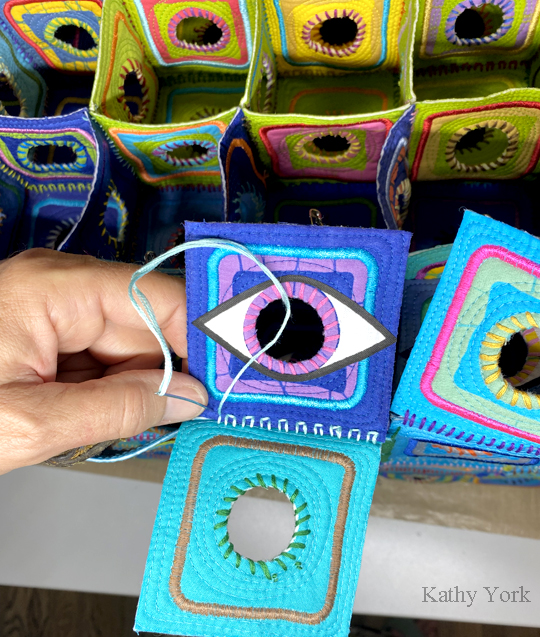
I almost did not make this in a 3D form.  I was looking through my second prototype, and I realized that beyond one block in, I could not see most of the work I had done. I could not see the batik, I could not see the satin stitching, I could not see the colors of the blocks, I could not see the colorful threads I would use to sew the blocks together.  All I could see was the hole, and some of the stitching around the hole. (ps. if you are wondering where the eyes are, remember, this view is on the prototype, not the actual project)

I also realized that the parts that I could see were only visible because of the placement of a light above the holes. This would not be the case for the rest of the cube. It would be dark inside.  I bought some fairy lights to light the holes.  I was planning to sew them into the seams, and leave the control boxes on the bottom of the giant cube. Sadly, they did not help much at all. It was disappointing. It felt like all that work was wasted on an idea that didn't work. Utter failure.

And yet, I had all these finished quilted blocks that were so colorful and pretty. I regrouped and tried them on my design wall.


Since I had over 1200 blocks, it completely filled my 8' x 8' floor to ceiling design wall, and I still had over 200 that weren't used.  I opted for a log cabin layout for several reasons. One is that I LOVE the log cabin block, it was the first quilt I ever made. Two the log cabin block references the home.....which is where the loss of privacy is happening on home computers. Of course, this version of log cabin is more reminiscent of courthouse steps in construction, or even square within a square, but those work too. Every white circle you see is a hole. Imagine this sewn together, and hanging some place where you can see people on both sides of the quilt! That would make the physical quilt an illusion of a solid surface, but holes everywhere that prevent privacy. I loved the symbolism of it!!
Also, this layout accommodated the colors of the pieces that were all ready finished.  My original idea of a cube, inside a cube, inside a cube (each being a different color), gave me the right number of pieces to be able to make a flat version of this idea. (Note: I hadn't started cutting out the eyes yet, so there aren't any on these photos, and if I made it flat, I would have decided where to put the eyes, which was also fun to contemplate.)

This lead me to want to be on both sides of the holes, which I could not do with them pinned to the solid design wall. So I took some of the remaining pieces and taped them together with painters tape.  Then I attached it with more tape to my sliding glass door in my studio. I wanted to be on the other side and look through the holes.
Now I could generally see what was on the other side, and as I got closer to the hole, I could see more.
Sorry the lens made the picture on the other side blurry.  It is a car with brake lights on (which means it is one of the few cars that actually stop at the stop sign on this corner!).

Then I went outside and looked in to my studio.
Mostly you see the painter's tape that I used to hold the blocks together. And, the view through the hole is pretty much what you would expect if you stand close to it.  I angled myself to see the iron on my ironing board. 

I was pleased with the results. But it was hard to give up my original idea. I got stuck here for a long time, not willing to proceed with the flat version. And not ready to commit to making the 3D version either.  I decided to be patient with myself. I knew that when the answer came to me, I would be ready to move forward.

And so I waited. Then I looked through the prototype again, without the lights on, and saw once again how dark it was.  That was when I realized that conceptually, I like the idea of loss of privacy on the internet so much better with the darkness, as in the dark web, and the dark scary thoughts of someone constantly trying to hack my into my personal space. It would be okay to leave parts of my project in the dark, and essentially make them private.  With the right technology, and motivation, you could spy into the holes of the cube, but without them, those hidden recesses would be private. YES! 

Time to commit to hand sewing all those very difficult and awkward seams.  Stay tuned, those are coming up on the next post!

Sunday, July 28, 2024

Where the Walls Have Eyes, Part 11

Where the Walls Have Eyes, Part 11

I was looking for a way to more literally and visually show the loss of privacy when I remembered this expression.  So I decided to put eyes on the insides of the walls, and ceilings, and floors of the project.

How?

I tried a few things, but this is the one that stuck! (ha ha!)

Mistyfuse (to the rescue again!) on the back of white fabric.  Draw the eyeball with a pencil.  Outline it with the black posca paint pen. Yes, it can leak through the fabric, so I put a magazine under it.
And then cut them out with scissors.
I did not have perfect cutting technique, so after the center circles were cut out, I touched up any of the black edges with the black posca pen.  I used this magazine cover to keep from getting paint on my table.  It used to be a frog...sorry, frog!

There were never enough eyes....

Here's a few of them with the centers cut out, one on a white table background, and one on a green fabric background. 
                                                 
I had fun arranging these shapes into patterns before I used them for my project!

Time to add them to the little quilted squares. All it takes is an iron and a few teflon goddess sheets (so they won't stick to the ironing board cover should there be a slip up). 

I love how the irises of the eyes lines up with the holes in the blocks! Also, these are the fronts of some of the blocks that need eyes, but there were also many times when the backs of the little quilts needed eyes.  

This gets more interesting as I begin to build the blocks into their cubes and you look inside, through the holes, to see eyes there!!!

Next week, the problem with the holes and the eyes, and how I almost didn't build this thing! Stay tuned!


Sunday, July 21, 2024

Untitled, Part 10

Untitled, Part 10

It began with a concept, the loss of privacy.
And morphed into a big project.

I started forming a very long list. A list of events, places, and ways to loose privacy. I drew a distinction between ways to loose privacy in public, and ways to loose privacy in your own home where there is supposed to be an expectation of privacy. There are so many privacy losses related to the internet that I knew that was the focus of my project. I had to question: who is doing the 'looking'. Is it friend or foe? It kind of haunts me.

.......Cambridge Analytica, algorthims, hot mics, third party cookies, social media, doxing, hackers, cyberattacks, hot webcams, malware, spyware, data mining, backdoors, trapdoors, the dark web, etc......

I started seeing my computer as a tiny little window that has the potential to let an entire world of unsavory characters into my home. Scary thought!

That started with....wondering if I could build this:

Ah, yes! It works. This was constructed from leftover blocks from previous projects. It is quite structurally stable, but I noticed that the overcast stitch made the pieces slide out of alignment. 

My final project will be a giant cube made up of these tiny cells. Visually my project vaguely reminds me of my first computer, the Apple Macintosh cubey thing. My structure will be composed of 7 x 7 x 7 little cells. I debated about having individual cubes sewn together, or having the little cubes have shared walls. I opted for the shared walls. Also, the big cube structurally references the myriad of links we follow when we are on-line. And the holes in the walls, and ceilings, and floors remind me that if I can look out, someone else can look in.

I also did not know if the little fabric quilts would be able to hand the weight of a BIG cube. Would they collapse in on themselves? So, I decided to build another prototype, a 1 x 7 column. I could stand it up and see if it could handle the weight, and the force of gravity. This also gave me an opportunity to test a different joining stitch for all the pieces. I opted for the ladder stitch. 

This is the bottom, (or the top), with 4 sides attached to the base.  Next, I will fold them up and sew the sides.

Previously, I was only attaching two pieces at a time.  Now, because there is a floor/ceiling on each cube, some of the seams will require attaching 3 pieces at a time. I came up with an altered version of the ladder stitch which worked quilt well.  Unfortunately, I am using 6 strand embroidery floss, which means a needle with a big eye.  And, I am hand sewing through layers of thick quilted blocks, 3 of them. It is physically difficult to have the hand strength to poke all the holes and pull the needle through. I am limited by how much I can do in a day without causing tendon injury.
But, the colors! The colors are fun! And the column is beginning to take shape!
I finished the prototype, and stood it on it's end. Success! It was able to hold the weight easily! Sadly, it was not stable as a single column, but this will not be a problem for the actual project.  All the columns will be sewn together, and they will give each other structural support to not fall over. My questions have been answered by these two prototypes and I can proceed with the actual project! I am also fully aware that the REAL thing will have many, many seams where I am joining 4 little quilts together in a single seam. I am not looking forward to that part!

With all those holes, you are probably wondering what it looks like inside? Yes?


Next week, I reveal the title of the piece, and add the last artistic element that pulls everything together!