Wednesday, April 28, 2021

Ocean Circles

Ocean Circles
10.5" x 10.5"


I have started a new series of work based on a palette of solid colors I bought. There are a lot of them, so there will be a lot of fabric to make things from.  My inspiration is the ocean.  I have missed visiting the beach where I grew up because of the pandemic.  I also stopped going after my dad died, a little over 2 years ago.  It was hard to face the grief in such a familiar place with so many memories.  Now, I am ready to go, but also not ready to go.  I miss the beach, the water, the waves, the salt breeze, the dunes, the seagulls and pelicans.  Soon....

My plans for a big quilt began, and then I started having doubts, so I decided to make some small samples to see which one I would like the best.  It is interesting to me that my favorite was not the crowd's favorite (according to Instagram).  So I present to you, the crowd's favorite, Ocean Circles, the first in the series of five so far.  It alludes to the constantly changing shoreline from the waves lapping along the shore and the wind blowing the sand and dunes.  

The circles are hand cut and needle turned applique.  I pieced the blocks before attaching the circles, then the quilting.  This one is densely matchsticked quilted with a LOT of different thread colors.  I don't mind changing the thread in my machine now that I have a needle threader.  It make it so much easier and faster.  I like the texture and how the lines of color seem to change with a different background color as they move across the quilt. I also wish I had made this a bit bigger on the outer squares, so that there would have been room to face it and turn the edge under.  Or so I thought!  After picking these 2 colors for the binding, I am really please with the reference to land and water.  Sweet!

I also tried coloring these on paper first, to get an idea of the scale of the squares and circles.  The watercolors just did not give the same feeling as the fabrics.  In fact, if I had only used the paper for inspiration, I would have stopped.  The feeling I got was closer to "ick" than "wow, that is so calming".

This is the part where the experience of working with the actual medium that I am going to use saves the day.  I believed in the fabrics and the emotional appeal of the colors.  So I let the sketch go, and trusted my instincts.  

Of course, now that I look at the collection, I am having more ideas to investigate! 

Wednesday, April 07, 2021

the Butterflies

the Butterflies (the other side of the Caterpillars)
64"ish x 64"ish

I find the the overall curb appeal is a bit weird for me, but this one is about the concept** (see below).  It had to be done this way, so I am making peace with it.

the design process:
I started with small bookmark sized sections. Some of these were redrawn/reinvisioned after coloring in.

Then I played with the ordering and the placement with things like this:

**That's when I decided that if I changed the shape of the top edge of the wings, they could line up and make a continuous arc across the top.  I loved the concept of this because it represents a great metaphor for differences in individuals and how they all belong to the same community. That feeling of belonging is like a safety net, or a protective arc, like an umbrella, helping us weather the storm.
Implementation:
The next step was to enlarge the shapes to full scale. I did it the old fashioned way with paper and pencil and eraser, occasionally resorting to measuring and math. I then traced the drawing with a Sharpie so that I can see it easily through the white fabric.
Also of note, I designed these panels to fit the largest sized frame I have for batik. I was able to fit two sections together which meant I had a total of two panels to make.  And, since I was dyeing for each part of the batik, I put the orange butterfly sections in the same panel, and the yellow and blue sections together.

After many hours of carefully applying the wax,

The sections were enclosed with a "wall" of wax and ready for the dye to be applied inside each wall,
After filling the sections with dye, they process overnight.  The next day it is rinsed with water, and the colors are checked.  In this case, I wanted more orange.  A slight delay because it required another layer of dye and waiting again.  The eternal wait.  Time never goes more slowly than waiting for the dye to process.... Then it is rinsed again to check the colors. And for this piece, the wax will be boiled out next.
This is a section after the wax is boiled out.  Next, I want to dye the white lines black.  To do this, I will need to add wax to everything that I just dyed orange, and the wax will have to be applied very precisely.  More patience was required than I have ever had, so I had to dig deep and settle in.

Here is a shot of the edge of the butterfly wing.  The grey line and the grey dots are the wax, and will protect the white fabric from the black dye.  In this photo, I have not started applying the wax to the orange parts yet.  Saving the "best" for last.... Finally, adding the black dye, and it looks so incredibly good.  All my dreams come true!
This shot has all the wax and all the dye.  All that is left is to boil out the wax.  By the way, the larger the piece, the harder this is.  I have to cram all this fabric, stiff with wax, into a large pot of boiling water.  The fabric folds in on itself in the pot and the wax gets trapped in the layers, which is problematic.  This process works better with more water.  However (and I found this out the hard way), if it has too much water, the fabric can also trap heat, which causes giant boiling bubbles to suddenly escape from one side and boil over the pot, or unexpectedly burn your arm if you happen to be stirring the pot at the same time.  Now I use long oven mitts when I do this.  
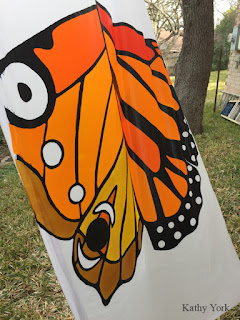
The finished panel, hanging outside to dry.

Then I had to repeat the entire process with the other panel, the blue one.


After the two panels were finished, I cut them, and stitched them in order of the caterpillars on the front, matching only the top edge of the arc for placement and adding some white panels to make it large enough.  

Time to start the quilting. This is the step that usually requires even more bravery.  It feels like so much work has gone into the parts, that the risk of quilting it has the possibility of ruining it. Wrong design, or other problems plague my courage.  It is time to remember all the time I have spent cultivating my skills and just relax into the challenge.  This is easier said than done.  I confront this same beast each and every time I make a quilt. It is interesting to me that sometimes the quilting does go wrong, and I rip it out and fix it.  A great metaphor for life, yes?