Showing posts with label handstitching. Show all posts

Sunday, June 21, 2026

No. 23

No. 23
70" x 34.5"


This one is an exploration of distance in a relationship. It sits on a field of yellow and green, both fear and growth. How do healthy relationships manage distance? What are the forces in the universe that cause two people to run in opposite directions?  For me, it asks the question, "How do I deal with distance in relationships?"

It reminds me of the quote from Kahlil Gibran, "let there be spaces in your togetherness". Such a powerful concept of love.

And, I love conceptual work that asks questions, vs. giving answers. 

The construction of this one follows all the same steps as the previous, so I did not take very many process photos.  Here are a few for you.

Selecting thread from my thread box.  I LOVE the variegated thread hand-dyed by Laura Wasilowski. 

Here is the 1/4" tape applied in wavy curves for the hand stitching. 
And, a close up of the finished project.  It is subtle, but there are three hand stitched lines of each color thread as they slowly get darker towards the 'stem' on the right. 

And the last one, which conceptually, I also love, is the quilt turned upright.
Because the lower half is darker, it looks vaguely like a reflection. And so the meaning of distance in a relationship could apply to the distance you have in relationship with your self. How well do I know myself? 

Monday, June 01, 2026

No. 22

No. 22
69.5" x 35"

Something has happened. All of this HST series work has led to a narrowing of the direction of the work...I am exploring one element of a complicated topic, relationships. I have been thinking a lot about relationships as we navigate through this ever evolving political dynamic of hate and fear mongering and increasing hostilities and violence to those who are different than us. When this is over (if that is possible), what will be left of our relationships? Do we cut ties to loved ones because of their egregious beliefs? Or do we stay engaged in conversations and find a way towards mutual understanding and forgiveness?  Each piece will explore relationship dynamics in general and will be left open to interpretation.

For example: This first piece in a series about relationships is about closeness, standing face to face. Is this the 'leaning in' for the first kiss? Is it standing face to face and shouting deeply held convictions and standing up for what one believes at a protest? 

I am using half square triangles for the background as a nod to traditional quiltmaking and the comfort that the idea of a quilt brings. I am using color schemes to communicate mood, and color gradients to communicate movement. The motif of a hump symbolizes a motivational/energetic hump to represent the resistance to change. What holds us back or propels us forward? Each piece will capture a moment in time of a constantly changing dynamic. 

Piecing the background. When I selected these cheerful yellows and subdued muted greens, I thought there would be more contrast.  However when pieced into HST's, they look so similar. Maybe that is better? Hard to get the colors right for the online photos, so this will be one of those, looks better in person kind of quilts....
To make the humps, I cut out the broad shapes, and then slice them vertically first. The color strips are 1" wide, so when pieced, they become 1/2" in width, which also maintains the shape of the hump. It doesn't grow or shrink with this sized of an insert. 
Then they are cut in the other direction and a new set of color strips are inserted.
The same process is used with the 'stems'.

Then I turn under the edges and hand baste them to stay in place.

Now that all the pieces are made, I am ready to start quilting the quilt. Here are the thread colors I used for this one. Sometimes I really like to use a lot of thread colors, and no it does not bother me to change the colors. 

You might be surprised that changing the quilting thread really has very little effect on the overall look of the quilt. Here's a close up, and you do have to look closely to see that there are different colors in the quilting threads...

An overall photo of the quilt while I was quilting it. You can see that half of the quilt still has the pins used to baste the quilt sandwich together. The humps have been casually placed, just to see what they look like. They have not been attached to the quilt yet. I choose not to piece the humps into the background (like I did on No. 9), because I have to make a LOT of starts and stops of the quilting lines and subsequent thread tucking. I really like the way it looks for the quilting threads to go UNDER the motifs. This requires the motifs to be appliqued after all the quilting is done. It is more difficult to hold everything while doing the hand applique, but I like the effect better...
After the humps and stems are hand appliqued, I add a layer of hand quilting with embroidery floss. In the photo below, I am marking my stitching lines with 1/4" masking tape. It is reasonably easy to apply in curves, easy to remove if the line is wrong and replace, and I can reuse it multiple times, if I don't have to clip the curves. I like how well this tape shows what the quilting lines will look like when I am finished. I also selected a gradient of embroidery floss colors for the hand quilting. 


And when I see these juicy beautiful colors and texture and lines, I practically swoon and fall in love with the work. Yes, you can laugh at me now! Ha!
Here's a close up for you.
This is also the part where I feel like I have finished the piece! Unfortunately it's similar to a false summit. I still have to apply the binding, then the hanging tube, an identifying label to the back, the photography, and eventually the blog post. I also make a quilt statement with the quilt description and artist statement, so if I want to enter it into a venue, all that information is readily available. Done!

Sunday, September 08, 2024

Where the Walls Have Eyes, Part 14

Where the Walls Have Eyes, Part 14
21" x 21" x 21"

Sometimes, when I get to a certain stage of making a quilt, the work speeds up for me, in eager anticipation of the finish. This was not one of those kind of projects. I had to deliberately work slowly so as not to tax my hands.

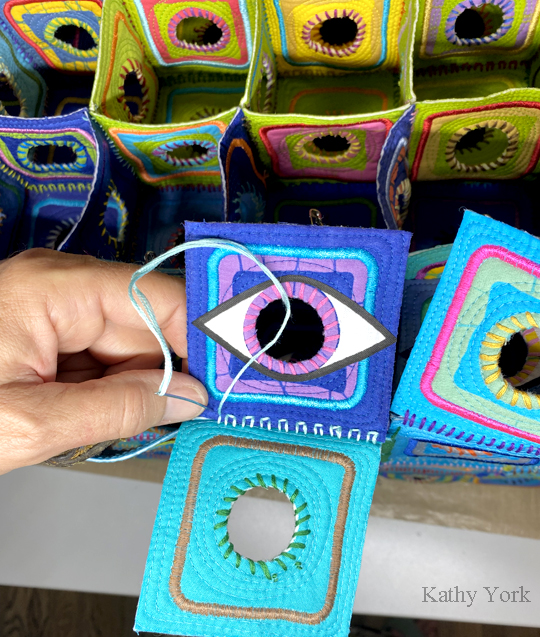
And then there were the unintentional delays.  The six stranded floss, at the point where it goes through the eye of the needle, becomes 12 strands. It is hard to push through the little quilted blocks, and much harder when there are also fused eyes to contend with.  Sometimes I would just yank it and accidentally peal off the fused eye. Rats!  I tried using a tiny miniature iron, I think it is called a Clove iron?, but I would over focus on the eye and the quilt, and not pay attention to where my fingers were, resulting in numerous clumsy burns. 
So, I opted for fabric glue, and clothespins and waited for the glue to dry. 
I also found that certain parts of the project were hard to reach at times.  The more I added, the taller it got. At one point, I had to switch from my table to a (closer to the floor) coffee table.  But then THAT was too low. 
My favorite seams were on the sides of the cube, because there are only 2 quilt pieces to join.  Very easy!
Here's what that stitch looks like from the inside.  You can also see me burying the thread end after taking 2 very tiny stitches in the end.  

Here is a sample below of sewing 3 pieces in one seam.  In this view you can only see 2 of the pieces.  The third piece is underneath, out of sight, until you flip this around.
Here's what it looks like to sew a seam with 4 little quilts in one seam. URGHH!
Just for a little trivia, I did not use any knots in the hand sewing seams.  I made a couple of very tiny stitches on the inside and then just proceeded forward.

I only used 2 hand stitching needles for the entire project.  This is the first one, after it broke.
Here is a photo of the inside at the part where it was time to use the little lime green squares! Ah YEASS!
And, here is the part where I got to add the little yellow squares.  Predictable, you can probably guess where this single yellow cube is.  Which is good, because once the cube is completely sewn, it is too dark to look inside to find it.
It is getting taller and heavier now. A view from inside the studio.   Ironically, the quilt on the wall is called Windows...
About half way through, I started arranging the 'ceiling' layers on my design wall.  It made it easier to keep up with the internal color patterning inside the cube. 
I never got tired looking through the holes to see the view. 

Getting very close to finishing.  This is the very last and top layer to add! Never thought I would see the day!!
The final project. I am not sure this view entirely captures how wonderful this is to experience in real life. So, I hope the process photos have help expand your imagination. The colors in real life are also pretty vibrant! 
As for the meaning behind this project, I have hidden some little trinkets inside the cube that are attached in a way that you cannot see them by looking through the holes.  I tried very hard unsuccessfully, and I KNEW where they were.  You could upgrade your "looking abilities" by investing in some technology, like a snake camera (which I did), and be able to see the hidden trinkets. It is possible to find them this way. And, it serves as a perfect metaphor for hackers upping THEIR game to steal YOUR privacy. 

Ta da! It really worked.  All those layers and it held up and did not collapse! 

And, for inquiring minds.  This build has 73.5 square feet of surface area.  That is equivalent to 102 in x 102 in quilt. And, all of these little pieces are essentially two-sided, so imagine twice the surface area!!
Compared to the flat version of the project (you can see here), it is even larger than THAT!

Monday, September 02, 2024

Where the Walls Have Eyes, Part 13

Where the Walls Have Eyes, Part 13

This part took so long to complete! Wahhhh! I took hundreds of photos along the way, and it has taken me a while to narrow it down a bit.  And, it is still too many photos for one post, so I will be making two posts about the building.

It is all hand sewn, like the prototype. Every seam is a different color.  Some of the seams have 2 squares, some have 3, and some have 4.  As expected the ones with 4 pieces being combined in a single seam were the most difficult physically.  I am pushing a needle through 4 quilted pieces while it is threaded with 6 strands of embroidery floss. Chonky! 
And, trying to remember the orientation of the thing while it is rotated many times during stitching. I selected one face (the front), and put a safety pin in it, to ease my confusion. There are also a number of different color patterns INSIDE the cube, that were a bit cumbersome to remember. 
The first row is completed, and now I move on to those even more tricky seams with 4 pieces at a time. After the first one, I wanted to quit! 

I am starting to get the hang of it! More rows on the first layer! I am also learning that the hand sewing is very stressful to my hands. And it tweaks my tendons, so I started doing hand therapy and getting out the forceps to pull the needle most of the time.

But, I did not. Breaks and rest time are a crucial part of this project! Here is the complete first layer. Every little interior cube will have 4 walls, a floor and a ceiling. The little interior cubes will share their walls, and floors and ceilings with adjoining little cubes. The beautiful colors and threads kept me going!
My stash of embroidery floss.  I had no idea when I started how much thread I would need.  I ended up shopping for more thread about 4 times throughout the project. 
I also changed the color scheme before I started. I liked the aqua blue so much better than the navy blues, that I opted to have all the external sides the brighter and lighter blue. I worked out the math because the entire structure was envisioned with a different set of colors, which were made to order. And, with a few modifications, I was able to make the change. I am so glad I did. I absolutely LOVE the aqua color on the outside.  

I also preplanned the layout of the external sides, to make sure that I was able to both have enough pieces, and that I could arrange those pieces in a pleasing layout.
You can see some of the missing pieces above, which shows how far along I was when I took this photo! 
On to the next level!
And flipped over...
And looking through some holes...

These process photos of looking in the holes before the 'ceilings' are sewn on, have an abundance of light, which really shows off the wonderful colors.  Once the ceilings are sewn on, this beautiful view gets lost, or maybe I should say, goes private? 

Stay tuned. I will post the rest of the process photos and the final project next week. Nearly there!

Sunday, July 07, 2024

Untitled, Part 8

Untitled, Part 8

Finally a title has emerged!! Unfortunately, I am not sharing it with you yet. Ha ha! Sorry!

This stage requires me to deal with a giant mess of tangled embroidery floss. I did not take a photo of the giant pile, but this is what it looked like after I pulled the threads out carefully, one by one. Wahhhh, so tedious and not fun!

I learned to wind yarn around my hand to make skeins back when I was a weaver.  So, I tidied these up the same way.

And, then stored them in color coded boxes, a yellow box for the warm tones, and a blue box for the cool tones. And while this pile of thread looked like a lot to me at the time, I think I purchased embroidery floss at least 4 more times because I never got enough, and a future step required even more and more floss.
Now, I am all set to begin the cut work. I usually cut a small section at a time, 8 to 10 circles, to prevent my hands from getting tired from using the scissors too much. Here I am with some, working out on my deck on a beautiful morning. (Yes, all 1000+ circles were cut with hand held scissors.)

Making thread selections for the hand stitching of the cut holes.
I also discovered that having the blocks in narrow strips, only 2 motifs wide, helped with thread management.  I could attach my thread choices to each block and have work that could go anywhere with me. So I carefully cut all the bigger pieces down.
When I got to the blue ones, there were so many.  Over 700 of these to do.  I wanted to maximize diversity of thread colors with the thread from the satin stitching, the color of the batik, and the color of the background.  So, I made thread color choices in mass.
Here is a sample after stitching.
All the holes...
And, after many months of work, the completed stacks of nearly ready blocks.
I am thinking that it doesn't look like much yet, but in my head, so much wonderfulness, it's hard to contain!