Showing posts with label quilting. Show all posts

Thursday, August 07, 2025

No. 11 Part 2

No. 11
78.5 x 53.5

part 2

Once I inserted the first set of strips, I opted to rotate the entire piece by 90 degrees. Notice how subtle the effect of the gradation is now with the 1/4" strips sewn into place.

Then I began slicing for the next step, the insertion of the other colorway of tiny strips of warm colored fabrics. 

Here is the obvious reason for turning the piece sideways.  Once the cuts above have been made, I can now pin the color strips in position, and with gravity, they hang down with a single pin.  Also note that my fabric stash did not always have pieces that were long enough for a single strip, so some of these had to be pieced together before inserting.
My hand for scale to show how narrow those little strips are!
Nearly there, approaching the last seams to sew for the background.
Next up, I decided to quilt the background before appliqueing the large foreground design. The advantage is that I will not have to do a lot of starts and stops while quilting, and no ensuing threads to tuck. It is an edge to edge quilting design without the applique. The disadvantage is that appliqueing to a quilt top is easier than appliqueing to a quilted quilt because there is less bulk to hold in your hand, and especially true for a large piece. Nonetheless, that was my choice this time.
First, the basting, then the quilting. 

Note that I have my quilting guide attached to my machine! Love that little tool. 

It is amazing to me how much work is involved in making a piece that will read so simplistically!

Trying out the placement of a flower before quilting.

For my next post, the big reveal, some additional shots of quilting and the specialized binding.

Tuesday, July 22, 2025

No. 9 Part 3

No. 9
Part 3: the quilting

I wanted to quilt the background in 1/2" lines. I don't remember if I have shown you this cool gadget. It attaches to the walking foot and guides your quilting lines with almost any spacing that you want. And you can attach it to the left or right side of the walking foot. It is very helpful and very versatile.
The only down side is that it is hard to change a bobbin with it attached.  After stitching the sample, I was satisfied that it would work!

I did some edge stitching on the stripes, and then completed the stitching in 1/2" intervals. If you remember all the humps, you will quickly realize that it meant a lot of starts and stops. I prefer doing the starts and stops vs. a continuous back and forth because the tension looks better. 

The next section that I wanted to do were the arcs. I did this with a free motion foot. And, I was worried about spacing the narrow lines because the arcs have varying widths along the length. It was harrowing!! But, once completed, it looked really good and I sighed a big sigh of relief!

Last, I quilted the half square triangle blocks inside the humps. The little blocks got a diagonal cross hatch. I LOVE how the texture looks in this lighting!
The slightly larger blocks got all 1/4" parallel lines (again with lots of starts and stops).
And, one last photo of the quilting from the back side:

Sunday, June 22, 2025

No. 6

 No. 6
48" x 27"


Wow! This one did not disappoint! I have big crazy love feels for it! I have chosen to photograph in it front of another one of my favorite around town art pieces, this lovely rhino!

It started as an exploration in scale. 
I have been making so many small half square triangles that once I got to the bigger ones, I took a pause. Making the big blocks felt like cheating somehow...? But I kinda love them too, and it was fun to see how they played with the smaller blocks. The tiny ones are 1" blocks.
While piecing these together, I saw other shapes emerge during the stitching process that I might want to explore later... The work itself provides unexpected gifts like this.
I was also happy to be able to decide on the quilting design really quickly. 
But sadly this one left a lot of threads to tuck. Still, it was totally worth it.  It is crosshatched in the blue sections and 1/4" lines in the orange and pink sections, very linear!

Sometimes my quilts need blocking before binding.  This was one of those. I don't mind the blocking, except that as soon as the quilting is finished, I get a rush to complete the binding. This part of wetting the quilt, and pinning it to the rug, and then waiting a full day for it dry is a slow delay. I typically feel rather impatient, and this time was no different!
However, as shown in the top photo, I did finally get there, and am now really enjoying this little quilt!

Friday, June 13, 2025

No. 2 and No. 4 Two-sided quilting

 No. 2 and No. 4: Quilting
45" x 45"

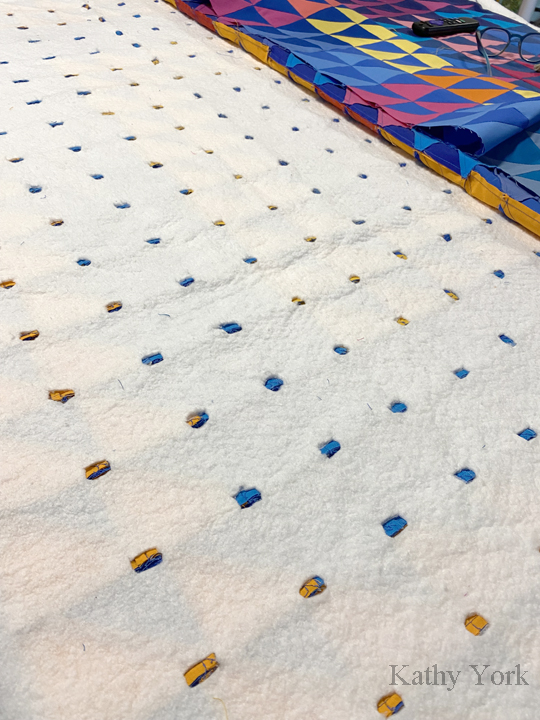
When I put the wrong sides together for this set of quilt tops, I could feel a really large bulk of seams at every intersection. I decided I would try the trick I did on THIS quilt, to see if it helped reduce the bulk.
Thus began the trimming of the batting with scissors...
It seemed to lessen the bulk, so I kept going to cut out holes at EVERY intersection. 

My original plan was to use straight lines across the designs of No. 4, which would include horizontal and vertical straight lines. This also requires a stellar basting job of lining up the top and back of the quilt so that the straight lines will work on both sides of the quilt. Unfortunately, this plan failed miserably despite my best efforts. The quilt tops kept shifting while I was working and the tension was really bad when I got anywhere near the intersections of all those bulky seams. 

I opted to rip out the quilting, and try something else. The new plan involved quilting circles in the centers of each square. It looks rather interesting, and has the bonus of not touching those bulky seams.
The trick was still to keep the quilt tops lined up. I solved it this time by using pins. I would pin through the seam on the top and feel for it underneath. Then I would make sure that it also went through the seam on the back before passing it back up. When stitching, I would have at least 3 sides of each square pinned before starting the quilting. And I worked slowly, one block at a time.  
The circle motif was easy to follow with free motion quilting by making a lot of freezer paper templates and pressing them on. They could be reused multiple times. The trick was pressing them on without the iron accidentally melting the pin heads...oops! I learned that it was a sequence problem.  Iron the paper circles on FIRST, then put the pins in to line up the seams (front and back). 
The next part was to tuck in all the thread tails, one set for each circle. Not fun, but it made the whole thing work. 

I also decided that a hanging tube on either side would look bad, so I opted early on to make an internal hanging tube, like on THIS quilt. The quilting of the circles was compatible with the internal sleeve, and I lived happily ever after. ;)

Last, I thought I would save time by making these two quilts into one quilt, that way, I would only have to quilt it once. Sadly, it did not save time. And it seemed like a lot of extra work for two quilts that I did not particularly like. The best part of this project was finishing it and moving on. It is all part of the learning path of working in a series, and I am okay with that. 

Monday, June 09, 2025

No. 3 part 2

 No. 3, the quilting


I meant to show these photos in the blog post from last week, but I couldn't find them.  Meanwhile, above is the little quilt hanging in our front sitting room. (See, the cat is sitting there!). No, I did not make this to match the wallpaper. I am inextricably drawn to this aqua blue color. I used it to cover the chair seat (one of six).  I used it to paint the dots on the chair.  This room used to be white wallpaper, but I painted over it to make this lovely blue.  Yes, a darker version was used to stain the concrete floor....

Meanwhile, back to the quilting.  I wanted concentric half circles for the yellow parts, and I wanted them reasonable evenly spaced. I didn't think I had the skill to free motion that design.  So, I opted to draw some circles on freezer paper, and iron it to the quilt.  
Once I stitched the edge of the paper, I pulled the freezer paper off, and cut the outer most ring along the pencil line. Then I pressed it back on the quilt surface and stitched the next line.  Slowly, but surely, I made it to the innermost tiny circle.  Since my paper template was limited by the size of my compass, I then used 1/2" masking tape for the outermost circles. The tape does a good job on curves, but when the curves get small, it gets increasingly difficult to tape a smooth circle, hence the freezer paper first. 
The straight lines were very easy to stitch. But each one had a discreet stopping point for the beginning and the end, which leaves a LOT of thread tails to tuck in. It is not difficult, but it is more work. They are stitched every 1/4". 
Many, many quilters would solve this problem by stitching a continuous line that goes back and forth. I like the way the discreet lines look better, so I am creating my own problem here, and I know it. But, I really, really like the effect.
Thanks for popping by.  Next week I will have a post about No.4, which became a two-sided quilt with the top for No. 2. 

Monday, June 02, 2025

No. 3

No. 3
25" x 25"

I had several ideas about how to make this one. I opted for drawing a template for each block that had a curve to see how well that works. It worked great! I made the shapes exactly how I was hoping! Sadly, it was so tedious and not fun, that it is unlikely I will want to do this again. That's the way it goes sometimes. However, I LOVE this little quilt. It is so pretty and simple, and it brings me joy!

First step was to draft it on paper. I was worried about getting confused with color on the blocks, so I used some colored pencils to color in the pattern. I also numbered the blocks in hopes it would help reconstruct the pattern, and that did help.

Then I cut the blocks apart. Many of the blocks have no curves, so I could easy construct those with a simple HST method. There were some aqua and black, and some yellow and black. And, the blocks that had a curve were cut along the curve with hatch marks for matching back up during the piecing process. For each little piece, I traced onto a piece of fabric with a pencil. And then I cut each piece out by hand, with scissors, making sure to add 1/4" seam allowance.


These were pinned and pieced, as you might expect...

And after making a set of two, I would place them on a black square block to sew them into HST's. 

The black piece is still one piece of fabric, so it stabilized the stitching while sewing along the diagonal edges. After cutting down the middle, I had two blocks ready to trim and put back on the design wall.

I worked one or two blocks at a time, so that I didn't get confused about their placements. I also anticipated that the paper templates for one quadrant would be able to be used for other quadrants if I flipped or rotated them. Unfortunately, that did not work at all. Only one set of templates was able to be used twice. This meant that I had to finish and cut out the paper templates for the other two quadrants of the overall square composition. The other problem I had, is that when working with solids, and tracing pencil marks on them, it is important to put the pencil marks on the backs of the fabric. And since they are solids, there is no obvious 'back'. I usually just experiment, and either do it wrong first, or get it right. Either way, it requires some thought, and some ....what do you call it? ....remembering.... Ha ha!

I also made changes to the composition after I finished the quilt top. I had planned to make a big circle, like this:

And, I did. But the more I looked at it, the more I wanted to rip it apart in the middle and reposition the halves. So I did that too. And I like it better, thus, the finished piece at the top.

The last part was the quilting. I have an irritation fear of quilting. I never believe that I can actually do it, and have it look good...which makes it hard to start. Regardless of my successes and years of practice, this fear is my nemesis. I confess that I was eventually able to start, and it was challenging, but it all worked out. I love the circular lines in the yellow section, and the contrast of the straight lines in the blue section. I also frequently annoy myself with the quilting design by coming up with something that requires a lot of stops and starts and thread tucking. But it all works out! And it was nice to try this on a small quilt because it was so much easier to push through the machine. It was also fun to finish something so quickly after years of making big pieces that take a lot longer. 

Sunday, June 23, 2024

Untitled, Part 6

Untitled, Part 6

Let the sewing begin!

First up, layering all the fabric with a backing and batting. These pieces will be seen from the front and a little bit from the back (or so I thought), so I picked matching solid colored fabrics for the backing. I think I used up ALL my blues, and had to buy some more! 

This effectively tripled the bulk of the project. Fortunately, I opted not to baste the layers.  The pieces are small enough that the quilting will be manageable without it.  I do not use an adhesive to baste.  These fabrics are being held in place by the friction of the fabric with the batting, and it works well enough. Finally, a small time saver for this extensive project!


The quilting part is a bit dull, and repetitive, but the lighting from the outside makes the texture look amazing.  And, I had two goals with the quilting.  The first is to add some texture to enhance the batik motif.  I don't want to distract from it. So, I chose a matching thread color.   The second goal is to add strength and stability to the little pieces.  In general, the denser the quilting the stiffer the quilt. 


These quilting lines are spaced about 1/16th of an inch.  Very close.  Also, lots and lots
of bobbins...

This page, I couldn't help but channel IKEA while quilting.  Hmmm....


The back of one of the pieces.

Thanks for following along! Progress is being made!

Friday, March 25, 2022

the Pouf

Form and Function (and pretty), the Pouf


I had a mess with these foam floor tile thingies that kept falling out of their storage spot.  Mostly it was just annoying.
And, it has been like this for a long time.  I recently had my front deck rebuilt and put in a new railing.  The new look had me inspired to use my deck differently.  I bought an outdoor rug from Target and then started shopping for poufs.  I already had the furniture I liked, but thought it needed something, just a little something to go with it. That's when I got the idea to solve two problems with one project.  
Not only does this spot look better now, but I can also move that thing around and use it for different tasks.  It is a great foot rest for when I am sitting and hand quilting.  It also works great to stand on to reach the high spots on my design wall.  AND, it looks fantastic outside on the deck (where it was designed to be used).  

The making of the pouf took me a long time, though it shouldn't have.  However, spring is happening here, and I have been spending many many hours every day outside, inspecting the new buds, trimming off the brown bits of plants, raking live oak tree leaves, transplanting, weeding, and spreading compost everywhere.  The garden is shaping up beautifully! And it lifts my soul to be working outside.  And then I am too tired to do anything else...which is okay, because there is no deadline for making a pouf!

The selection of fabrics and cutting went quickly. That lovely dark brown is such a nice contrast for the florals and pale blues.  And, it goes great with the new deck railing color!

Then came the quilting, which took longer. I decided to try different quilting ideas on the different sides, just for fun, and just for practice!


Then came the trimming to size, and since I was cutting through the quilting lines, I needed to zig-zag all the edges. 
For such a small project, it seemed to have a lot of surface area.  Here are the pieces stitched together before adding the zipper.
Yep, the zipper is really BIG!

The moment of truth, will all the foam floor tiles fit inside?
Yes, YES THEY DO!  The bag is a little loose, which makes it easy to put the floor tiles inside.  I think it would look better if I stitched those seams a little bit smaller, but it functions better with a little slack in it.  So, it will stay loose.  Also, when this thing gets dirty (and it will get dirty!), I can unzip, and toss it in the washing machine! YEASS!!
you can see the zipper on this side

the other side, with more colorful florals


Thanks for stopping by.  I can now return my attention back to quilting (well, and, um, the garden!)