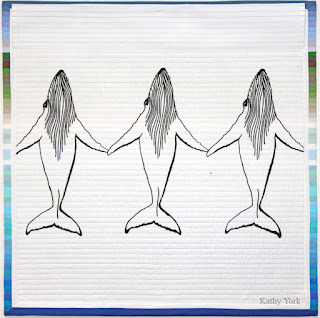
The Island
30" x 30"
This quilt is a reminder of where I grew up. Corpus Christ is on a bay which is protected by barrier islands and has a seaport with a ship channel that connects to the Intracoastal Canal and the Gulf of Mexico. We refer, affectionately, to the barrier islands as the 'island' or the 'beach'. And, I really love, love, love the beach!
The barrier islands also serve a very important ecological purpose. They protect the shoreline from big storms. They also provide a protected wetland for many plant and animal species including lots of birds. This is where they form a very protected and cherished place in my heart. I always thought I would want to live there, until I took a geology class. It seems very wasteful to build on a barrier island. They are not permanent and are constantly shifting. Not ideal, but humans live in NOW time, and geology is a much longer time perspective. The islands are also under constant attack by humans, from our waste, our concentrated industrial waste, and our constant desire to develop in such beautiful areas.
I made a smaller version of this quilt, Sea, Sand, Sky and I liked it so much, that I decided to try a bigger version of it.
1. I wanted it quilted, but with no quilting showing on the front.
2. And, I wanted to put something cool on the back (okay, this is not new for me!)
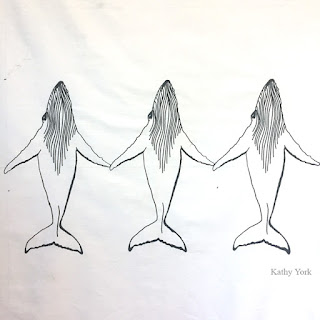
The main idea was to piece each strip by sewing the seam on top of the batting and backing. This will both piece the front while simultaneously quilt the back. This meant that before I even started sewing the top, I needed to have the back ready to go. Note: I was also working on an even bigger quilt with this color palette and had decided to do some screen printing for it. You may have seen some of my Instagram posts with the whales, turtles, crab, and the oil tanker? This new smaller quilt was the perfect size for 3 whales, so I printed it on a whole cloth:
I love the way it looks like they are holding "hands"!!!
Then I cut all of those strips. The width of each strip is 1/2" after sewing. I needed 1" strips slightly longer than 30" (to have extra to wrap to the back for the facing). And, it is easy to calculate how many, because....math! Sixty strips were needed, with the top and bottom ones slightly wider so that they too can be wrapped to the back. For a while, I had these up on my design wall, looking ever so lovely, but then I needed my design wall for something else, and needed to take the strips down. I wanted to keep them in the order that I planned to sew them. I came up with this, and it worked beautifully!
I layered them on the safety pin, one by one, and when I pulled them off, voila! They were still in the same order! Ha ha! Reminded me of geology and the Law of Superposition, which states that younger layers of rock sit on top of older layers. A perfect law for sedimentary rocks and sedentary work!My plan was to sew as you go, or maybe it is called quilt as you go? I don't think this idea is original, but it was new to me. After finishing the quilt, and deciding to blog about it, I decided to google it, and sure enough, there are a LOT of youtube videos on how to do this! For this project it was perfect, because the piecing IS the quilting. It will look simple and flat with no extra texture on the front, and yet it will still be quilted for stability of the piece.
I started with the backing and the batting. I decided to hand baste these two layers before stitching the strips in place.
With the basting complete, I added the first two strips of sky fabric, and then stitched it.
This is after opening the first seam and pressing. I also matched thread colors for piecing because I wanted the different colors to refer to the colors on the front for the back side with the whales.
As I made progress, I started to notice that there was some slippage. It was getting increasingly hard to sew precisely on top of this spongy batting sandwich. Arghhh! My solution was to press the next strip in place, then pin it. I next turned the entire thing over, drew stitching lines lightly in pencil with a long rotary cutting ruler, and stitched on the back side.
There was not a lot of room for the pins with such narrow strips, but there was enough. This shows the pins and the stitching. Here's a photo from the back side:
I find it interesting that even the simplest ideas require practice and problem solving. I also found that changing the thread colors 60 times did not make much difference at all on the back side (see below). It is so subtle that I question if it was worth doing. You might notice it if you stand really close and put your glasses on! Otherwise, it was a bit of a bust. Ultimately, the back looks quilted (because it is), and the front does not (even though it also is). I really like how this turned out. Last steps are the finishing, facing the edges and adding a hanging sleeve.
Since the back was white, I used a very small white strip to face it. Because some of the front flips to the back, it makes a really nice graduated color frame around the whales.
Here is the back completed:
This shows the back with the hanging tube on it at the top. The hanging tube was top-stitched with corresponding 9 different colors so that it blends it and does not distract from the imagery.
I like the richness of the colors on this quilt and currently have it hanging in my living room. It will be nice to enjoy it in it's new space before entering it into an exhibit. If it gets in, I will be happy that it gets to be seen in real life and hopefully inspire or connect with others in a way that is qualitatively different than seeing it on-line. If it does not get in, I will get to enjoy it longer. One of the perks of spending the time and effort to make it! :) Cheers and happy sewing!


7 comments:
I love this!!! I appreciate the geology and geography lesson included!!! I know about Corpus Christie but, not much. (Only one trip to Texas - Dallas) I appreciated your determination to “make it work” and your solution. The hand basting on back and batting. So smart. It is gorgeous!
Thank you! So glad this appealed to you. It can be frustrating when things don't work the first time. I like to take a break and re-think. Lucky for me, it worked this time! :)
I love this quilt so much! Thanks for sharing every detail. I love seeing how you work.
Thanks so much Lisa!
Finally got a chance to catch up on your blog posts. Absolutely LOVE this piece! Your attention to detail and the accompanying descriptions with your process info is a joy. Thanks once again!
Actually it didn't catch my name, so I'm not anonymous - it's me - Susan Fletcher King!
Hi Susan Fletcher King! So nice to see you here!! Thanks for the comments, and especially the super nice one about my work! and you are welcome!
Post a Comment