Wednesday, June 30, 2021

Log Cabin two-sided block

Log Cabin two-sided block


After making The Island, I decided to experiment with construction a two sided block with different designs on both sides, and yet both pieced.  I have seen this done at a masterful level by Emiko Toda Loeb.  I first saw her quilts at the International Quilt Festival many years ago. Her work has different designs on the front and the back, both constructed with a log cabin process.  They are amazing and wonderful! Please follow the link above if you would like to be delighted and inspired!

At some point, I saw a youtube video showing how she does it.  I don't remember if I used her technique exactly, but I got the broad strokes.  I started grabbing strips of fabric that had been left over from previous projects, with little regard to the color palette.  (Sorry about that!) I mostly wanted to try this technique.  It works! And like all good things, it requires some patience and practice.  I have been sewing long enough to realize when things are not going well, it is best to rip out a bit, and reconsider my process. For mine, I needed pins from the front, and then pins on the back to hold the thing together while stitching. 

I had so much fun with this little experiment, I forgot to take process photos, which I normally do just to help my memory.  I am not sure I would make an entire quilt like this, but I do like how nicely it turned out.  It has the same quality of being quilted at the same time it is constructed or pieced. 


I had planned to make a series of these and practice sewing the blocks together, but I lost interest after doing the first block. I was thinking it would be a great summer project, because you could quilt the blocks before joining them.  I was thinking some hand stitching would look good! Then you would not be baking under a large quilt while quilting.  

The only thing left was to finish it up.  Instead of choosing a binding or a facing, I just trimmed the batting and tucked the edges inside.  This is called a knife edge finish. 

Now it is complete and about the size of a good mug rug!


Wednesday, June 23, 2021

The Island

The Island
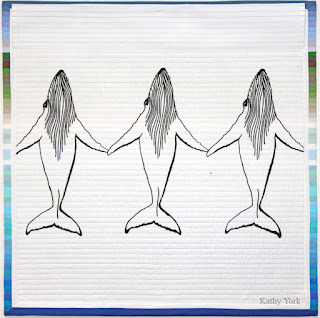
30" x 30"


This quilt is a reminder of where I grew up.  Corpus Christ is on a bay which is protected by barrier islands and has a seaport with a ship channel that connects to the Intracoastal Canal and the Gulf of Mexico.  We refer, affectionately, to the barrier islands as the 'island' or the 'beach'. And, I really love, love, love the beach! 

The barrier islands also serve a very important ecological purpose.  They protect the shoreline from big storms.  They also provide a protected wetland for many plant and animal species including lots of birds. This is where they form a very protected and cherished place in my heart. I always thought I would want to live there, until I took a geology class.  It seems very wasteful to build on a barrier island.  They are not permanent and are constantly shifting.  Not ideal, but humans live in NOW time, and geology is a much longer time perspective. The islands are also under constant attack by humans, from our waste, our concentrated industrial waste, and our constant desire to develop in such beautiful areas. 

I made a smaller version of this quilt, Sea, Sand, Sky and I liked it so much, that I decided to try a bigger version of it. 
1. I wanted it quilted, but with no quilting showing on the front.
2. And, I wanted to put something cool on the back (okay, this is not new for me!)

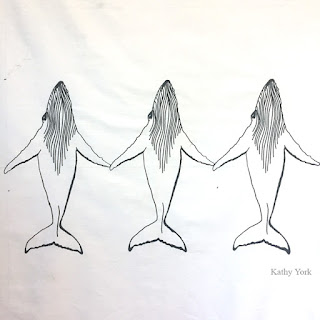
The main idea was to piece each strip by sewing the seam on top of the batting and backing. This will both piece the front while simultaneously quilt the back. This meant that before I even started sewing the top, I needed to have the back ready to go. Note: I was also working on an even bigger quilt with this color palette and had decided to do some screen printing for it.  You may have seen some of my Instagram posts with the whales, turtles, crab, and the oil tanker? This new smaller quilt was the perfect size for 3 whales, so I printed it on a whole cloth:

I love the way it looks like they are holding "hands"!!!

Then I cut all of those strips. The width of each strip is 1/2" after sewing. I needed 1" strips slightly longer than 30" (to have extra to wrap to the back for the facing). And, it is easy to calculate how many, because....math! Sixty strips were needed, with the top and bottom ones slightly wider so that they too can be wrapped to the back. For a while, I had these up on my design wall, looking ever so lovely, but then I needed my design wall for something else, and needed to take the strips down. I wanted to keep them in the order that I planned to sew them. I came up with this, and it worked beautifully!
I layered them on the safety pin, one by one, and when I pulled them off, voila! They were still in the same order! Ha ha! Reminded me of geology and the Law of Superposition, which states that younger layers of rock sit on top of older layers.  A perfect law for sedimentary rocks and sedentary work!

My plan was to sew as you go, or maybe it is called quilt as you go?  I don't think this idea is original, but it was new to me.  After finishing the quilt, and deciding to blog about it, I decided to google it, and sure enough, there are a LOT of youtube videos on how to do this! For this project it was perfect, because the piecing IS the quilting.  It will look simple and flat with no extra texture on the front, and yet it will still be quilted for stability of the piece. 

I started with the backing and the batting. I decided to hand baste these two layers before stitching the strips in place. 

With the basting complete, I added the first two strips of sky fabric, and then stitched it.
This is after opening the first seam and pressing. I also matched thread colors for piecing because I wanted the different colors to refer to the colors on the front for the back side with the whales. 

As I made progress, I started to notice that there was some slippage.  It was getting increasingly hard to sew precisely on top of this spongy batting sandwich. Arghhh! My solution was to press the next strip in place, then pin it.  I next turned the entire thing over, drew stitching lines lightly in pencil with a long rotary cutting ruler, and stitched on the back side.

There was not a lot of room for the pins with such narrow strips, but there was enough. This shows the pins and the stitching.  Here's a photo from the back side:
I find it interesting that even the simplest ideas require practice and problem solving.  I also found that changing the thread colors 60 times did not make much difference at all on the back side (see below).  It is so subtle that I question if it was worth doing.  You might notice it if you stand really close and put your glasses on! Otherwise, it was a bit of a bust.  Ultimately, the back looks quilted (because it is), and the front does not (even though it also is).  I really like how this turned out. 

Last steps are the finishing, facing the edges and adding a hanging sleeve.
Since the back was white, I used a very small white strip to face it.  Because some of the front flips to the back, it makes a really nice graduated color frame around the whales.  
Here is the back completed:

This shows the back with the hanging tube on it at the top.  The hanging tube was top-stitched with corresponding 9 different colors so that it blends it and does not distract from the imagery.  

I like the richness of the colors on this quilt and currently have it hanging in my living room.  It will be nice to enjoy it in it's new space before entering it into an exhibit.  If it gets in, I will be happy that it gets to be seen in real life and hopefully inspire or connect with others in a way that is qualitatively different than seeing it on-line. If it does not get in, I will get to enjoy it longer.  One of the perks of spending the time and effort to make it! :)  Cheers and happy sewing!

Wednesday, June 16, 2021

Caterpillars/Butterflies

Caterpillars/Butterflies
64" x 62"

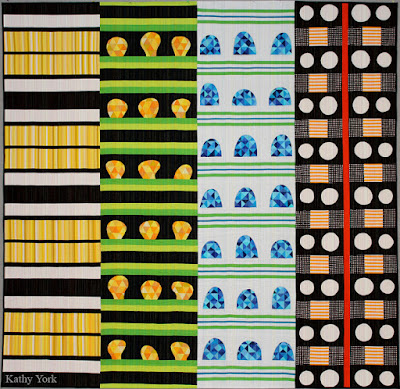
Whoot hoo!  Finally finished with this one! 
Caterpillar side:

Butterfly side:

This quilt for me is all about the similarities and differences between the four panels.  They each have things in common with each other, but also differences.  And, from my previous post... I love the way the tops of the butterfly panels flow together in a continuous arc.  It is a metaphor for the differences in individuals and yet they all belong to the same family or community. It is a feeling of belonging, like a safety net, or a protective arc, like an umbrella, helping us weather the storm.

You may notice that the white fabric on the back looks a bit less than white? Each panel has a slight color cast because there are so very many threads of different colors used for the quilting.

Quilting:
Even though I pin basted the quilt, I wanted absolutely no shifting between the layers.  I started in the middle and worked my way out by removing the pins, and replacing with hand basting every 2 inches or so.  Then I filled in with some machine quilting.  Then I went back in for the close spaced machine quilted lines.

You can see the front (the green and orange), with the rolled up section of the back (the blue butterfly).

The caterpillar side of the blue panel with all the quilting lines going through the tiny pieced "humps".

The same section of the quilt from the butterfly side showing the quilting lines and thread colors
Quilt Textures:
You may remember from the previous post, my concerns about doing this matchstick densely spaced quilting over all the tiny pieces sections with lots of seam bulk? Well, I opted to put in the carefully trimmed batting.  In some sections, I even put in the extra batting just to add another element of texture design.  It is kind of cool how the circles show up on the other side, just from the extra individual circles of batting that are inside the quilt, and how they allude to the design on the opposite side of the quilt.

This side is the caterpillar side.  I inserted a circle of batting under the white circle.

This is the butterfly side of the same panel.  Can you see the evidence of the extra circle shaped batting?
It is a subtle effect but really quite interesting!

Two-sided binding:
The very top photos show the quilt photographed on a grey back board.  If you look closely, you can see that the binding does not distract from the design.  I pieced it to match the different colored sections, and I made it two-sided.  That way, it could be white on one side of the quilt, and black on the other.  This required a "knife-edge" binding, which was not at all easy.


Also, on the butterfly side of the quilt, I tried to match the black binding to the section of the wings that were going off the edge of the quilt.  I made a design decision to just use a solid black, even though there were more colors on the edge. 

Hanging tube:
The quilt was so heavily quilted, that a simple white tube (the same color as the background fabric), would have stuck out and not blended in. I made the painstaking decision to top stitch the tube with all the same colors.  Yeah, I did that!

One color at a time, I went down the tube and traced where it should go. This is the mostly empty sleeve on top of the back of the quilt.
Nearly there, I am almost finished with this blue section and ready to move on to the warmer section on the right.
Here is the tube sewn with a tuck and pinned to the back.
The photo of the butterfly side of the quilt at the top has the hanging sleeve already sewn on it.  Can't see it? Yep, that was the point!  Success!!!

Wednesday, June 09, 2021

Quilting over seam allowances

Quilting over seam allowances

My most recent finish was a two-sided quilt, and the front side has some tiny piecing on it, which makes for some hefty seam allowance bulk for my consideration. Just recently I heard about hump jumpers. (You can google it to find places to buy one or see youtube videos on how to use them.)

Perhaps you have experienced the really bad tension problems that result from sewing over a bulky seam? The reason for the biggish loops of thread that appear on the back side is that your walking foot is not level while sewing over them. As it approaches the thick stack of seam allowances, the front of the foot tilts up. As you sew over and exit the thick stack, the front of the foot tilts down.  I don't know why that should matter, but it does. The hump jumper is meant to place under your sewing machine foot, first in the back, then take a few stitches, and then move it to the front....all in an effort to keep your sewing machine foot level while going over the changes in thickness. This sounds fine and reasonable to me, with the exception that there are just so many changes in thickness as I sew across a section of tiny piecing. It would require so many stops and moving of that hump jumper, that I would NEVER make it across an entire seam, much less hundreds of lines of stitching. 

My quilt required great precision on both sides though, because it is two-sided, so I had to do solve the dilemma. That's when my mind thought up this crazy scheme. I tried it out on a practice sample first.

I decided to use batting as a way to build up an extra layer of thickness near the bulkiest seams, in an effort to keep the walking foot slightly more level as it goes over. I put a piece of batting on the back side of the sections with tiny piecing. Then I cut a circle around the most extensive bulky seams, for each seam. 

I pinned the Swiss cheese looking batting in place (which will be basted if I decide to use this technique). Then I added a second layer of a full batting, and then sandwiched the entire thing together with top, the two batting layers and the back, held by more pins. 

Then I went crazy with the matchstick quilting. 
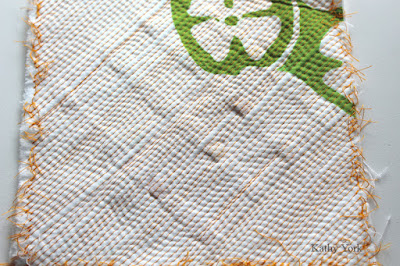
For convenience, I opted for one color of thread for the experiment. I was surprised how this much  orange thread changes the appearance of the white fabric. Regardless, I was very satisfied with the performance of the process. There was also an unexpected "gift" in this process. Either the cut out holes or the bulky seams left a vague texture that can be seen on the back. 
My mind reels with possibilities of how to use this in the future! And, this little sample was successful enough to give me confidence to move on the machine quilting of my Caterpillar quilt.  

Wednesday, June 02, 2021

Life imitating art?

Life imitating art?


I just saw this on Facebook (okay, with my scheduled posts, that was probably a weeks ago!), but it so closely resembles my art, that I found it a bit uncanny.  And, the truth is that this type of urban development is not new.  My work was based on Central Park in NYC.  Still, I like that developers are considering open space and recreational activities for residents. 

It reminds me of this quilt (Central Park), made in 2010. You can read more about it here.

They look remarkably similar, yes? Amazing!!