Sunday, September 15, 2024

The Outtakes, fabric waste

The Outtakes, fabric waste

Regarding, Where the Walls Have Eyes, I think I have mentioned before how BIG a project this was. It also created a lot of waste..I made the following videos of the piles of "leftovers" from the project. 

Here are the cutouts from making the eyes...

And here are the quilt sandwich circle cutouts from quilted blocks...
 

And last, the quilted pieces that were trimmed off all 4 sides of each block...


Sunday, September 08, 2024

Where the Walls Have Eyes, Part 14

Where the Walls Have Eyes, Part 14
21" x 21" x 21"

Sometimes, when I get to a certain stage of making a quilt, the work speeds up for me, in eager anticipation of the finish. This was not one of those kind of projects. I had to deliberately work slowly so as not to tax my hands.

And then there were the unintentional delays.  The six stranded floss, at the point where it goes through the eye of the needle, becomes 12 strands. It is hard to push through the little quilted blocks, and much harder when there are also fused eyes to contend with.  Sometimes I would just yank it and accidentally peal off the fused eye. Rats!  I tried using a tiny miniature iron, I think it is called a Clove iron?, but I would over focus on the eye and the quilt, and not pay attention to where my fingers were, resulting in numerous clumsy burns. 
So, I opted for fabric glue, and clothespins and waited for the glue to dry. 
I also found that certain parts of the project were hard to reach at times.  The more I added, the taller it got. At one point, I had to switch from my table to a (closer to the floor) coffee table.  But then THAT was too low. 
My favorite seams were on the sides of the cube, because there are only 2 quilt pieces to join.  Very easy!
Here's what that stitch looks like from the inside.  You can also see me burying the thread end after taking 2 very tiny stitches in the end.  

Here is a sample below of sewing 3 pieces in one seam.  In this view you can only see 2 of the pieces.  The third piece is underneath, out of sight, until you flip this around.
Here's what it looks like to sew a seam with 4 little quilts in one seam. URGHH!
Just for a little trivia, I did not use any knots in the hand sewing seams.  I made a couple of very tiny stitches on the inside and then just proceeded forward.

I only used 2 hand stitching needles for the entire project.  This is the first one, after it broke.
Here is a photo of the inside at the part where it was time to use the little lime green squares! Ah YEASS!
And, here is the part where I got to add the little yellow squares.  Predictable, you can probably guess where this single yellow cube is.  Which is good, because once the cube is completely sewn, it is too dark to look inside to find it.
It is getting taller and heavier now. A view from inside the studio.   Ironically, the quilt on the wall is called Windows...
About half way through, I started arranging the 'ceiling' layers on my design wall.  It made it easier to keep up with the internal color patterning inside the cube. 
I never got tired looking through the holes to see the view. 

Getting very close to finishing.  This is the very last and top layer to add! Never thought I would see the day!!
The final project. I am not sure this view entirely captures how wonderful this is to experience in real life. So, I hope the process photos have help expand your imagination. The colors in real life are also pretty vibrant! 
As for the meaning behind this project, I have hidden some little trinkets inside the cube that are attached in a way that you cannot see them by looking through the holes.  I tried very hard unsuccessfully, and I KNEW where they were.  You could upgrade your "looking abilities" by investing in some technology, like a snake camera (which I did), and be able to see the hidden trinkets. It is possible to find them this way. And, it serves as a perfect metaphor for hackers upping THEIR game to steal YOUR privacy. 

Ta da! It really worked.  All those layers and it held up and did not collapse! 

And, for inquiring minds.  This build has 73.5 square feet of surface area.  That is equivalent to 102 in x 102 in quilt. And, all of these little pieces are essentially two-sided, so imagine twice the surface area!!
Compared to the flat version of the project (you can see here), it is even larger than THAT!

Monday, September 02, 2024

Where the Walls Have Eyes, Part 13

Where the Walls Have Eyes, Part 13

This part took so long to complete! Wahhhh! I took hundreds of photos along the way, and it has taken me a while to narrow it down a bit.  And, it is still too many photos for one post, so I will be making two posts about the building.

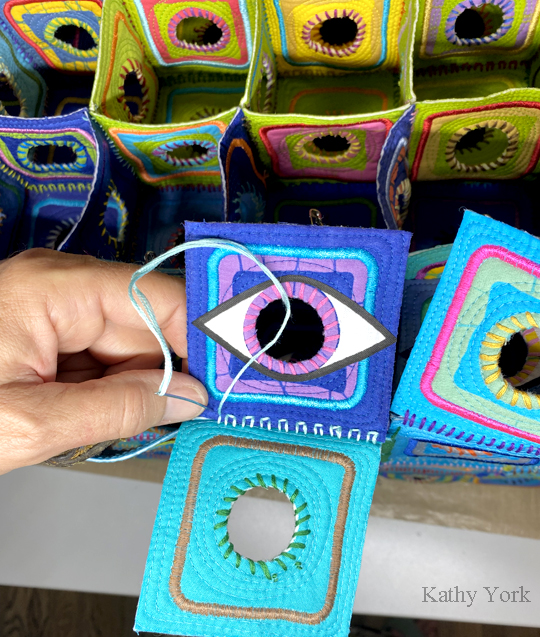
It is all hand sewn, like the prototype. Every seam is a different color.  Some of the seams have 2 squares, some have 3, and some have 4.  As expected the ones with 4 pieces being combined in a single seam were the most difficult physically.  I am pushing a needle through 4 quilted pieces while it is threaded with 6 strands of embroidery floss. Chonky! 
And, trying to remember the orientation of the thing while it is rotated many times during stitching. I selected one face (the front), and put a safety pin in it, to ease my confusion. There are also a number of different color patterns INSIDE the cube, that were a bit cumbersome to remember. 
The first row is completed, and now I move on to those even more tricky seams with 4 pieces at a time. After the first one, I wanted to quit! 

I am starting to get the hang of it! More rows on the first layer! I am also learning that the hand sewing is very stressful to my hands. And it tweaks my tendons, so I started doing hand therapy and getting out the forceps to pull the needle most of the time.

But, I did not. Breaks and rest time are a crucial part of this project! Here is the complete first layer. Every little interior cube will have 4 walls, a floor and a ceiling. The little interior cubes will share their walls, and floors and ceilings with adjoining little cubes. The beautiful colors and threads kept me going!
My stash of embroidery floss.  I had no idea when I started how much thread I would need.  I ended up shopping for more thread about 4 times throughout the project. 
I also changed the color scheme before I started. I liked the aqua blue so much better than the navy blues, that I opted to have all the external sides the brighter and lighter blue. I worked out the math because the entire structure was envisioned with a different set of colors, which were made to order. And, with a few modifications, I was able to make the change. I am so glad I did. I absolutely LOVE the aqua color on the outside.  

I also preplanned the layout of the external sides, to make sure that I was able to both have enough pieces, and that I could arrange those pieces in a pleasing layout.
You can see some of the missing pieces above, which shows how far along I was when I took this photo! 
On to the next level!
And flipped over...
And looking through some holes...

These process photos of looking in the holes before the 'ceilings' are sewn on, have an abundance of light, which really shows off the wonderful colors.  Once the ceilings are sewn on, this beautiful view gets lost, or maybe I should say, goes private? 

Stay tuned. I will post the rest of the process photos and the final project next week. Nearly there!