Tuesday, August 23, 2016

The Flying Geese Quilt

The Flying Geese Quilt
48" x 64"
This one began with a community service project for the Austin Modern Quilt Guild.  We were asked to make flying geese blocks of any color and donate them.  So, I made some that looked like this: (and donated them)
I had fun making these because they just seem to FLY together (ha! ha!). And that's when I remembered that my old lap quilt made from my very first quilting class was falling apart. 
And, I thought I solved that problem when I made this quilt:
i Quilt
...but the i Quilt went on to bigger and better things, and it is still out on exhibit (Houston QuiltFestival), and I am still cuddling with the worn out thread bare quilt....but I digress. I thought I could whip up the flying geese pattern in no time at all.  I should stop myself right here because quilts don't "whip up" in no time at all.  There is a LOT of work to make a quilt, a lot of decision making, a lot of cutting, and sewing, basting, quilting, and binding.  Every single step takes a lot of time!  But, I like spending my time this way, so I set about to make myself a new lap quilt, for you know, napping between quilt making sessions.  :)
So, I selected a color palette and used fabrics from my stash to make some blocks for my quilt.
Yep!  I like this one.  And when the top was finished, I needed a back and was lacking (once again) enough fabric of just one kind to put on the back, so I pieced another back to make another two sided quilt:
I liked the big scale fabrics and the big scale design.  Fun and fast! (or rather, faster!).  Then I started quilting, 1/4" because it looks good, and what I didn't know at the time was,
that the dense quilting lines, and the small stitch size, and possibly the tension on my machine, made the quilt blocks get distorted.  This quilt was quilted on my Juki Virtuoso Pro with free motion quilting, no walking foot.  I thought it would make a nice practice piece for getting re-acquainted with my giant quilting machine (and it did), but I was honestly surprised at the distortion.  And, my fall back, washing the quilt, or getting it wet, and blocking it did not work.  The quilting lines were so dense and tight that they allowed for absolutely no reshaping or blocking into the correct shape.  It was disappointing that after piecing everything straight, the machine quilting had warped it.  So, I am glad that I have learned something from this experience on a quilt that was not intended to go to the show.  It will be loved and used until it is thread bare.  The colors make me happy!


Wednesday, August 17, 2016

Blue Plus

Blue Plus
95" x 95"
Blue Plus
I was inspired to make this quilt after making this one back in 2012:
Gift
Gift (or here) was made by folding squares of fabric and dipping the folded edges in melted wax (batik), then discharging out the original color, and overdyeing with a new color.  After boiling out the wax, the big squares were sewn together.  I wanted to know how this simple motif would transfer to a quilt that was completely pieced from solids with no batik, no discharge, and no dyeing. (If you click the previous links you will see some other color palettes I designed with Photoshop with this idea.)
However, I didn't have a stash of any significance of solids, but I did have the 100 yard roll of white fabric (waiting to be dyed).  So this definitely counts as a stashbuster because I am using fabric that I already have! I tore off 12 panels (each about 19" wide to allow for shrinkage).  This would give me three 18" squares from each panel (the fabric was 59" wide) for a total of 36 blocks (aka, big enough for a king sized bed). I picked this size for the blocks because it would work with fat quarters too.  And then I decided on a quieter color palette, because honestly, the quilt, Gift, is just about as bright as you can get and can be a bit overwhelming in a small room!
Here they are being rinsed on our zip line.  Just love the perspective view!
After washing and drying and ironing, I cut the fabric into 18" blocks.  Then I trimmed off two strips (2.5" wide), one from the side (this will be the long strip), and one from the top (this will be the shorter strip). I set the strips aside and tossed the blocks up on the design wall:
And because there are 3 of each color, the design is easily balanced by this rather random arrangement.  Sorry for the bad lighting here, truly a snapshot if I ever saw one!
Next, I tossed up the strips by selecting strips that were different colors that the background.  I was looking for contrast, which was not easy in this pale landscape.
Once again, bad lighting, but you get the idea.  I also decided at this point to make the plus motif a big wonky by offsetting the piecing a bit.
Next up, the cutting and sewing of the blocks.  I cut each block horizontally about half way or slightly less or more, and then stitched the short contrasting strip to both of the cut sides.  Then I cut each block vertically, once again, about half way, and then stitched the long strip to both cut sides.  After all the blocks are sewn together to complete the quilt top, the blocks have a finished sized of about 16". 
One thing that I noticed after completing this quilt was that I liked the way the blocks looked before piecing.  This is because the scale looks different, the plus motif is wider compared to the block after piecing.  I like the wider better.
LEFT, unpieced layout: RIGHT, after piecing together all the blocks
Next time! Also for next time (if there is a next time),  I maximized the size of the quilt by keeping all the cuts very straight and perpendicular.  I seriously think it would have been worth it to make the blocks with more wonky angles and trade off for smaller blocks.  Plus, the quilting....quilting giant monoliths on a home machine is just very hard work.  It makes your shoulders and back bark like a rabid dog (truth, I've never seen a rabid dog....do they even bark?)
The machine quilting:  I did not want to do 1/4" quilting like I did on Gift.  This one "needed" it's own unique quilting lines!  I decided to make 1" quilting lines inside a giant ring of quilting lines and then quilt 1" lines again in the other orientation on the outside of the circular ring.  Don't ask me why, it's just what happened, but I LOVE the way it looks:
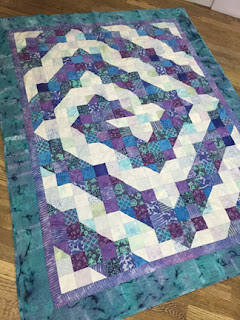
And if you are wondering about what I put on the back?  I purchased a solid blue fabric.  Sigh....seriously not up to my demanding standards!! Ha! And to answer my original question, this quilt has a lot going for it, but I really prefer the batiked squares more. That was a lot of work to answer a simple question.



Sunday, August 14, 2016

V is for Victory

V is for Victory
49" x 61"
This lovely bright and fun quilt was a challenge from the Austin Modern Quilt Guild.  The challenge was to get a surprise "funky" fabric and make something cool from it.  To compete for a small motivational prize, the quilt has to be completed, which includes quilting, the binding, and the Austin MQG label on the back.  We were also supposed to keep our project a secret, presumably to make the voting fair.  So, our funky fabric arrived in a small brown paper sack, with a secret number, instructions and the little label.

Well, the cat is out of the bag for me.  I am not really motivated by winning a prize.  I like the challenge.  I like making quilts.  And I like that this quilt will be given to a child.  I also think that by sharing our progress along the way, we have an opportunity to inspire others.  Why keep that a secret? ...even for a few months?

So I started with this fabric:
small scale multicolored floral - the challenge fabric cut into 2" squares
It is not particulary funky or ugly, but it isn't anything I would ever buy.  I do like florals, but more so of the Marimekko variety:
tote I made from Marimekko fabric, YES, floral, large scale, very graphic....LOVE!
The challenge fabric has a lot of colors in it, but the main three were red, blue, and yellow.  That is not my normal palette, and as I struggled with what to do with this, I tried several things.
1.  I tried pairing it with reds, yellows, and blues.
2.  I thought if I cut it small enough, like the 2" squares above, I could blend it in with other things.

Ultimately, I decided that the 2" squares were making unnecessary work for myself.  I wanted to work bigger and make a bigger quilt than the required minimum.  So, I went with stripes.  I learned that putting pretty and bold fabrics next to the challenge fabric had the unexpected result of making the challenge fabric a neutral!  Who would of thought?  I think it works because the scale of the floral is so small.  It is the only fabric that I used multiple times in the quilt (about 6 times), you don't see IT when you look at the quilt.  You see mostly the bright bigger scale fabrics.
I also listened to my heart and tossed out the fabrics I paired with this that were causing me distress.  I had some lovely blues and purples that honestly just didn't work regardless of the "thinking" that thought they "should". Just let it go.  I am delighted with the results.  I learned a lot with this project.

The back:
I wanted a back that would go with the quilting lines that I intended to put on the front, and so I opted for giant half square triangles.  I think these are about 17" blocks.  And the fabrics are fun!  I used at least one Malka Dubrawsky (my batik teacher from long ago), a few from my only fabric line (Urban Landscapes) with Clothworks, and a bunch of new fabrics I got from STOF when I made a quilt for them, and a few other prints and batiks that I had in my stash.  A great combination! And functionally, this lovely charity quilt is now two sided!
Here are a few shots of the two sided quilted pillows I made a few months ago from the same STOF fabrics (the circles, and the stripes).  They go great with my green IKEA sofa and pink Owl IKEA pillow!


Monday, August 08, 2016

Five

Five
18" x 26"

This is a little quilt I made for a special art quilt exhibit honoring Yvonne Porcella:  “Quilting in the Garden” at Alden Lane Nursery in Livermore, CA, September 24-25, 2016, curated by Pokey Bolton.

I wanted to make a quilt that blends my voice with Yvonne’s to show respect for her inspiration and influence. Our kitten (aka, Mr. Innocent) is going fishing in room filled with references to Yvonne, including the number 5, which plays into the humor of the moment. I also wanted a special candle to show that even though she is not here, her light continues to shine bright!
I just recently learned that Yvonne started SAQA. I am in awe of the leadership and vision that Yvonne had for creating an organization that promotes quilts as art. I am a long time member of SAQA. And because of her vision and hard work, I am happy to have my art quilts hanging in almost 30 different venues in a total of 8 different exhibits. That never would have happened without her.

I also had the honor of having my work hang with Yvonne’s in a number of exhibits including the Dinner@Eight exhibits in Houston, Long Beach, and Chicago. I am so sad that I missed meeting her in person. She was truly a gift to our quilting community and she will be missed.

I thought it would also be interesting to show you one of my very early quilts, back when I used exclusively patchwork to build a quilt top and hand quilting to quilt it.
Mikey Likes It

one of the many fun fabrics used for the center, and close up of the hand quilting
hand quilting in the border, this was the duck pond close to our house

And, I didn't buy enough of my favorite theme fabric (a bright yellow fabric with vehicles on it) to use on the back, so I decided to piece together something fun and that's when I decided it would be interesting to use Yvonne's colorblock style and checkerboard style on the back.

Here's a close up:
I fussy cut out all these vehicles from the fabric mentioned before, and fused them on.  I used invisible thread to zig-zag around the edges.  I like the composition a lot. And it is super soft from years of use. There are a few places where the quilting thread has broken, and the binding is starting to fail, but those are things that can still be repaired.  It is sentimental to see this quilt again because my son is all grown up.  How did that happen so fast?

Friday, August 05, 2016

Cover Girl!

Cover Girl!

I am so pleased to have my quilt, One Earth, chosen for the cover of Machine Quilting Unlimited for the months of July and August!!  It has been a long time since I have been in the quilting magazines, mostly my own fault because I almost never submit anything.  For those few publishers who find me and seek me out, I usually agree, but I wasn't expecting the cover!  Very cool!

There is also a fantastic article (if I do say so myself!) about my work, and a lot of photos.  I find it extremely gratifying to have my work in this beautiful quilting magazine, and they got all the colors right!  My quilts from this time period were a bit on the bright side, and it is hard to do them justice in print media or on computer screens, but these folks got it right!  Kudos!

Here are some shots of my work.  If you want to read the article, you will have to buy a copy!