Monday, January 23, 2012

Morning Commute with Sweet Jane

Morning Commute with Sweet Jane
24" x 60"

I was inspired to create this quilt by my morning drive with my daughter to school.  She is a transfer student, and it's a bit of a drive for us.  At first, we used to go on the highway.  Then I discovered the "back route" on a particularly heavy traffic morning, and since then, it has become the preferred route.  It is not a quick route, but it is scenic and calm.  A perfect start to our mornings together, and one of my favorite shared times with her.

So as the image crept into my mind, I didn't know how to represent it.  So many choices!  Then I saw this blog post by Deidre Adams, Evolution of a Commission (be sure to look at all 6 parts!).  I love her work!  It is so viscerally appealing.  I wanted to give her process a try to see what would happen.  I was a bit nervous to start.  I didn't want my work to look too much like hers if I used her techniques (Ha!  not to worry!!).  It turns out that my voice over-rides the process.  My way of thinking and expressing is just much more....concrete maybe? or discrete, in terms of obvious objects....


Let's start with the car.  I drew it on Photoshop first.  Eventually, I painted some fabric with white paint.  Then I traced my image from the Photoshop print out with a Sharpie pen.  Then I put more white paint on top of that.  It sandwiched the Sharpie ink between layers of paint, and then the line I made was also less obvious, and acted more as a guide for subsequent painting.  And, then I painted it, and used it as a block in the construction of the quilt top.

I chose fabrics that were already the color palette I was aiming for.  The next step was sandwiching the quilt layers, and then massive machine quilting.  I really thought I could quilt it in a day, but it took 3 long days to quilt.
quilting as seen from the back
 The next step was the scary one....covering the entire quilt with white paint.  I wanted to keep the white paint a little transparent so that the background fabrics would show through a bit (okay, I got carried away with painting all the layers, and almost all of the lovely background fabric disappeared....not what I anticipated...).

So, I added several layers of white acrylic paint.  It was harder to apply than I thought it would be, and eventually, I just started pouring it on the quilt top.  Did I mention that I was nervous about this step?
I was still working out the design, as it needed the deer.  I decided to screen print them, directly onto the quilted surface.  Okay, that didn't work either.  Plan B....Print the deer separately on some cloth.

These were later cut apart, and fused to the quilt surface.  It was nice because I got to move them around a bit before deciding their placements.  Then I painted over them.  Here is another process shot with a few details.  I love the way the paint makes the surface texture just pop!
 The last step was adding the words.  On the way to school we typically count the deer.  If it is a low deer count morning, we will practice spelling, or math.  I had wanted to incorporate this in the quilt, but I didn't quite know how to.  My experience of screen printing on the quilted surface didn't go so well, so I was a bit nervous about trying to write on it.  I gathered my wits and a white Sharpie pen.  It worked beautifully!

  I added letters with dots between them to indicate the spelling.  And the words I chose were real spelling words, but also words signifcant and representative of my daughter and her experience at school.  This is a  meaningful quilt for me because my daughter is finishing up her last year at this school.  Next year she will be closer, and will take the bus to school.  I will miss our morning drives together!  but it already has me thinking...what new rituals will replace this one to celebrate our time together?

Tuesday, January 10, 2012

Urban Daisy

Urban Daisy
92" x 92"

Is this a modern quilt?  I'm not good at categories, but I can say that I love the way this one came out.  This quilt was made from the leftovers of my batik test from fabric testing.  It is so warm and cheerful and bright and BIG!  It lights up my room!  I look forward to quilting it, but for now, I am taking it down to work on a few other, smaller projects.  My goal for this one is to have it quilted in time to enter IQA's new exhibit The Modern Quilt Guild Showcase.

Now, back to work....

Friday, January 06, 2012

Calculating Costs

Calculating Costs

In my last post I talked about my fabric swatch tests, the dye test and the batik test.  Today I want to talk about cost comparison.  Ultimately, I will want to choose the fabric that works best for my needs, but if I can choose the least expensive, I will.  
Each of my fabric samples had different widths.  This is important because if you buy a yard of fabric that is 108" wide compared to 42" wide, you will get 3 times more fabric with the first one per yard purchased.  Is it 3 times more expensive?  Or is it cheaper??  Good question!  To be able to compare the prices I calculate the price per square foot.  See the following for an example:
The taxes are usually paid for local purchases.  The shipping costs are for the on-line orders.  It could make a difference in your decision. I like buying local, and I like the immediacy of it's availability....assuming someone local has what I want. Another factor to check... sometimes when you buy 10 yards or more, you will get a better price.  And sometimes, if you buy 100 yards, the price gets even better!  Perhaps you could consider going in with a few friends?

Caveat...Shrinkage....I did not measure shrinkage in my testing or my calculations. It is usually a small factor, from 1 - 10%.  It might be a good idea to check it for any new fabric samples before ordering a big batch. Measure the fabric swatch before washing and after.  Get a ratio of the two measurements and compare across all your samples.

Now, since I have already calculated the prices for my samples, I will share them with you.  They do not include shipping, taxes, or shrinkage. (Sorry, wish I knew how to format this into a table...)

Kaufman pimatex (not PFD) = $0.75/square foot
Testfabrics, 419W = $0.41/square foot
JoAnns Legacy Muslin = $0.37/square foot
Dharma  MCCB Cotton Broadcloth, 59" = $0.59/square foot
Dharma CCL Cotton Lawn = $0.49/square foot
Dharma SWCB60 Cotton Broadcloth = $0.39/square foot
Dharma PTC45 Pimatex PFD = $0.60/square foot

So which was my favorite?
Well, the JoAnns was the least expensive, did well in the dye test but failed the batik test.  I will definitely buy some and use for the backs of my quilts, especially since the width is so awesome!  108" !!!  NO more piecing the backs!
Next in terms of price is Dharmas Sandwashed Cotton Broadcloth.  Good price, but the red dyes were not as intense and bold as several others on the list, so I'll say no to this one.
Next is Testfabrics, 419W.  It did super on the dye test and the batik test.  The price is really good....and a little secret, if you ask for seconds, the price is half of what I showed here.  This is a no-brainer.  It WINS hands down over all the others.  If it was as wide as Jo-Anns, I'd buy it for all my needs!!  Also, as a side note, the Testfabrics is sold per meter....not per yard.  It adds an extra step in the calculations, but basically a meter is slightly bigger than a yard.

Last, as mentioned previously, I did a batik test on all the samples.  I had another agenda for this test because I wanted a large batiked flower for another quilt (I am not showing that yet, sorry!).  However, I assumed that drawing a big flower with the tjanting tool would be a drippy mess and I was not expecting much success.  I took 26 big squares representing multiple samples of my test fabrics.  Surprisingly, they all looked really good.  It wasn't as hard as I thought, or my skills are better than my confidence.  So....I have enough for both the original project and a new one, that I am calling Urban Daisy.  It is 25 daisies, and is king sized.  I tore each sample to fit on my batik frame, slightly larger than a fat quarter.  After dyeing all of them, batiking the daisy, bleach discharging, and overdyeing, each was trimmed to 19" x 19".  I am happy that the testing gave me the knowledge about which fabric I want to buy, and more so, that the leftovers gave me a new bright quilt.  Here is a closeup.  Yummy and warm!

Wednesday, January 04, 2012

Testing Fabric Samples

Testing Fabric Samples

I like to order white fabric in large quantities, like 50 yards or more at a time.  When I start dyeing fabric or batiking, it seems to disappear faster than my ideas...  Unfortunately, my supplier is having quality control issues, and I needed to find a new supplier. So I set up a test for the following fabrics:

Kaufman white cotton pimatex, 44" wide from my local quilt store (not PFD)
Testfabrics, 58" wide cotton broadcloth, 419W
Jo Anns Legacy bleached cotton muslin, 108" wide
Dharma: merc. combed cotton broadcloth, 59" wide
Dharma combed cotton lawn, 57.5" wide
Dharma sandwashed cotton broadcloth, 60" wide
Dharma PFD (prepared for dyeing) pimatex cotton 45" wide

And since all the fabrics look basically the same before dyeing, I had to devise a system to keep track of them.  You could just write on the fabric with a permanent marker....but I decided to use color coded safety pins with beads.  I put a sample pin with a colored bead (or two!) on a small piece of the original, stapled it into my book, and then put it on all the little 5" squares that I used in the test.
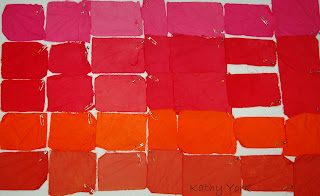
I wanted to dye samples and see which one took dyes the best.  They also had to perform a batik test.  This consists of batiking the dyed fabric, bleach discharging, overdyeing, and then boiling out the wax.  Some commercial cottons cling to wax, horribly, and I did not want to order a big bolt of something that did not easily release the wax. I tried 5 different colors of dye, pink, two red samples, and two orange samples.
You will notice that one of the columns of samples towards the middle that all the squares dyed fairly lightly compared to the others.  So, it does matter which fabric you start with!  Also, I noticed that some of the samples did well with some of the colors, but not with the reds!  Very interesting! That could get complicated pretty quickly, trying to maximize dye color with each type of fabric, so I decided to just pick the one that dyed the most colors the brightest, and there were two clear winners, the muslin from Jo-Anns and the broadcloth from Testfabrics.  Although the others were also close enough that I would consider them as well.  Only one fabric failed the test and I would not choose it, Kaufman's pimatex from my local quilt store.

Next, the batik test.  I also wanted to note that these tests were done on a fat quarter size of fabric.  And because most of the fabrics passed the test, I now have quite a nice stash that will become a new quilt.  BONUS!!  All the fabrics passed the batik test except two.  The cotton lawn, which I loved because it dyed very bright colors and had such a nice light hand to it. The wax clung to it as it was drawn out of the boiling water and was a bit difficult to rinse out in cold water. The muslin from Jo-Anns also failed, it was exactly the type I hoped to avoid, the wax seemed to migrate into every fiber on the sample and not come out.  Very frustrating!

Which fabric will I ultimately buy?  It also depends on cost, which I will talk about on my next post.  I can say that regardless of the fact that the muslin from Jo-Anns failed the batik test, it does come in such a lovely width, 108"!  Wow!  And it takes dye very nicely!  It would be perfect for the back of quilts, or possibly large whole cloth quilts (as long as I avoid trying to put wax on it!!).