Wednesday, December 25, 2019

Plenty to Go Around, the back side, Part 2

Plenty to Go Around, the back side, Part 2
80" x 80" project

Welcome to another installment of my blue quilt, Plenty to Go Around. I am working my way through all the photos of batik work I did this last summer to create a back for my quilt. And it seemed appropriate on this Christmas day to show the panel with the fence.  Because as the front of my quilt has plenty for the fawns to eat (hence the name), the back has just the opposite. It will be about Scarcity. The fawns will be on one side and they will be separated from their food with this giant fence. I also represented the crisis by intentionally using baby deer, the fawns, to draw attention to the unaccompanied minors and the children separated from their parents at the border.  It is my hope that people who are in this situation are met with compassion and care instead of brutally separated from their children and left in holding cells for seemingly endless blocks of time. I can only imagine what a difference it would make if the funding for this useless wall was spent on direct aid for those in need.

The fence reaches from the bottom of the quilt to the top.  I found it quite the interesting task to do this in a way that the multiple panels would line up and present the image of the fence as a continuous one. After multiple attempts, here is my sketch of the wall.  This is the full scale drawing, in pencil first, and then Sharpie so that I can see the lines to trace onto the fabric. I wanted it to undulate as if going over the hilly landscape, and I wanted it to have depth and appear to go on forever.

 Also, I am starting to feel a bit of pride in my craftsmanship of putting the wax where I want it to go.  This is not easy on so many straight and parallel lines, but I am getting the hang of it.


I am also really fascinated by the interesting abstract lines and shapes of the detail shots, so you will have to indulge me with too many photos.  The light gray part is actually the wax.  This will be white when finished.  The dark blue lines have already been dyed and represent the hills that will be seen through the open sections of the fence. The white part in this photo will be dyed gray, so essentially the white and grey colors will be reversed when completed.


Once again, I put a generous border of wax around anything that I was going to dye, to avoid leaks and spillage, but even those borders of wax look really interesting at this stage.

After dyeing and boiling out the wax, this panel is complete.

The group of fawns will be on one side of this fence.  Next week, I will post the "food" on the other side of the fence, just out of reach of our fawns.  

Wednesday, December 18, 2019

Plenty to Go Around, the back side Part I

Plenty to Go Around, the back side Part I
80" x 80" project


I love how the front of this quilt just frolics in a land of plenty for these little fawns.  On the back I wanted to tell a different story, one that completes the front side, one that is usually hidden from us, but perhaps, not so much lately.

The logistics of putting a different story on the back was daunting.  I could have chosen to use the same technique as the front side, essentially batiking and dyeing all the elements of the composition, and then cutting them out, one by one, and hand sewing in place.  The trouble with this scenario is the quilting.  Trying to quilt through layers of applique on the front and the back would be challenging, especially because I am planning to hand quilt this one.  Too many overlapping seams.  Learned that the hard way on Neurodiversity and again on Wedding Rings and Crossroads.

With this in mind, I drew the picture full scale on paper that was taped together, and then started formulating a plan.  It could be done in a series of panels, the size of my batik frame, with one extra small center filler piece.  In this way, I could do a series of batiked whole cloths and not have to cut out or applique anything.  The entire back would be composed of 5 panels.  The first panel is the fawns!

First up, I already had some fawns drawn on tracing paper for the front side design.  So after I found where I had carefully saved them, I pulled them out, and started moving them around.  When I found a composition that I liked, I taped the fawns in place.  Next, I covered them with the white fabric, and gently traced the fawns onto the fabric.  The fabric is then pinned onto my wooden batik frame and moved to the garage for the application of wax along the lines.


This was a LOT of wax that had to be applied nearly perfectly.  I had to take it slow or risk unslightly drips and mistakes.  I wanted them to look like the fawns on the front that had their edges turned over.  To achieve this effect, I essentially had to wax a double line on the outer lines. I was grateful to have had a lot of practice from doing the front side first!

This was also done in the month of July and Aug.  It was so incredibly hot.

It was hard to work for very long.  The sweat would roll down my arms and then drip on the fabric, and then I had to wait for it to dry before I could wax it.  And, mosquitoes.  Did I mention the mosquitoes? And whining.  I really began whining in earnest for this section of the project.  I share this with you because I want you to know that even IF this project does not end up looking that great, at least I worked really hard under daunting circumstances to get it there.  Ha! Things that helped: a fan, working in the mornings, bug spray, ice water, and itunes, and the belief that this would eventually all be worth it!


Above, I filled the spaces between the deer with solid walls of wax.  Then I applied turquoise dye to the spots and brown dye to the eyes and noses.  I will later go back and add just a bit of wax to the eyes to protect a small section of brown before finishing it with a touch of black.  The black was also used to dye the hooves at this stage. Then I covered all the little turquoise, brown and black parts with wax, to protect them from the later application of the fawns' blue for the bodies.


You will also notice the copious amount of wax to the background after the lines were completed. I love how transparent the fabric looks once it has the wax on it. But, the extra wax was really necessary to to protect these areas from the dye leaking into the wrong places.  It worked really great for that, but it was an extra difficulty when boiling the large panels to get the wax out.  Each panel is about 35" x 55".


Ahhhh! So satisfying to see the blue emerge!


This photo is after the wax is boiled out.  It doesn't look that great because the lighting is weird, and it is all wrinkled.  But that is NOT how it looks in my head.  In my head, I can see it as perfect as I wanted it to be which is immensely satisfying!


Stay tuned, more batik and more panels to come.

Saturday, December 14, 2019

QuiltCon 2020: Here I come!

QuiltCon 2020: Here I come!

I am so excited that QuiltCon 2020 will be in Austin this year! I haven't been to QuiltCon since the last time it was in Austin, and it is one of my very favorite quilting events.  The work is so inspirational and motivating!

And, I am super pleased to have the following 3 quilts juried into QuiltCon.  This show has grown substantially since it began.  And, as such, has become increasingly difficult to get quilts juried in. Many, many, many quilts are rejected to make room for a carefully crafted set of quilts for the very best exhibit. So many quilts are rejected that makers have taken to the hashtag #quiltconreject.  If you search for #quiltcon or #quiltcon2020 and #quiltconreject you will find a feast of very beautiful quilts.  You may even find yourself questioning why one quilt got in and another was rejected.  I admit to having raised an eyebrow or two myself, but I also know how difficult the job is.  And, typically the jurors work as a team, so it can be even harder to come to a consensus. 

I also wanted to mention this note.  As tempting as it is to want to try to determine what the jurors for a particular exhibit are drawn to, there simply is no way to second guess what the next set of jurors will want or like.  I don't worry too much about my rejected quilts and that's because when I was making them, they needed to be made.  There was something in the project that spoke loudly enough to me that I was motivated to do it.  And because quilts are so much work and take so much time that voice has to be pretty loud for me to listen.  In the grand scheme of things I have found that I learn something for each quilt I make.  I frequently make the same mistake more than once.  I also push myself to try new things.  I don't always know where the work will lead me, but I trust that I need to go there.  Growth is not always a straight path.

Okay, here are my quilts that are going to the show!
Unfinished

Two Halves

Beach Colors

Hope to see you at the show!  If you can't go, you can see glimpses on Instagram, which is what I have done the last few years. Cheers!

Wednesday, December 11, 2019

Warm Heart Trapped by Icy Blue

Warm Heart Trapped by Icy Blue
70.5" x 86.5"
(back side of Flow)

This quilt is the reverse side of Flow. It started out as square sections of red that I built up with strips of blue in a log cabin style.

It is an easy and fun way to build a quilt top to use up scraps. Then as I was working on it, the center red reminded me of my heart.  The blue strips were experiences through time.  As time passes, I have more experiences and more pain and build bigger walls around my heart.  It's all about protection and fear.  What does it take to get back to the center?  I am suspecting that the answer is love.  Because as these "wall" are built from emotional pain, they will be pulled down from an emotion just as strong as any other, Love.  If you have ever fallen in love, you know what I mean.  The love just bypasses any thoughts and gets right to the heart of things. 

Here is the completed top, before the quilting.  This is the trapped side.  It is all about being stuck behind the walls.  The other side, Flow, is about movement and flow and getting the heart pumping again, breaking free of constraints, sometimes self imposed constraints.  This is one of the many reasons why I love this quilt so much, because it truly integrates both sides of the quilt.

I am not sure if you have noticed how distorted the full view of the completed quilt is at the top? This is because of the dense machine quilting on the front in long diagonal zig zag lines.  I was really surprised when I looked at the back and noticed just how distorted the quilting made my beautiful and perfectly square shapes.  Maybe a metaphor for memory, or cognitive distortions? I am not sure but I really find it even more beautiful now.


To get this quilt to lie flat, I tried blocking it.  First I soaked it in a bathtub full of water.  It looks really interesting suspended in folds in the water. 


I flattened it out while it was wet, and pinned down all the edges and then set some fans up to blow it dry.  That worked to flatten it, and then I trimmed it and put the binding on.  All set!  Here are a few details of the back that show the quilting from the front side.  I love how it adds interest and texture to the big red blocks.


This completes the last of the new quilts, and hopefully I will be updating soon with another installation of the Plenty to Go Around quilt.  Cheers!

Wednesday, December 04, 2019

Flow

Flow
70.5" x 86.5"

This design reminds me of liquid motion bubble tumblers. A snapshot in time, it is a great reminder to take time to breathe, slow down, and relax and be in the present. When I post next week, about the back side of this two-sided quilt, I will explain more.


It began as a great opportunity to use up some of my fabric stash.  I love aqua blue so much, that I had a lot of it!  The funniest thing was that as I started using up this collection of blues, I went out and bought some more, which kind of defeated the purpose of using up my stash.  I haven't done this for any of the other stash busting quilts I've made, just this one.  I guess I just need aqua fabric!

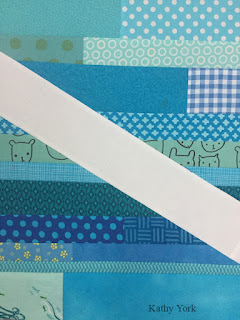
Some of these are pretty cute (like the cat faces!!)!  The little house fabric I got while making a commissioned quilt for STOF fabrics.


Here is a shot of the planning part, even though this was mostly random and improvisational, I did not want the vertical seams to fall in the path of the zigzag.


As I would get to each big section where the path would bend (approximately 1/3 of the quilt), I would slice the blue part and insert the section of white. The rotary rulers were so helpful by being marked with 60 and 30 degree angles!
I also had a few difficulties with the geometry along the way.  However, I found that if I thought about it, I could devise an experiment to test my idea before cutting the actual quilt.  The small experiments worked to either show me what I got wrong and try again, or validate what was right.

I thought I would cut the red circles with a circle cutter. I found it easier to cut lots of circles from freezer paper with the circle cutter, and then pressed them to the back of my red fabric and cut the seam allowance with scissors. I then pressed under the edges of the circles using the edge of the paper as a guide.  It made that part so easy!  Then I hand appliqued them to the quilt.


They don't look as flat as I would have liked, but the quilting I have planned will take care of that!
Here's a closeup of the quilting for the red drops. These were done using free motion machine quilting.


I also used a walking foot for the aqua blue part this project.  The lines are quilted every 1/4 inch.  It did not go as smoothly as I expected.  The wrestling of this under the machine was heavy and awkward, and the angles I sewed (even with GREAT pin basting), tended to make big puffy spots in the middle.  It was hard to flatten those without making tucks and folds.  Extremely frustrating after so much work!


I just love looking at all the angles of this quilt! So fun!!


Please stop back by next week for the rest of the story.  That crazy diagonal long lined quilting really distorted the quilt on the back, which actually improved the design (maybe?); here's to happy accidents!