30" x 50"
This abstract quilt
references a kayaking adventure on Lady Bird Lake in Austin. I was
enjoying the beautiful scenery, but also keenly aware of the ever
increasing influence of population growth and corresponding growth of
new downtown towers.
The story behind it's construction:
This piece was made using tiny, tiny pieces, all cut with a rotary cutter and sewn by machine. I started with some sketches with copic markers of the patterns I wanted to try with fabric, and a life size sketch of the curved background.
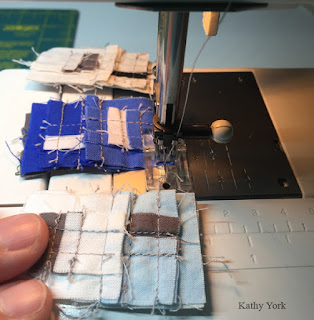
I practiced the piecing on a tiny scale to see if it was something I could even do. My goal was to make the tiny inside squares only 1/4" square.
It is pretty small!! Next step to try a larger sample involving more blocks and learning how to sew tiny blocks together and manage all the thicknesses of all the tiny seams. I really doubted if my machine was up to the task. The blocks get rather thick with all the seams and I thought the sewing foot would slide off the edge, but it didn't! (All of the seams are pressed to one side.)
It was definitely doable, so I proceeded onward. To have that many little pieces, I would need to cut a lot of squares. The first day I worked so many hours, my body hurt too much to sew the next day. And, I didn't get much done! I needed to work smarter. I learned how to cut long strips, and line them up, side by side, so that with each rotary cut, I got a lot of little squares. I usually worked ahead enough to cut squares for about 2-3 days of sewing. It would have been impossible for me to cut all the squares at the start, so I just alternated the tasks of cutting and sewing. That worked pretty well.
I usually worked on one section at a time until I got tired of the color palette and then I moved to another section. This kept the work fresh for me.
As I worked, I was constantly surprised at how big the original array of tiny squares was compared to the size of all the pieces sewn together. I called this skrinkage. And you can see it here from the individual blocks before and after they are sewn together.
Another thing that kept me sane while working through this massive repetitive task was chain piecing, and not just the individual pieces, but also the blocks.
As the block sections began to accumulate, I pinned them on top of the paper template until the paper was completely covered, creating rather unwieldy shaped pieces.
It took a very long time to make actual visible progress on this quilt. And, I would get in a frenzy to make progress, only to find I needed to take a break. Some things I enjoyed about this quilt:
The middle section has slightly longer blocks. When working through the steps to make them, one of the stages reminded me of little caterpillers. I always took such delight to see them appear!
Also, the day that I finally reached the half way mark. I can honestly tell you that the thought of ending it right there crossed my mind quite a few times before I continued onward (and I am so glad that I did!)
And then there was the day I was goofing around with this little guy. You can see the video on my Instagram account.
Eventually, the giant irregularly shaped pieces were ready to remove from the wall and trimmed to the correct shapes with scissors. I also stay-stitched along the curved edges. And, then I had a plan!! I would treat each piece like a separate quilt. I layered the full sized backing and batting onto the floor, and pin basted only the yellow section. Yes, it is also difficult to pin baste through all those seam allowances! Ouch!
I quilted it by machine. Then I used a narrow black piece of fabric to bind the overlapping edge of the middle section. I stitched the binding to the right front edge, flipped it to the back, and used Mistyfuse to hold it to the back. It made an easy and beautiful finish to the edge. I simply placed it on top of the quilted yellow section and pin basted in place.
Then I machine stitched along the black edge and then quilted the new section. I repeated those steps with the blue section. It made the project so much easier to push under my sewing machine. Even though it doesn't look like a big quilt, it was very heavy and stiff because of all the seam allowances. Here is a photo of the quilting from the back, a different pattern for each section.
All that was left was the actual binding around the edges (which you can just barely see in the photo above).
I'll end with a detail shot:
Oh, and one last thought. This quilt is my entry into Quilt National this year. I don't always have a quilt that falls correctly into the timing of this exhibit, and I am grateful to have one this time around. I am also just so incredibly relieved and happy that they have loosened up their restrictions on letting images be seen on social media and private blogs. It has been so helpful to share my process along the way with you on Instagram and Facebook. It kept me going on more than one day! So, thanks if you were a part of that! Quilt National is one of the most selective venues to get into, so I hope you will wish me luck!


