Wednesday, January 29, 2020

i Quilt at Texas Quilt Museum

i Quilt at Texas Quilt Museum


It is an honor to have my quilt included in this exhibit of prize winning quilts from the Modern Quilt Guild at the Texas Quilt Museum! I am hoping to go see this one because La Grange is just a short drive from Austin.  I also know that they will be having day tours during QuiltCon, so that's pretty exciting!  The exhibit is up from January 9 to March 15, 2020.

"These 15 quilts, including Kathy York’s witty iQuilt awarded Best of Show in 2015, cover a wide range of categories and showcase the Modern Quilt aesthetic. Among the artists represented are Maria Shell, Stephanie Skardal, Kim Soper, Corinne Sovey, and Colleen Wooten. This exhibit was also curated by Dr. Sandra Sider."

Wednesday, January 22, 2020

Let Your Hair Down

Let Your Hair Down
32" x 53"

Continuing with my series of whole cloth batik line art is this one, Let Your Hair Down. This is probably no surprise to anyone here, but when I work, I can get....well...a little obsessive. It is hard to take a break. One of my personal goals the last couple of years has been to balance work and play.  So, this quilt is dedicated to the idea of letting my hair down and playing more! It reminds me of my hair loose in the water, a peaceful and relaxing moment. Mood.

I used the same process as my previous work.  This one was a bit more difficult because it required more layers to boil out, free hand drawing of the lines, and dense straight line quilting around all these curves. (Yes, I see the irony in the work to make this piece, and the actual theme of the work!)

This is layer 1 of the wax.  The smooth edged lines will get dye.
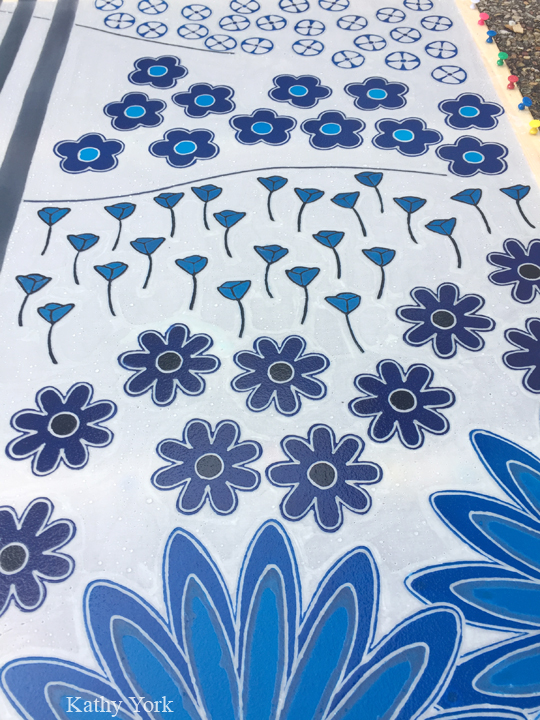
Next, layer 1 of the dye:
These will be pale when washed out.  Then, I will boil out the wax, draw the new lines and re-pin to the frame. Now, I have to decide where to put the next round of lines.  I feel a bit confused about how to draw them and have them interact in a flowing organic way with the lines that are already there.  To practice, I attempt on a full scale paper version first.  If I like them, I trace with Sharpie, if I don't like them....well, there's a big eraser, ready to go!
I taped the paper to the floor, and then taped the dried fabric on top.  I will try to follow the shape of the lines, but the best lines are drawn kind of in a giant arc and quick motion.  The lines on the paper will be more of a hint, "try to go this direction". The lines on the quilt fabric will not be identical to these, but they will be close.
Wax layer 2, then dye layer 2:
Perhaps, not surprisingly, it requires a certain level of concentration to put the correct dye in the correct place, and not spill any.  This time, I got lucky, all went to plan!

I repeated the process of boiling out the wax again, and then drawing layer 3 of the last round of lines, re-pin to the frame again.  Here is the wax for layer 3:
Layer 3 only has 2 new lines, but it looks even more complicated while working. One more wax boil out and the quilt top is complete.  Next up, the quilting.  I decided to outline each dyed line in a matching thread color, and then add vertical lines from top to bottom of the quilt.  The actual color part of the quilt will not be quilted at all, so will become a bit puffy in texture.  Here is the beginning of the work of tucking in the starting and stopping points of every line of thread that I sewed.  This level of detail makes a big difference in the overall look of the quilt; and though it takes a LOT more time and effort, it is worth it!
Long shadows at the end of the day, here is a close up of the back.
And though it may look difficult to quilt so many straight and evenly spaced lines, there are tools to help! My favorite is 1/4 inch masking tape.
A few more closeups of the front after the quilting is completed and all the threads have been tucked in:


I sincerely hope you like this one! And that it speaks to you.  Play is important. Play more! Yes!

Wednesday, January 15, 2020

Conversations

Conversations
52" x 33"
Pretty overlapping lines with the transparencies of the colors showing through. The boldness of the lines and simplicity of shape and form are so appealing to me! Fresh, modern, skillfully executed. Joy!

OR

Two overlapping sound waves, suggesting the concept of "overtalking". Conversations when two people are talking, perhaps over each other, and not really listening to what the other person is saying. When having a conversation, do you listen? or just talk? And then I realized how incredibly hard it is for me to listen when someone is saying something that I disagree with, or something I just don't like at all.  This happened to me when watching the impeachment hearings.  I found myself repeatedly hitting the mute button on my remote control, perhaps a universal experience regardless of which side you are on? And, it led me to think that this is where the trouble STARTS, not being able to listen to opposing viewpoints. Hence, the somewhat disparate color palette. And, this is where the discomfort starts for me, having an insight, and then trying to decide what to do about it....

Meanwhile, in the studio, some process shots for you. Some days I worked for hours and the time just slipped away, other days, not so much.  One thing that I did enjoy was working in cooler weather, even on the really cold days. Beginning the stripes of wax....
The first round of dyes:
Note the difference between the colors of the wet dyes above and the rinsed and dried dyes below. Getting ready to boil out the first layer of wax:
Drying on the line: (the image is actually reversed in this photo, this is the back of the fabric)
Adding the second round of waxed lines:

After adding the second set of dyes and boiling out the wax.  This is a photo of the basting stage, getting ready to machine quilt. It is so rewarding to see all the colors!!
The quilting. I decided to leave the color stripes unquilted.  I love how puffy and dimensional they look with the white background quilted. 

Thanks for visiting my blog! 

Wednesday, January 08, 2020

Plenty to Go Around: batiking the back panels Part 4

Plenty to Go Around, the back side, Part 4, project
80" x 80"

The top two panels have a few flowers, hills, and sky. Here are some of the spiral flowers.  The waxed over flowers at the bottom is the part that overlaps with the panel below, they will not be needed, and the pencil markings will come out during the boiling stage.  It is also very likely that part of this section will be trimmed off as the panels are sewn together.


This photo shows the flowers with the fence.


Here it is hanging on the clothes line, complete and nearly dry.  I like the way in undulates in the wind, kind of like the hills undulate on the panel.


The other top panel was so quick in comparison!  Just a few lines for the hills:

It was such a great feeling of relief for being so close to the finish line!  
Here is the final image of the back.  The panels have all been hand appliqued together.  This part could have been done with a sewing machine, however, my panels did not line up as well as I had hoped.  By stretching each piece of fabric individually on the frame, they stretched slightly, and not completely evenly, so that in the end, they did not line up well enough to just chop and sew.  But by carefully placing and turning under the edges of the panels as I went, with hand sewing, I was able to get the final image well enough, and keep the entire piece flat and square.  
I love the final design.  It is both simple and complex.  The colors are rich and hopefully the message is clear, or at least asks you to think about a very complex subject.  Next up the quilting.  I will be hand quilting this one, so it will take a while.  Hope to update you on the progress in about 4 to 5 months.  

Wednesday, January 01, 2020

Plenty to Go Around, the back side, Part 3

Plenty to Go Around, the back side, Part 3, project
80" x 80"

This panel has all the same flowers as the front side, but instead of done individually, cut out, and appliqued, they have been done in one big panel, all at once.  These flowers represent all that the fawn are fleeing to.  They could represent food (because deer are forb eaters), freedom, or even safety.

It began with the sketch, and then the applying of the wax to the sketch.  I think this panel had the heaviest application of wax because I put it between EVERY flower! Yes, completely nuts! But, it worked!  The first ones above are the giant flowers, about 16" across.
The next set are much smaller flowers.  If you notice, these flowers also have the tiny double edge, so that they look like the flowers on the front that have their edges turned under with just a hint of color past the white edge of the flower. 

These flowers were originally orange and blue on the front side, but I decided to make them all blue here. They will be done in two parts.  First they will be dyed, and then rinsed.  Then I will add more wax to the aqua blue, leaving just a thin outline of the flower that will be overdyed with navy: all while working on the giant single panel with all the flowers.

This set, like a number of the other flowers was also done in two stages of dyeing, so that different flower parts could have different colors.


Looking good! and ready for the dye. I am already thinking, this is a LOT of wax to boil out! Yikes!

Here are the layers of dye:


The final stage of this panel!  Sorry I forgot to take a photo after the wax was boiled out.  This is the stage where the dyeing is complete and I am rinsing the excess dye out with a garden hose. The dyes are still wet and looking super intense! I just love this stage, and sadly feel just a bit disappointed after the wax has been boiled out and the piece is dried as the colors fade a bit. You can see the very edge of the fence peaking out on the left side of the panel.  

Next week, I will show you the rest of the panels and the final piece!