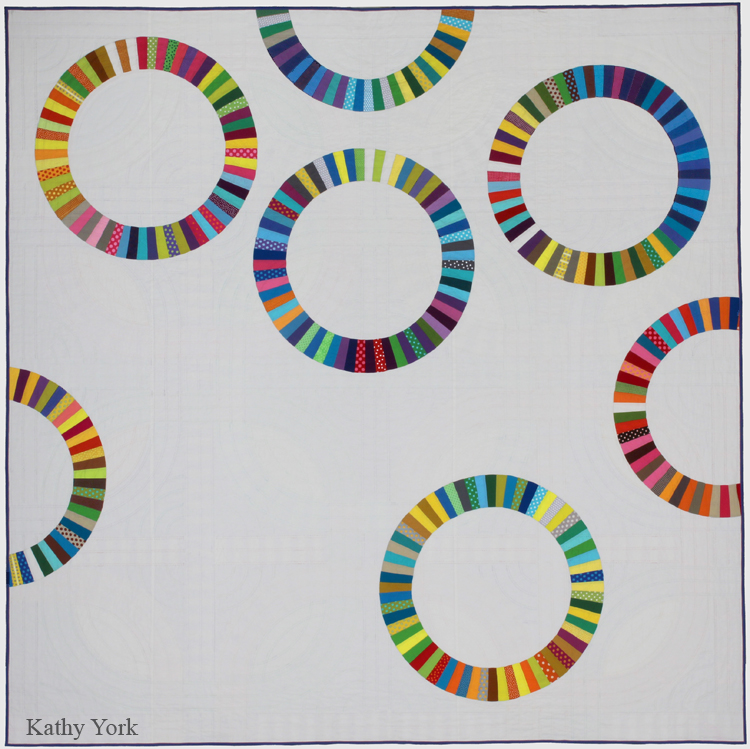
Wedding Rings and Crossroads
102" x 102"
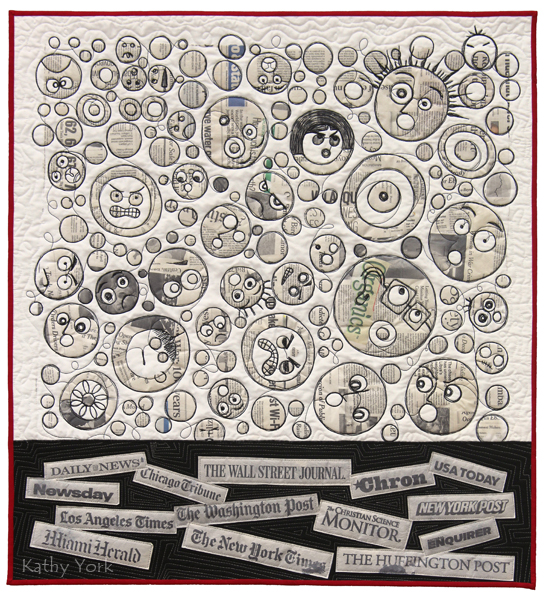
 |
| Wedding Rings and Crossroads, back (aka, Up in the Air) |
I am delighted to share with you my newest quilt! I am also so very thankful to have finished it before the Thanksgiving holidays. It is so nice to have it behind me and have the entire week off to relax and enjoy time with my kids.
This somewhat traditional
pattern (DWR, double wedding ring) speaks to me of
marriage. It is a cautionary tale of how couples can have cycles of
behaviors and patterns (which can be annoying or comforting) along
with the crossroads that can divert our attention away
from our loved ones. I will leave it to you to decide if any part of that statement fits your experience. For my 2 cents, I can say that I have been blessed to know the happiness of being married and in a committed long term relationship, and also, the happiness of being whole and complete as a single person.
How it started:
I have been wanting to learn how to make a double wedding ring quilt for a long time, but somehow the idea of all the curvy pieces eluded me. This one is a simplified form because it is constructed in square blocks. I also like that the shape of the circles are not perfect circles, but more like squares with rounded corners. I was lucky to have an opportunity through the
Austin Modern Quilt Guild to take a class with
Tara Faughnan. She demystified the double wedding ring for me. I loved her class!
Process story and photos:
After I got home, I got out some drafting supplies and explored the shapes. I scaled up the 12" blocks from class to 20" blocks. Yes, it was hard to find paper big enough for my ideas, but that is why Scotch tape is so essential to quilting! The scale was so wonderful and so huge! I played with a number of the components of the block until I found that perfect one for me. And I began cutting the pieces for my quilt.
I ran out of big enough pieces of blue fabric. I could have shopped for some but finding the range of subtle differences is difficult with a bright cobalt blue. So, I shifted gears and started dyeing some.
At some point I tossed out the random color selections that we learned in Tara's class, and began to strongly prefer the regular patterns of colors. So, not being in a hurry, I decided to pull them all off and begin again. Arggh!
You can see the quilt at this point has 16 blocks, all about 20" square. If only I had stayed with this idea, I would have had a quilt that was 80" x 80". But, no! I had a curious idea of adding more, so I got out some graph paper and markers.
I fell in love with the chaos of lines going in every direction. It created a crazy amount of movement and a lot of interest. It reminded me of highway overpasses, and giant game boards, like Parcheesi. It lended itself to the idea of games we play in marriage, which I had already been thinking about with the double wedding ring pattern.
Here is the entire layout, not completed yet. It stretches ceiling to floor, and then extends onto the floor. The scope of the project was a bit overwhelming. Here I am pressing seams on my big board. It was done in sections because I don't have an ironing board big enough! Who does?
When I finished the front, I still had a lot of leftover hand pieced arcs which had previously been discarded. And I still needed to make a backing for the quilt...
So, I put some of these together to see if it would make a giant circle. Of course it does!
 |
My dear cat demonstrating that if you put a circle on the floor, a cat will sit in it!
|
I decided to make them into circles that would float abstractly on the back. I used strips of
Mistyfuse on the backs of the circles to hold them in place while I hand stitched them. Perfect! Here's the back after it was pin basted, just checking to make sure the back does not have any giant folds or wrinkles before I start quilting.
This quilt is so huge that I was worried about hurting my shoulders trying to hold it and guide it through my sewing machine. It is really big and really heavy. So, I decided to hand quilt it. I love hand quilting, the process is very relaxing to me. I also love how the hand quilting looks on a quilt, and I thought it would be the perfect compliment for this really high contrast, hard edged design. But, the quilt is so BIG, which means a LOT of hand quilting. The circles on the back have turned under edges and are hand appliqued. and between the front and the back, there are a lot of layers, which is really hard to hand quilt.
I bent a LOT of needles. I used 1/4" tape to mark my path, and a hoop to get even tension. Here I am rocking the needle back and forth through the layers to load up stitches on the needle before pulling it through.
I followed the shapes on the front in double lines of quilting.
And, I really like the way that the lines from the front made an abstracted grid for the organically floating giant circles on the back. Don't forget, you can click on the picture to see a close up!
When I finished, I ended up liking the back better than the front! Delightful!
Update: This quilt was featured in Quiltfolk Magazine, #22, Spring 2022:
photos by: Azuree Wiitala